CenterPoint® Accounting
- Create a Purchase Order from a Sales Order
Related Help
_24.jpg) Create Purchase Order from a Sales Order - Duration: 5 min 51 sec
Create Purchase Order from a Sales Order - Duration: 5 min 51 sec

When a customer special orders a product or orders an item that is currently out of stock in your inventory, you can efficiently create a purchase order at the time the sales order is entered. This saves the time of manually creating the purchase orders. This process can also be used for those times when the product is dropped shipped to the customer's address instead of being sent to your business. ▼
A purchase order can be created for a single item or multiple items on the sales order. The vendor on the purchase order(s) is determined by the items being ordered and who they are normally ordered from. If the sales order includes information in Memo Line 1, Memo Line 2, Custom Fields, or Comments, it will be copied to the purchase order; if needed, the information can be changed on the purchase order. If multiple items need to be ordered and their default vendors are different, multiple purchase orders will be created.
Create a Purchase Order from a Sales Order
- Enter a sales order to the customer as you normally would.
- Once the order is entered, but prior to clicking Save, select the Create PO(s) button from the Order tab.
- Click Yes on the "Your Sales Order will now be saved. Are you ready to create purchase orders or this sales order? screen. If the sales order is set to print, it will print after clicking Yes to Save the order.
- The Create Purchase Orders from Sales Order screen will be displayed. Most of the information displayed can be modified.
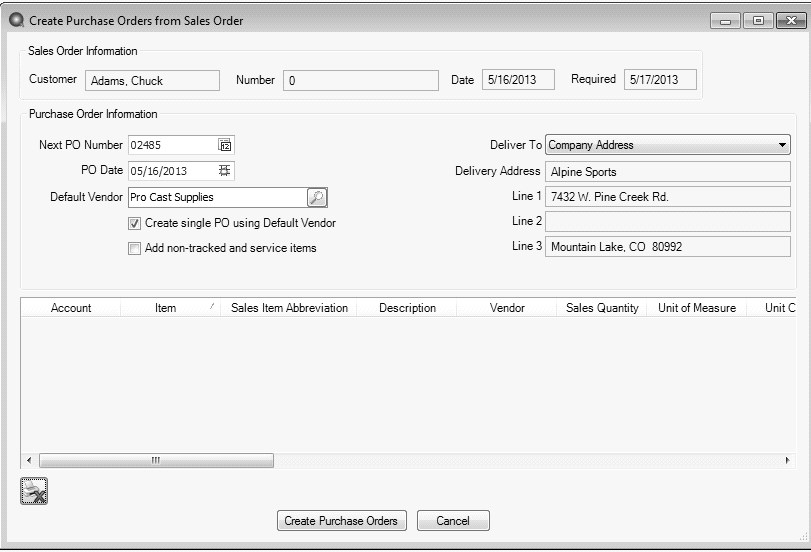
- The Default Vendor field can remain blank, unless you want all displayed inventory items to be ordered from a single vendor and that vendor is not in the Vendor column in the grid.
- Select the Create single PO using Default Vendor check box if only one purchase order should be created for the default vendor.
- Select the Add non-tracked or service items check box if you want all non-tracked or service items to be added to the purchase order grid. Any item that does not have an account assigned will display in red. If an account is not selected before creating the purchase order, a message will display and a purchase order isn't created until an account is selected.
- Specify the Deliver To information. The information selected controls the text that will be printed in the Purchase Order Ship To field.
- For Drop Shipments: Select Customer from the drop down box. The purchase order(s) will specify the customer's name and address in the Ship To area.
- Select Company Address to have your own company address in the Ship To field.
- Select Other if you'd like to specify an address that is different than the Customer Ship To or your Company.
- All items from the Sales Order will be listed in the grid. Review the information in the grid and make corrections as needed.
- The Vendor field will default to the vendor assigned to each item and can be changed directly in the grid. The default pulls from Setup > Sales > Items> Purchase Information > Vendor Information or Setup > Inventory > Items > Purchase Information > Vendor Information.
- If you are ordering an item for this sales order AND for your own stock, you can increase the quantity to the quantity you need instead of the quantity on the sales order.
- If an item should not be added to the purchase order, right-click on the row and select Delete Row.
- Click the Print button. (An image of a printer displays on the button. A green check mark means the order will be printed and a red X means the order will not be printed.) The selections set in File > Preferences > Purchase Orders > Printing will display and can be changed. Select whether the order should be printed when it is created. To set your default for the Print button, right-click on the button and select Set As Default. To override the Print button default, click the Print button and change the settings on the Print Settings screen.
- Click Create Purchase Orders. A separate purchase order will be created for each vendor specified in the sales item grid. The purchase orders can also be viewed and/or modified by selecting Processes > Purchases > Purchase Order Maintenance.
|
Document: 3220 |
|---|