CenterPoint® Accounting
-
Related Help

An assembly is an item that is sold from inventory and built from other inventory or component items (including non-tracked or service items). Every assembly starts out as an inventory item. Before an assembly can be produced and sold, the assembly item and the component items must first be setup as separate items in Setup > Inventory > Items, including labor, which is setup as a service item. General Ledger accounts can also pass cost to the assembled item. You may want to use account allocation for such things as overhead. Then, the assembled item must be defined in Setup > Inventory> Assemblies and then produced in Processes > Inventory > Build Assemblies to take the component items out of inventory and add the assembly quantity to inventory. Optionally, you can setup production plans which allow you to build multiple assemblies at the same time.
Follow the steps below to:
Option 3: Setup an Assembly in the Same Inventory Location as the Component Item Inventory Location
Option 1: Setup an Assembly
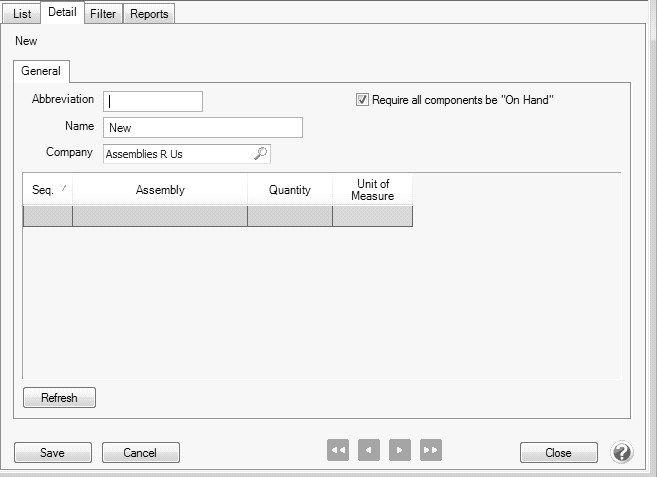
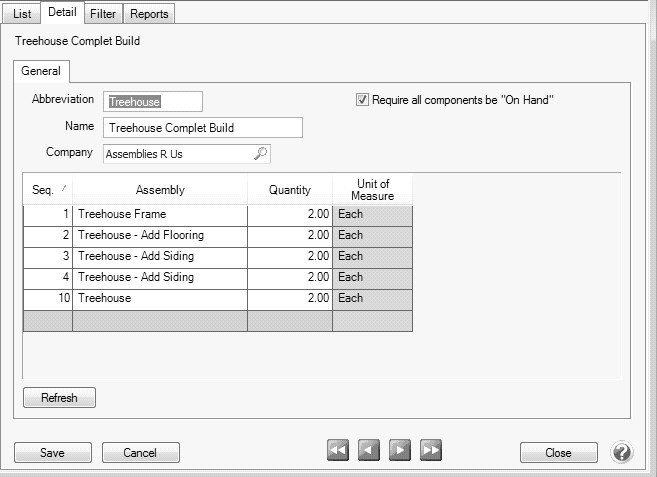
- Select Setup > Inventory > Assemblies. Click New.
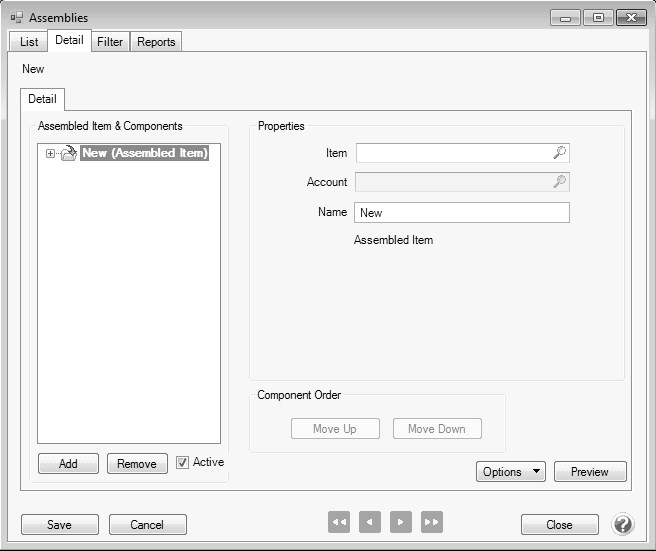
- Click the Options button, select Add/Remove Assembly Items. Select all of the check boxes that you will use when setting up this assembly. For example, if you need to change the profit center or location for the component items. Click OK.
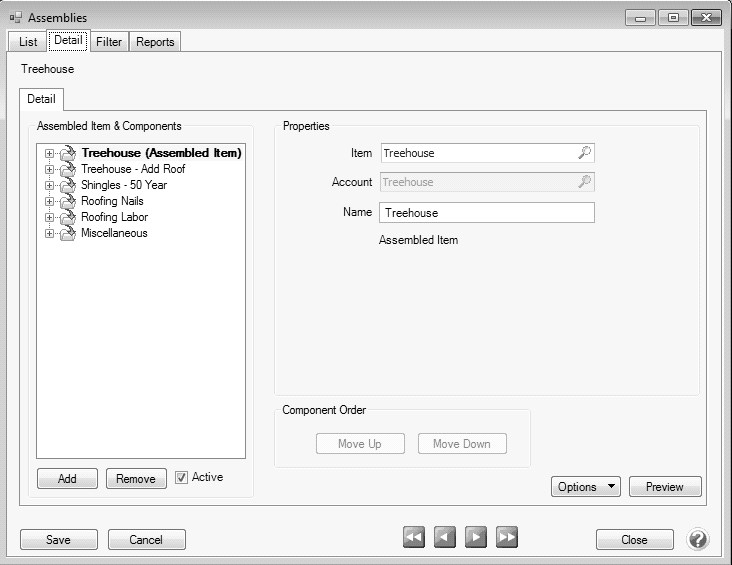
- On the right side of the screen, in the Item box, select any existing inventory item as the assembled item.
- The item Name displays as the default. The name can be changed. This is the name that will display in the left column for the assembled item.
- Click the
 next to the assembled item on the left side of the screen to expand the details for the assembled item. To expand/collapse all the nodes on the Assembled Item & Component List, right-click and select either the Expand All or Collapse All option.
Note: The main Assembled Item cannot be removed.
- On the left side of the screen, select the Quantity - Unit of Measure line.
- On the right side of the screen, in the Unit of Measure box select the unit of measure to use when building the assembly.
- Ignore the Inventory Location line.
Note: If you use the Inventory Location module, please see Option 2 or Option 3 in this document.
- On the bottom left side of the screen, click Add to begin adding the component items that are used to produce the assembled item.
- In the Item box, select a component item.
- The item Name or the account Name displays as the default depending on whether you selected an account in lieu of an item. This name can be changed. This is the name that will display in the left column for the component item.
- Click the next to the component item on the left side of the screen to expand the details for the component item.
- On the left side of the screen, select the Quantity - Unit of Measure line.
- On the right side of the screen, in Quantity box, enter the number of this component to use (components can be saved with a zero quantity) when building the assembly and in the Unit of Measure box select the unit of measure to use when building the assembly.
- Repeat steps 11-15 for all component items used in the assembly item.
- Click Save.
-
Continue with the Build an Assembly section in this document to immediately build the assembly or continue with the Production Run section in this document to build the assembly with other assemblies and post your build.
Option 2: Setup an Assembly in a Different Inventory Location as the Component Inventory Item Location
Prerequisite
The Inventory Location module must be purchased and registered.
- Select Setup > Inventory > Assemblies.
- Click New.
- Click the Options button, select Add/Remove Assembly Items. Select all of the check boxes that you will use when setting up this assembly. For example, if you need to change the profit center or location for the component items. Click OK.
- On the right side of the screen, in the Item box, select any existing inventory item as the assembled item.
- The item Name displays as the default. The name can be changed. This is the name that will display in the left column for the assembled item.
- Click the next to the assembled item on the left side of the screen to expand the details for the assembled item. To expand/collapse all the nodes on the Assembled Item & Component List, right-click and select either the Expand All or Collapse All option.
Note: The main Assembled Item cannot be removed.
- On the left side of the screen, select the Quantity - Unit of Measure line.
- On the right side of the screen, in the Unit of Measure box select the unit of measure to use when building the assembly.
- On the left side of the screen, select the Inventory Location line.
- On the right side of the screen, if you want the inventory location to always be the same, in the Type box, select Always the Same and in the Value box, select the inventory location for the assembled item. If you want to select the inventory location at the time the assembled item is built, select Choose From List and in the Default box, select the default location. Change the caption to "Build Location," so that it is easily identifiable on the Build Assemblies screen
- On the bottom left side of the screen, click Add to begin adding the component items that are used to produce the assembled item.
- In the Item box, select a component item.
- The item Name or the account Name displays as the default depending on whether you selected an account in lieu of an item. This is the name that will display in the left column for the component item.
- Click the next to the component item on the left side of the screen to expand the details for the component item.
- On the left side of the screen, select the Quantity - Unit of Measure line.
- On the right side of the screen, in Quantity box, enter the number of this component to use (components can be saved with a zero quantity) when building the assembly and in the Unit of Measure box select the unit of measure to use when building the assembly.
- On the left side of the screen, select the Inventory Location line.
- On the right side of the screen, if you always want the component's inventory location to be the same, in the Type box, select Always the Same and in the Value box, select the inventory location the component item is from. If you want to select the component inventory location at the time the assembled item is built, select Choose From List and in the Default box, select the default location. Change the caption to "Component Location," so that it is easily identifiable on the build assemblies screen.
- Repeat steps 11-17 for all component items used in the assembly item. For additional component items, the "Inventory Location" will normally be copied from the first component selected, unless components come from different locations. Set the Type to Copy for the Inventory Location line for all additional components. For Labor component items, set the Type to Copy and then under Extended Properties select the assembled item inventory location.
- Click Save.
-
Continue with the Build an Assembly section in this document to immediately build the assembly or continue with the Setup a Production Run Definition section in this document to build the assembly with other assemblies and then follow the Run a Production Run section.
Option 3: Setup an Assembly in the Same Inventory Location as the Component Item Inventory Location
Prerequisite
The Inventory Location module must be Purchased and Registered.
- Select Setup > Inventory > Assemblies.
- Click New.
- Click the Options button, select Add/Remove Assembly Items. Select all of the check boxes that you will use when setting up this assembly. For example, if you need to change the profit center or location for the component items. Click OK.
- On the right side of the screen, in the Item box, select any existing inventory item as the assembled item.
- The item Name displays as the default. The name can be changed. This is the name that will display in the left column for the assembled item.
- Click the next to the assembled item on the left side of the screen to expand the details for the assembled item. To expand/collapse all the nodes on the Assembled Item & Component List, right-click and select either the Expand All or Collapse All option.
Note: The main Assembled Item cannot be removed.
- On the left side of the screen, select the Quantity - Unit of Measure line.
- On the right side of the screen, in the Unit of Measure box select the unit of measure to use when building the assembly.
- On the left side of the screen, select the Inventory Location line.
- On the right side of the screen, in the Type box, select Always the Same and in the Value box, select the default inventory location for the assembled item. If you want to select the inventory location at the time the assembled item is built, select Choose From List and in the Default box, select the default inventory location. Change the caption to "Build Location," so that it is easily identifiable on the Build Assemblies screen
- On the bottom left side of the screen, click Add to begin adding the component items that are used to produce the assembled item.
- In the Item box, select a component item.
- The item Name or the account Name displays as the default depending on whether you selected an account in lieu of an item. This name can be changed. This is the name that will display in the left column for the component item.
- Click the next to the component item on the left side of the screen to expand the details for the component item.
- On the left side of the screen, select the Quantity - Unit of Measure line.
- On the right side of the screen, in Quantity box, enter the number of this component to use (components can be saved with a zero quantity) when building the assembly and in the Unit of Measure box select the unit of measure to use when building the assembly.
- Repeat steps 11-15 for all component items used in the assembly item.
- Click Save.
- There are a couple of reports that can be run from Reports > Reports > Setup Lists > Assemblies to verify your setup:
Assembly Components Where Used -Displays each component and the assembled items where they are used. Component quantities needed for each assembled item are also included.
Assembled Items - Assembled Items - Displays the assembled item and lists each component .along with quantities to build assemblies.
-
Continue with the Build an Assembly section in this document to immediately build the assembly or continue with the Setup a Production Run Definition section in this document to build the assembly with other assemblies and then follow the Run a Production Run section.
Build an Assembly
A finished product or sub-assembly must be built (produced) before the item can be sold or used in an assembled item. Use the build process to remove the components from inventory and add the built quantity to the finished product. or sub-assembly.
- Select Processes > Inventory > Build Assemblies.
- Select the Company this assembly is being built for.
- Select the Assembled Item you want to build.
- Determine if you Require all Components to be On Hand when the assembly is built.
- Verify the Transaction # and Date.
- Enter the Build Quantity.
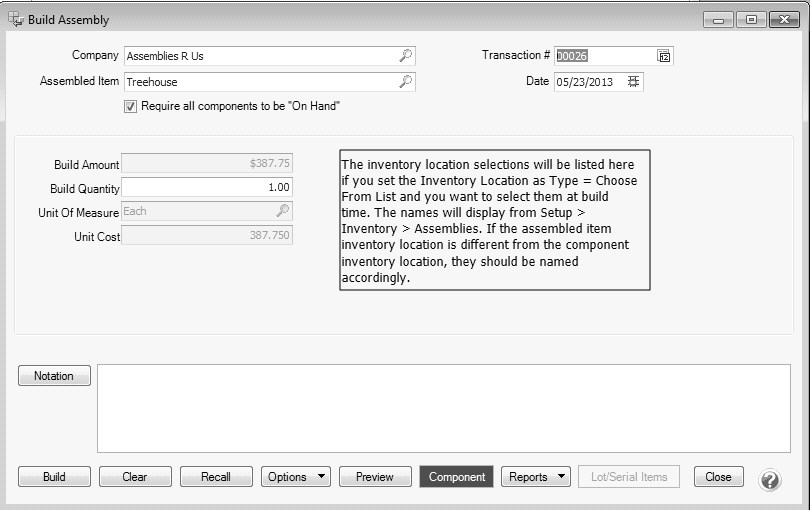
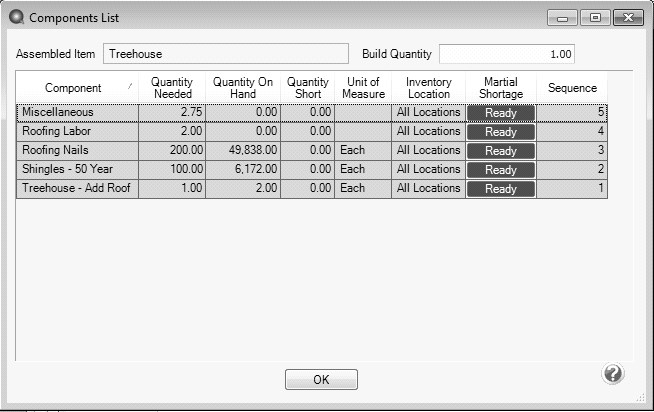
- The Component button will be green if all of the components needed to build the assembly item have a Quantity On Hand greater than or equal to the Quantity Needed to build the assembly item. If the button is Red, either the Quantity On Hand is less than the Quantity Needed for a component item or a sub-assembly in the assembled item. If the button is Yellow, the Quantity Needed is less than or equal to the Quantity on Hand and a sub-assembly has a Quantity on Hand less than the Quantity Needed to build the assembled item. Click the Component button to view the Components Lists for the build. The Material Shortage button will identify which components triggered the color change on the Component button.
- Click OK.
- To print reports about this build assembly, click the Reports button and select either the Material Requirements, Material Shortage or Assembled Item Cost report.
- Click Build to remove the components from inventory and add the built quantity to the finished product. or sub-assembly. If the Require all components to be on hand check box is select and there is a shortage of any required component the build will fail.
Setup a Production Run Definition
Production runs are used to build multiple assemblies at the same time. First define the production run and then run then Build the Production Run to complete the build process.
- Select Setup > Inventory > Production Run Definitions.
- Click New.
- Enter an Abbreviation and Name for the Production Run Definition.
- Select the Company the Production Run Definition is for.
- Select the Assemblies and Quantity to build in the Production Run Definition. Repeat for all assemblies to be built at the same time.
- Click Save.
- Click Close.
Build the Production Run
- Complete the Setup a Production Run Definition section of this document.
- Select Processes > Inventory > Production Runs.
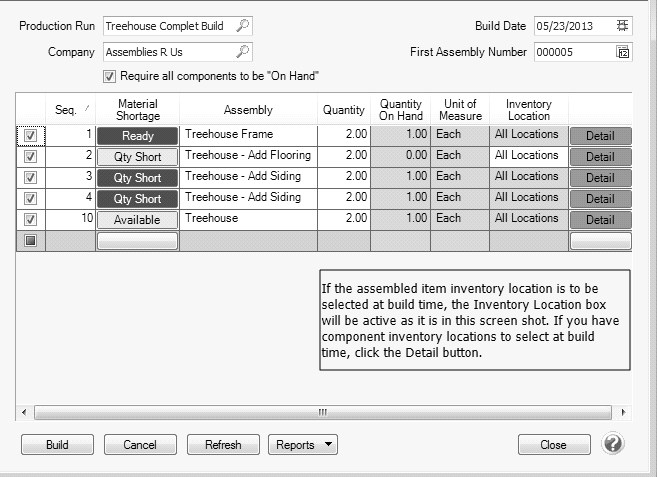
- The button in the Material Shortage column will be green if all of the components needed to build the assembly item have a Quantity On Hand greater than or equal to the Quantity Needed to build the assembly item. If the button is Red, either the Quantity On Hand is less than the Quantity Needed for a component item or a sub-assembly in the assembled item. If the button is Yellow, the Quantity Needed is less than or equal to the Quantity on Hand and a sub-assembly has a Quantity on Hand less than the Quantity Needed to build the assembled item. Click the button in the Material Shortage column to go to the assembly and view the components list by clicking Components.
-
If a component location needs to be selected for a build, click the Detail button and select the component location.
- To print reports about this production run, click the Reports button and select either the Material Requirements, Material Shortage, Assembled Item Cost, or Assembled Item Planning Using Last Cost report.
- Click Build.
- Click Close.
|
Document: 3229 |
|---|