CenterPoint® Accounting
- Understanding and Using Inventory Locations
Related Help
_24.jpg) CenterPoint Accounting for Agriculture - Inventory Locations Video - Duration: 5 min 17 sec
CenterPoint Accounting for Agriculture - Inventory Locations Video - Duration: 5 min 17 sec
CenterPoint Accounting - Inventory Locations Video - Duration: 8 min 11 sec
 View or Print as PDF
An inventory location is a physical location where purchased inventories are stored. Each location stores the address, e-mail address, fax number, the units of measure used for that inventory, and the capacity or storage. Inventory locations can be entered as part of any transaction and used through transaction reports and the analysis of transaction data. Inventory locations (storage centers) are a way to tag transactions to specific locations where your inventory is stored. If tracking inventory balances by location, the inventory balances report will designate where your inventory is stored. Inventory locations are optional in CenterPoint and can be added at any time.
Prerequisite
This option is available only when the Multiple Inventory Location add-on module is purchased and installed.
This topic will include instructions on how to:
Change the Status of an Existing Location
Combine Two Existing Locations
Create an Inventory Location
- On the Setup menu, point to General, and then click Inventory Locations.
- Click New to create a new blank location. Or if the location be adding is similar to an existing location, you can highlight the similar name and click Copy. This will create a new location using all of the information in the highlighted location.
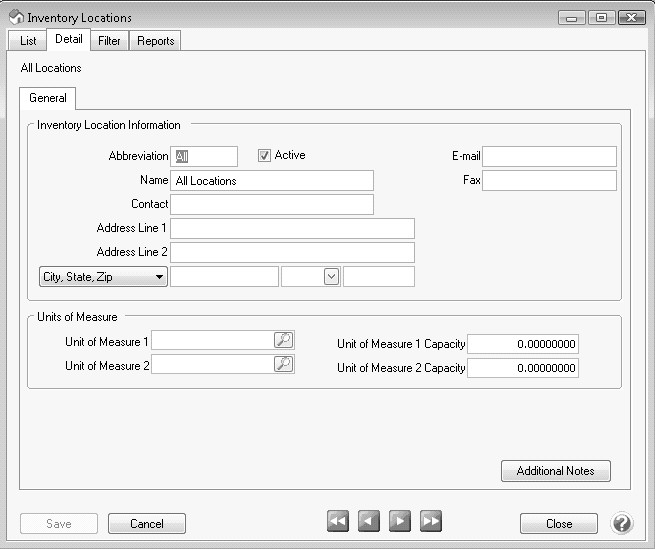
- In the Abbreviation box, enter
- In the Name box, enter
- In the Contact box, enter
- In the Address Line 1 and Address Line 2 boxes, enter the optional street address and any other information, for example, suite number or post office box number.
- If your preferences are set to use the automatic Zip Code/Postal Code Lookup for addresses, in the Zip/Postal Code box enter the zip code or postal code. If a list displays, select the appropriate city/state or city/province from the list. If your preferences are not set to use the Lookup for addresses, enter in the City/State/Zip, City/Province/Postal Code, or Address 3 Foreign Address information.
- Enter the E-mail address and Fax number (if applicable).
- In the Unit of Measure 1 and 2 boxes, select a unit of measure stored at this inventory location. Unit of Measure are optional.
- In the Unit of Measure 1 and 2 Capacity boxes, enter the maximum amount of the unit measure that can be stored in this inventory location. Unit of Measure Capacities are optional and are for information purposes only.
- To add notes to this inventory location, click Additional Notes, enter the notes, and then click OK.
- Click Save to save the inventory location and return to the List tab, or click Close to save the inventory location and close the Inventory Locations screen.
Change an Existing Location
All information on an existing Location can be modified, including the abbreviation and name. All history and balances will stay with the Location.
- On the Setup menu, point to General, and then click Inventory Locations.
- Select the inventory location you want to change, and then click Edit.
- Edit the details associated with this inventory location.
- Click Save to save the inventory location and return to the List tab, or click Close to save the inventory location and close the Inventory Locations screen.
Delete an Existing Location
The Delete button completely removes a location from the system.
- On the Setup menu, point to General, and then click Inventory Locations.
- Select the inventory location(s) you want to delete, and then click Delete.
- At the "Are you sure you want the item deleted?" message, click Yes.
Change the Status of an Existing Location
Locations that are no longer being used, but have history, can be deactivated. On transaction screens, the list of locations will only include active locations. Filters can be created in reports, lists, etc. to only include active locations. Locations can be active for some companies and not for others.
- On the Setup menu, point to General, and then click Inventory Locations.
- Right-click on an active location and select Activate/Deactivate, select the
Combine Two Existing Locations
The Combine button allows you to combine two existing locations into one. For example, if a location was inadvertently setup twice or is no longer used. The Combine feature allows you to transfer all the activity and balances from one location to another location. The location you combined will disappear from the list. The location that was combined into will include all activity from both locations.
- On the Setup menu, point to General, and then click Inventory Locations.
- Select a Location that you want to combine into another location. This is the location that will no longer be in the list when the process is complete.
- Click the Combine button.
- On the Combine screen select the Location you wish to combine the activity to.
- Click OK.
- At the "Are you sure you want to combine (the location you selected in Step 2) into (the location you selected in Step 4)?" message, click Yes.
- The location you selected in Step 2 has now been removed and will no longer appear on the List tab. The combined information will be stored in the location you selected in Step 4.
Create Inventory Transfer Defaults (Optional)
The Inventory Transfer Defaults screen allows you to setup optional default transactions to move multiple inventory items from inventory location to location. You can also transfer from/to profit center, production center, productions series, production years, project, name and associated account.
- On the Setup menu, select Inventory, and then Inventory Transfer Defaults.
- Click New to create a new blank inventory transfer default. Or if the inventory transfer default you will be adding is similar to an existing default, you can highlight the similar name and click Copy. This will create a new default using all of the information in the highlighted default.
- In the Abbreviation box, enter
- In the Name box, enter
- In the Transfer From column, select the inventory location, profit center, production center, productions series, production years, project, name or associated account you want to transfer inventory items from.
- In the Transfer To column, select the inventory location, profit center, production center, productions series, production years, project, name or associated account you want to transfer inventory items to.
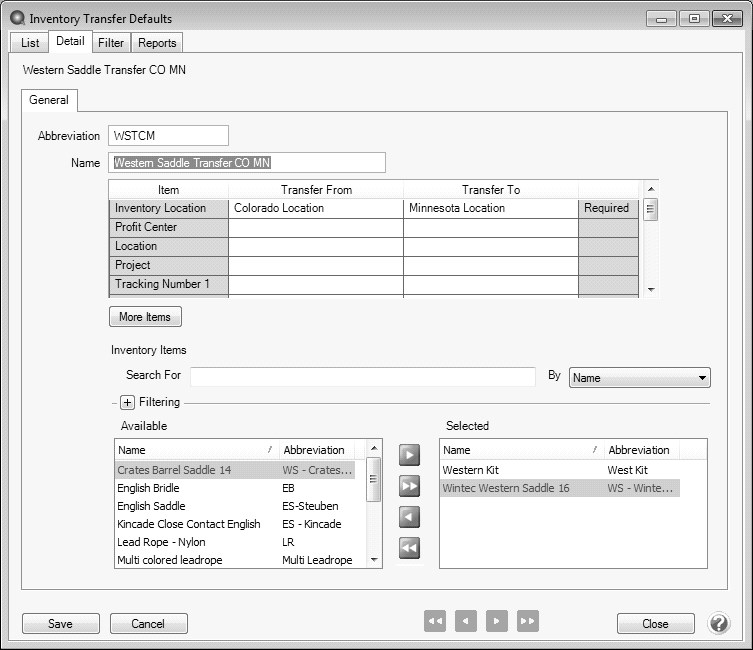
- Select the inventory items that will be transferred by moving the inventory item from the Available column to the Selected column. Move an item to the Selected List by clicking
 . To select multiple criteria
in the Available List, hold the CTRL key while making the selections and then to move your selections to the Selected List, click
. To select multiple criteria
in the Available List, hold the CTRL key while making the selections and then to move your selections to the Selected List, click  . If you have a long list of inventory items, the list can be filtered. Click Save.
- To find specific inventory items, for example items with "Western" in the name.
- In the By box, select which column you want to search for a specific record in the list. For example, you want to search for Western, so you would select the Name column .
- In the Search box, enter the name you are searching for, for example Western.
- The first name that starts with Western is highlighted in the Available list, followed by all of the other names that start with Western.
Transfer Inventory
Processes > Inventory > Inventory Transfers
The Inventory Transfers screen allows you to transfer inventory by using an inventory transfer default setup in Setup > Inventory > Inventory Transfer Defaults.
- On the Processes menu, select Inventory, and then Inventory Transfers.
- Click New.

- In the Company box, enter the company name that this transfer is for.
- If applicable, select the Inventory Transfer Default for this transfer. Click the Details button to view the Inventory Transfer Default details.
- If you selected an Inventory Transfer Default, the Transfer From location will display. Otherwise, enter the inventory location you want inventory to Transfer From.
- In the Transaction Date box, enter the transaction date.
- If you selected an Inventory Transfer Default, the Transfer To location will display. Otherwise, enter the inventory location you want inventory to Transfer To.
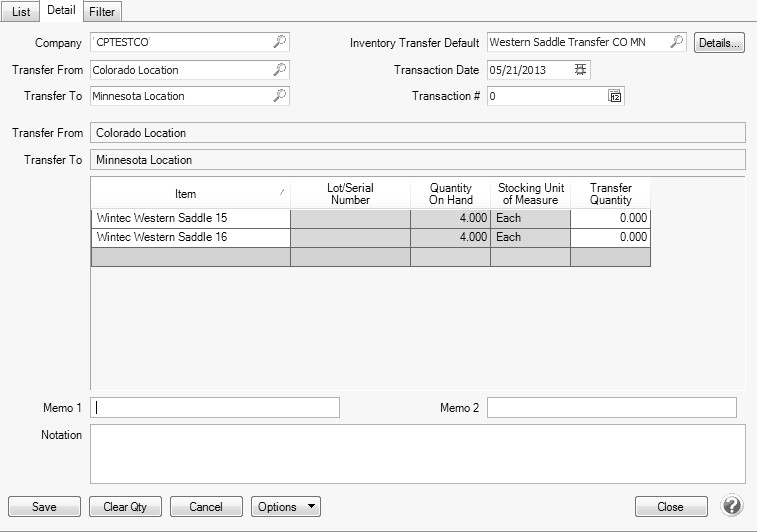
- If you selected an Inventory Transfer Default, the Item will display, otherwise select the Item you want to transfer from the Transfer From location to the Transfer To location.
- In the Transfer Quantity column, enter the quantity that you want to transfer from the Transfer From location to the Transfer To location. The Transfer Quantity cannot exceed the Quantity On Hand. To clear the Transfer Quantity column, click Clear Qty. Click Save.
|
Document: 3092 |
|---|