CenterPoint® Accounting
- Approve Purchase Orders
Related Help
_24.jpg) Approve Purchase Orders- Duration: 5 min 13 sec
Approve Purchase Orders- Duration: 5 min 13 sec
 View or Print as PDF for CenterPoint Accounting or CenterPoint Accounting for Agriculture
View or Print as PDF for CenterPoint Fund Accounting
The Approve Purchase Order screen is used in conjunction with the File > Preferences > Purchase Order .> Require Purchase Order Approval preference for businesses that require a stricter system for entering and approving purchase orders; for example, the employee that has a purchase request and enters into CenterPoint may not have the authorization to approve it. The screen sets the "Date Approved" and "Approved By" on purchase orders.
Prerequisite
You must have the Purchase Order module purchased and registered in the module configuration manager (File > Administration > Module Configuration Manager) prior to entering any purchase orders.
Step A: Set the Require Approval Preferences (One-time Setup)
Step A: Set the Require Approval Preferences (One-time Setup) and
When the Require Approval preference is set, it changes the entry process for purchase orders. On the Processes > Purchases > Purchase Orders and Purchase Order Maintenance screens, the Approved by box will not be active and you will not be able to print or email a purchase order without an approval date. The Approval Requires a Vendor to be Selected preference allows you to determine when a vendor is required
- Select File > Preferences > Purchase Orders > Require Purchase Order Approval.
- Click the Database tab.
- In the Require Purchase Order Approval box, select Yes.
- In the Approval requires a Vendor to be selected box, determine if a vendor is required when a purchase order is approved.
- Click Save.
Step B: Approve Purchase Orders
All entered and saved purchase orders that require approval will display on this screen. Purchase orders that have been previously approved, edited, and saved will also redisplay on this screen for approval.
- Select Processes > Purchases > Approve Purchase Orders.
- The Date Approved will display the current system date and can be changed. Purchase order dates must be the same or earlier dates than the "Date Approved".
- Select the Approved By name. The list of names that display in this Lookup will be names marked as Employees. If you create a new Approved By name through the Lookup screen, it must be marked as an Employee.
- To filter the list of purchase orders that need to be approved, click the Filter button, select a filter selection, and then click OK.
- To review a purchase order, double-click on the detail line in the grid or select the line and click the Edit button.
- To approve one or more purchase orders, click the Select check box. To approve all purchase orders, click the Select All button.
- Click Approve.
- Click Close..
Step C: Print/Email Approved Purchase Orders
After the purchase order is approved, the purchase order can be emailed or printed by following the steps below:
- Select Processes >
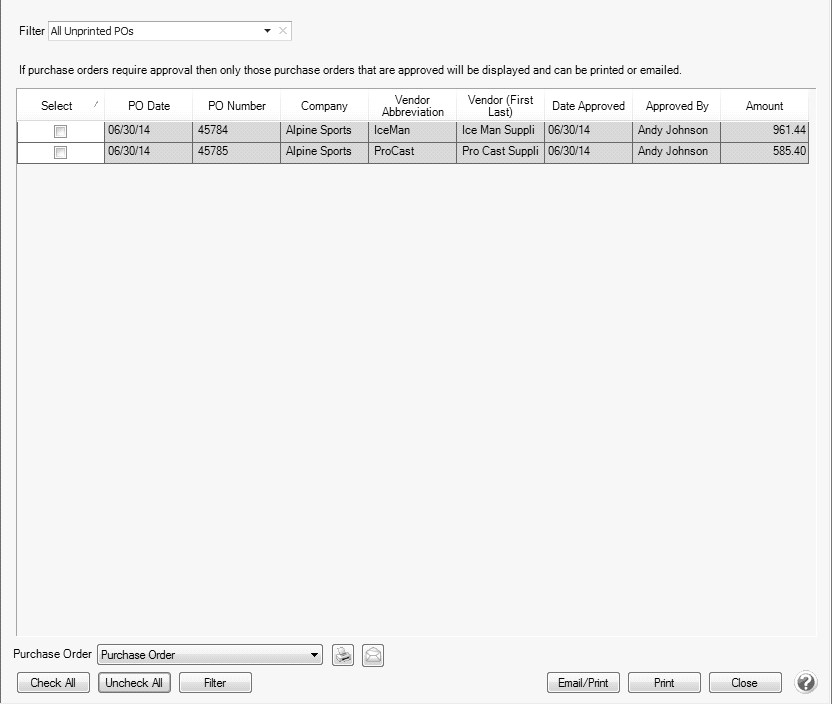
- All unprinted, approved purchase orders will display. If you would like to filter the list of purchase orders that display, click the Filter button, select your filter criteria, and either Apply the filter to the list (you will see Custom in the Filter box) or Save the filter so you can select the named filter in the Filter box.
- To select all purchase orders for printing, click Check All or select each purchase order you want to print. To unselect all purchase orders from the printing selection, click Uncheck All.
- Select the Purchase Order form type.
- Click the Printer icon to select the printer and the number of copies to print.
- Click the Envelope icon to change the defaults set in File > Preferences > Email > Purchase Orders for the Subject, Message, and Form.
- Click Email/Printto email and/or print all selected purchase orders or click Print to print all selected purchase orders. Purchase orders will be printed and/or emailed based on the selections made for the vendor in Setup > Names or Setup > Vendors.
- Verify or change your Email Settings.
- Click OK. You will receive a Process Completed Successfully message when the invoice is e-mailed.
- Click Close.
|
Document: 3245 |
|---|