CenterPoint® Accounting
- Create a Purchase Order (without Inventory module)
Related Help
_24.jpg) Enter and Maintain Purchase Orders- Duration: 11 min 11 sec
Enter and Maintain Purchase Orders- Duration: 11 min 11 sec
 View or Print as PDF for CenterPoint Accounting and CenterPoint Accounting for Agricutlure
View or Print as PDF for CenterPoint Fund Accounting
The Purchase Order module is used to provide a printed purchase order for vendors and manage the orders you've placed.
Edit an Existing Purchase Order
Prerequisite
You must have the Purchase Order module purchased and registered in the module configuration manager (File > Administration > Module Configuration Manager) prior to entering any purchase orders.
Create a Purchase Order
- Select Processes > > Purchase Orders.
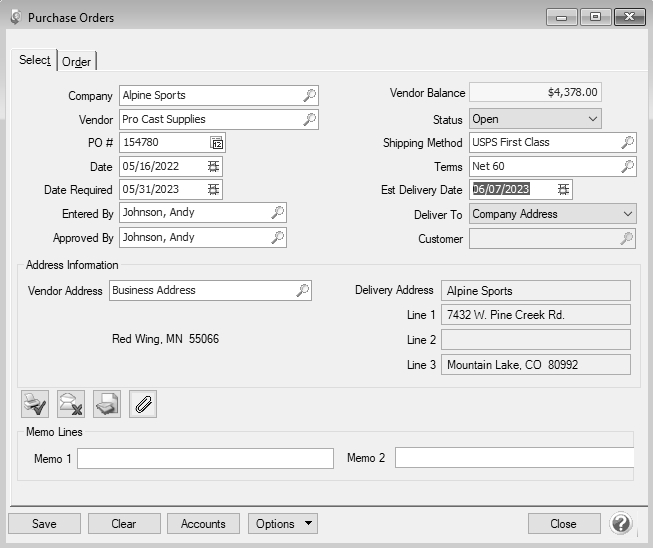
- Select the Fund/Company you are ordering goods for.
- Select an optional Vendor you are ordering the goods or service from. The vendor name and default terms are displayed. If you have the File > Preferences > Purchase Orders > Approval Requires a Vendor to be Selected preference set to Yes or Not Set:
In Processes > Purchases > Purchase Orders / Purchase Order Maintenance, when a purchase order is saved with an Approved By selection with no Vendor, a "You must have a vendor selected to continue." message displays and requires a vendor .
In Processes > Purchases/Expenditures > Receive Purchase Orders, when a purchase order is received, the default purchase order vendor entered in Processes > Purchases > Purchase Orders / Purchase Order Maintenance will display or the vendor can be changed/entered. When the purchase order is filled or posted without a vendor, a "You must have a vendor selected to continue." message displays and requires a vendor.
- The default PO # is displayed based on the current value in the "Last Used Sequence" field in the Sequence assigned to the purchase order number field. Use the system-supplied PO number or enter a new one. Messages will display when duplicate sequence numbers are found based on the Duplicates and the Check When fields in Setup > General > Numbering Sequence. The messages inform you if a duplicate sequence number was found and how the duplicate sequence number should be replaced with a new sequence number, automatically or manually.
- Specify the Date for the purchase order. The date field defaults to today's date but can be changed as necessary.
- The Date Required field is optional and is used to notify the vendor the date by which the goods/services need to be received.
- Select or enter the name of the person responsible for placing the order in the Entered By field. The list of names will include those marked as Purchasers in Setup > Names > Names. This field is optional.
-
- The Status field will default to Open. This can be changed to Hold if the purchase order is not yet complete. A purchase order that is on hold cannot be received.
- Select the Shipping Method for shipping the goods being ordered. This is an optional field that can be printed on the purchase order.
- The Terms will be used to calculate a due date (and optional discount due date) when an invoice is created for the received goods.
- The Est Delivery Date field can be used to communicate with the vendor on when you would like to receive the goods, or can also be used to specify a date the vendor noted the goods would be delivered.
- Normally the Deliver To field is set to Company/Fund Address for a manually created purchase order, but there are three options available:
- Company/Fund Address: The Delivery Address section of the purchase order will default to your companies/funds location.
- Customer: This option is used if you'd like to drop ship the order to a customer. When Customer is selected, you will then select the appropriate Customer to ship to.
- Other: Allows you to manually specify an address to ship the order to.
- Email and Print buttons will always be active if the File > Preferences > Purchase Order > Require Purchase Order Approval preference is set to No. If the preference is set to Yes, the buttons will be active only when an Approval Date is entered. The Email or Print Options selected on the Email/Print tab in Setup > Names > Names or Setup > Vendors will determine the default setting for thePrint (an image of a printer displays on the button) and E-mail (an image of an envelope displays on the button ) buttons (the selection can be changed on this screen). If the Print or E-mail buttons display with a red X, it means the purchase order will not be printed or e-mailed when the purchase order is saved. If the Print or E-mail buttons display with a green check mark, it means the purchase order will be printed or e-mailed when the purchase order is saved. To override the Print button default setting, click the Print button to display the Print Setting screen where you can override the Print Purchase Order setting for this purchase order only, select the printer to print the purchase order to, the number of copies of the purchase order to print, and the form the purchase order should be printed on. To override the E-mail button setting for this invoice only, click the E-mail button to display the Email Settings screen where you can override the E-mail Purchase Order setting and the default To, CC, BCC, From, Subject, Message, and form the purchase order should be e-mailed on. Individual and multiple purchase orders can also be printed/emailed from the Processes > Purchases > Print/Email Purchase Orders menu.
- The system will automatically bring you to the Order tab when you enter/tab off of the last field on the Select tab. Otherwise you can click on the Order tab manually or use the hot-key combination Alt + D.
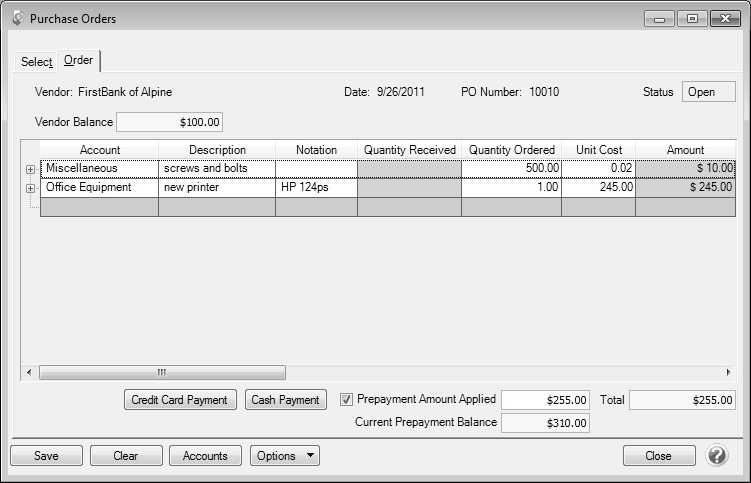
- In the Account field, select the account that should be charged for the first item being ordered.
- Enter a Description of the item being purchased. Use the Notation field to specify additional details regarding this item.
- Specify the Quantity Ordered. This is an optional entry.
- Specify the appropriate Unit Cost. The amount is calculated from the unit cost multiplied by the quantity, you can override the amount but it will not recalculate unit cost
- Continue entering additional lines for each item that is being ordered from this vendor.
- If you want to reorder the lines you entered on the transaction in a particular order, include the Line Sequence column in your data entry grid. Each line will automatically be assigned a line sequence number. The first line is assigned 10, the second 20, and so on. To reorder the lines, change the sequence number to the order in which you want the lines to print or display. For example, if you want the second line to print before the first line, change the line sequence to be 5, 6, 7, 8 or 9. To view the reordered lines, click Options, and then select Refresh.
- If you need to change the default Accounts Payable, Freight, Sales Tax or Prepaid Vendor Purchase accounts (set in File > Preferences > Vendor Invoices > Default Accounts) accounts for this purchase order, click the Accounts button, change the account, and then click OK.
- Verify the information for accuracy and click Save to complete the order. The order will be printed if the Print button displays with a green check mark or e-mailed if the Email button displays with a green check mark.
Edit an Existing Purchase Order
- Select Processes > > Purchase Order Maintenance.
- Select the Purchase Order you want to edit and click Edit (or simply double-click on the order). Only orders with a Status of Open or Hold can be edited.
- Added a new optional Attachments column that will display the number of attachments saved with the transaction.
- Make all needed changes and click Save.
Delete a Purchase Order
- Select Processes > > Purchase Order Maintenance.
- Select the Purchase Order you want to delete and click Delete.
Reprint an Existing Purchase Order
- Select Processes > > Purchase Order Maintenance.
- Select the Purchase Order you want to reprint and click Edit (or simply double-click on the order). Only orders with a Status of Open or Hold can be reprinted.
- Click the Print button, select Print Order, complete the printer settings, and then click OK prior to clicking Save..
Cancel a Purchase Order
- Select Processes > > Purchase Order Maintenance.
- Right-click on the appropriate purchase order and select Cancel Order.
Frequently Asked Questions
Q: Can a purchase order be canceled or closed?
A: Yes, from the List tab, select one or multiple purchase orders, right-click, and chose either Cancel Order or Close Purchase Orders, enter a Close Date (the date will default to the system date), and then click Yes or select a purchase order, click Edit, in the Status box select Canceled or Closed, click Save, enter a Close Date (the date will default to the system date), and then click Yes.
|
Document: 3198 |
|---|