CenterPoint® Accounting
- Purchase Order Prepayments
Related Help
 View or Print as PDF for CenterPoint Accounting and CenterPoint Accounting for Agriculture
View or Print as PDF for CenterPoint Fund Accounting
Prepayments (down payments) can be entered and sent to a vendor and in the future can be applied to a purchase order. This document provides step-by-step instructions on how to enter a prepayment and apply the prepayment to a purchase order:
Creating a Prepaid Vendor Purchases Account (One-Time Setup)
Setting the Prepaid Vendor Purchases Default Account (One-Time Setup)
Entering the Purchase Order and Applying the Prepayment
Posting the Prepayment Amount in Receive Purchase Orders
Optional: Using the Remaining Prepayment without a Purchase Order
Creating a Prepaid Vendor Purchase Account (One-Time Setup)
An account must be created to use when a prepayment (down payment) is entered. The account must be in the Prepaid Vendor Purchases account category.
- Select Setup > Accounts > Accounts. Click New.
- Enter an Abbreviation and Number for the account (optional).
- Enter a Name.
- The Account Type is Asset.
- The Account Category is Prepaid Vendor Purchases.
- Click Save.
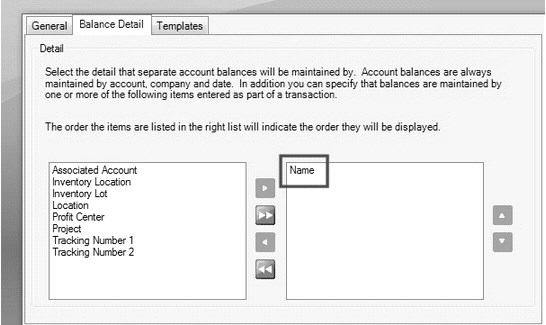
The Prepaid Vendor Purchases account category must be set up to maintain balances by name so that each vendor has a prepayment account balance:
- Select Setup > Accounts > Account Categories.
- Select the Prepaid Vendor Purchases account category.
- Click the Balance Detail tab.
- Verify that Name is in the box on the right hand side of the Balance Detail tab. If the Associated Account is also on the right hand side of the tab, move it to the left hand side.
- Click Save.
- Click Close.
Setting the Prepaid Vendor Purchases Default Account (One-Time Setup)
Enter the default account to display when a prepayment (down payment) is entered for a purchase order. The account selected here must be in the Prepaid Vendor Purchases account category.
- Select File > Preferences > Vendor Invoices > Default Accounts.
- Select the Database tab.
- In the Prepaid Vendor Purchases box, enter or select an account in the Prepaid Vendor Purchase account category.
- Click Save.
Entering the Prepayment
- On the Processes
menu, point to
- In the Company/Fund box, enter the company/fund name that this payment is for.
- In the Current
Batch box, leave the No Batch selection to update balances in real-time
(immediately) or enter a batch name to update balances at a later time.
- In the Bank Account box, enter the bank account that will be decreased by this prepayment transaction.
-
- In the Sequence box, enter or select the type of sequence you want to use for this prepayment.
- In the Check
Number box, enter the appropriate check number.
- In the Date
box,
- In the Amount box, enter the amount that the bank account should be decreased by.
- In the Memo Line 1 box, enter a memo line that you want to print immediately after the date on the check.
- In theMemo Line 2 box, enter a memo line that you want to print immediately after Memo Line 1 on the check.
- Select the Prepayment account that the amount, or a portion of the amount, should be charged to.
- Enter the Amount of the prepayment.
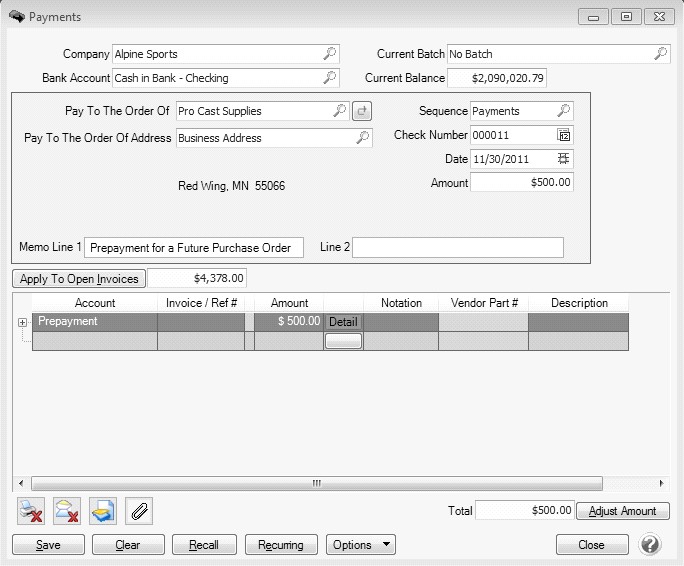
- Click Save.
- Click Close.
Entering the Purchase Order and Applying the Prepayment
- On the Processes
menu, point to
- Select the Vendor you are ordering the goods or service from. The vendor name and default terms are displayed.
- Specify the Date for the purchase order. The date field defaults to today's date but can be changed as necessary.
-
- Enter the name of the person responsible for placing the order in the Entered By field. This field is optional.
- If the preference is set to No, Select the name of the person responsible for approving the order in the Approved By field. This field is optional. The Approved By field lookup will provide you with a list of employees currently setup in CenterPoint. If you do not use CenterPoint Payroll but would like to track who purchased the items, they can be added by right-clicking in the Approved By field and selecting New.If the preference is set to Yes, The Approved By field will not be active and Processes > Purchases > Approve Purchase Order screen is used to approve purchase orders.
-
- Select the Shipping Method for shipping the goods being ordered. This is an optional field that can be printed on the purchase order.
- The Terms will be used to calculate a due date (and optional discount due date) when an invoice is created for the received goods.
-
- Normally the Deliver To field is set to Company/Fund Address for a manually created purchase order, but there are three options available:
- Company/Fund Address: The Delivery Address section of the purchase order will default to your companies\funds location.
- Customer: This option is used if you'd like to drop ship the order to a customer. When Customer is selected, you will then select the appropriate Customer to ship to.
- Other: Allows you to manually specify an address to ship the order to.
- Select the Print this Order? check box if you would like the system to print this purchase order when the transaction is saved. If you always print your purchase orders; after selecting the box, right-click and select Set as Default.
- The system will automatically bring you to the Order tab when you enter/tab off of the last field on the Select tab. Otherwise you can click on the Order tab manually.
- In the Account field, select the first Item to be purchased by either typing in a portion of the item abbreviation or description, or click on the lookup button to display a list of items and accounts.
- The Description will automatically be displayed for inventory items, but can be overwritten. Use the Notation field to specify additional details regarding this item.
- Specify the Quantity Ordered.
- Specify the appropriate Unit of Measure. The default purchasing Unit of Measure for this item will be displayed. Click on the lookup button to view a list of all units of measure assigned to this item.
- Specify the appropriate Unit Cost. The last cost for the item will be displayed. If the item has never previously been purchased, the cost will default to .01.
-
- The Vendor Part # will display from the Setup > Sales > Items > Purchase Information tab or Setup > Inventory > Items > Purchase Information tab.
- Continue entering additional lines for each item that is being ordered from this vendor.
- The Current Prepayment Balance displays at the bottom of the Order tab.
- Select the Prepayment Amount Applied check box to apply the amount of the purchase order to the prepayment.
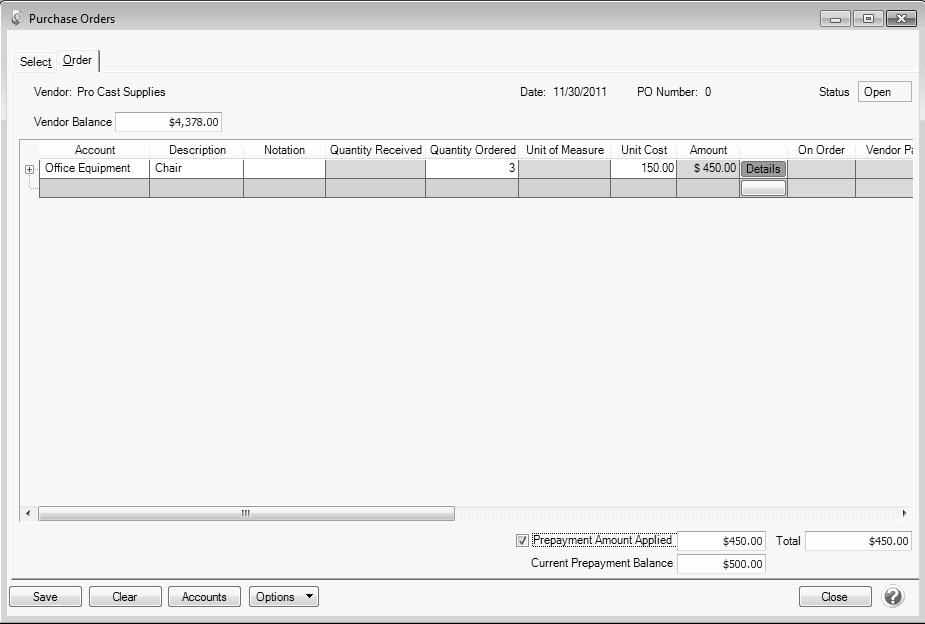
- Verify the information for accuracy and click Save to complete the order. If the Print this Order button was selected on the Select tab, the purchase order will print when the transaction is Saved.
- Click Close.
Posting the Prepayment Amount in Receive Purchase Orders
- Select Processes >
- Select the Purchase Order you want to receive. Only open purchase orders that are not on hold are available for receipt.
- Once the PO is selected, the PO Number, PO Date, Vendor, PO Total will be displayed.
- In the right corner, review the Receiving Information. This information will be used to create the vendor a/p invoice in CenterPoint. Unless you've already received an invoice from the Vendor, we recommend you leave the default values. Once the invoice is received from the vendor you will be able to correct the information by editing the a/p vendor invoice transaction.
- Verify that the Place on Hold field is selected. If it's not, select the box and then right click on the field and choose Set as Default.
- In the Quantity Received field, specify the actual quantity received for each item. If an item was not received, leave the field at 0.0.
- If the cost differs from the received cost, you can change it in the Amount field. This value should be the amount for the quantity received. The Unit Cost field will automatically recalculate based on the Amounts and Quantity Received.
- If an item received is a lotted or serialized item, the Lot/Serial # button on that row will be highlighted in yellow. Click on the Lot/Serial Number button to specify the Serial or Lot Numbers and Quantity Received. Click OK to save the Lotted/Serialized Items screen. The information from the Lotted/Serialized Items screen will update the Receive Purchase Order grid.
- Repeat step
- The Prepayment Amount displays and can be changed based on the information entered above.
- Once all items that were received have been documented, click Post.
- If some of the original items or quantities on this purchase order were not received, a message will be displayed that allows you to leave the remaining items open (select No) or close the entire PO (select Yes).
- The posting process will
- Click Close.
Optional: Using the Remaining Prepayment without a Purchase Order
- On the Processes
menu, point to
- In the Company/Fund box, enter the company/fund name that this payment is for.
- In the Current
Batch box, leave the No Batch selection to update balances in real-time
(immediately) or enter a batch name to update balances at a later time.
- In the Bank Account box, select the Prepayment account used for the remaining prepayment amount.
-
- In the Date
box,
- In the Amount box, enter the amount of the remaining prepayment.
- Select the account that the remaining prepayment amount should be applied to.
- Enter the Amount of the prepayment.
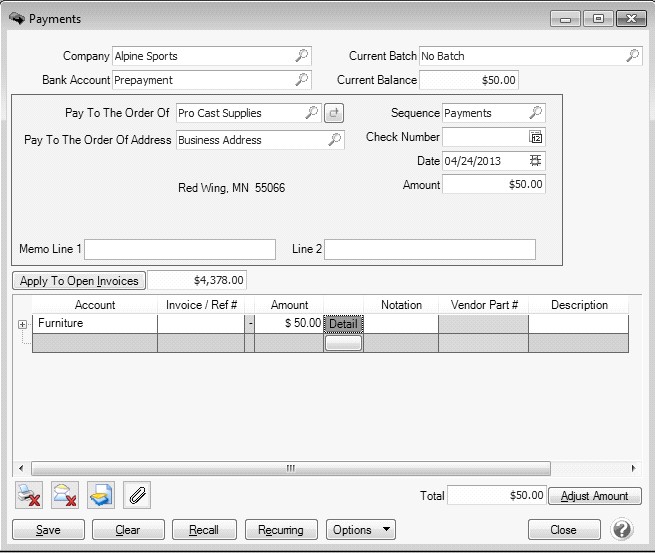
- Click Save.
- Click Close.
|
Document: 3227 |
|---|