CenterPoint® Accounting
- Receive a Purchase Order
Related Help
_24.jpg) Receive Purchase Orders- Duration: 7 min 55 sec
Receive Purchase Orders- Duration: 7 min 55 sec
 View or Print as PDF for CenterPoint Accounting and CenterPoint Accounting for Agriculture
View or Print as PDF for CenterPoint Fund Accounting
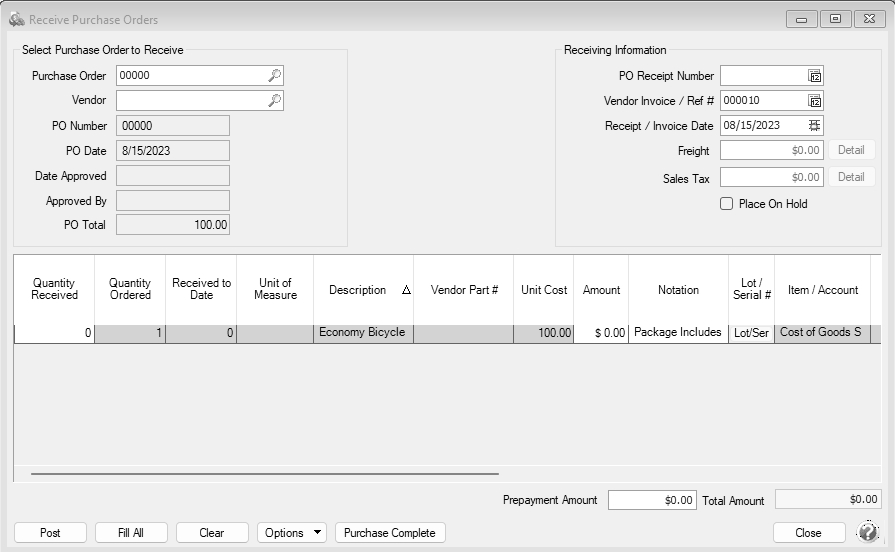
When the items ordered on a purchase order are received, they must also be received in CenterPoint. This process has you match receipts of items (or services/non-inventory items) against purchase order quantities. You can receive all of the items or some of them (a partial purchase order) and can adjust
Updating the Invoice Transaction One the Vendors A/P Invoice is Received
Receive a Purchase Order
- Select Processes >
- Select the Purchase Order you want to receive. Only open purchase orders that are not on hold are available for receipt.
- Once the purchase order is selected, the PO Number, PO Date, and PO Total will be displayed.
-
If there was no vendor assigned to the PO, select the appropriate Vendor. The vendor name and default terms are displayed. If you have the File > Preferences > Purchase Orders > Approval Requires a Vendor to be Selected preference set to Yes or Not Set:
When a purchase order is received, the default purchase order vendor entered in Processes > Purchases > Purchase Orders / Purchase Order Maintenance will display or the vendor can be changed/entered. When the purchase order is filled or posted without a vendor, a "You must have a vendor selected to continue." message displays and requires a vendor.
- In the right corner, review the Receiving Information. This information will be used to create the vendor a/p invoice in CenterPoint. Unless you've already received an invoice from the Vendor, we recommend you leave the default values. Once the invoice is received from the vendor you will be able to correct the information by editing the a/p vendor invoice transaction. The Receipt/Invoice date entered cannot be before purchase order date and if the File > Preferences > Purchase Orders > Require Purchase Orders Approval preference is set and the purchase order was approved, the Receipt/Invoice date entered cannot be before the Approval date.
- Verify that the Place on Hold field is selected. If it's not, select the box and then right click on the field and choose Set as Default. Note: The only time you would not put the transaction on hold is if you have already received the invoice for this receipt.
- In the Quantity Received field, specify the actual quantity received for each item. If an item was not received, leave the field at 0.0. If you are receiving non-inventory items and/or accounts, you will not be required to enter a quantity, alternately amounts can be received instead. Note: If all items were received for this purchase order, select Fill All at the bottom of the screen instead of entering the quantities manually.
- If the cost differs from the received cost, you can change it in the Amount field. This value should be the amount for the quantity received. The Unit Cost field will automatically recalculate based on the Amounts and Quantity Received.
- If an item received is a lotted or serialized item, the Lot/Serial # button on that row will be highlighted in yellow. Click on the Lot/Serial Number button to specify the Serial or Lot Numbers and Quantity Received. Click OK to save the Lotted/Serialized Items screen. The information from the Lotted/Serialized Items screen will update the Receive Purchase Order grid.
- Repeat step
- The posting process will
Updating the Invoice Transaction Once the Vendors A/P Invoice is Received
Once the invoice is received from the vendor, it should be verified against the transaction created by the Receive Purchase Order process.
Edit an Invoice
- Edit the invoice created during the Receive Purchase Order process. Please refer to the Edit or Delete a Transaction topic for step-by-step instructions. In this example, we are going to edit the invoice by drilling down to the transaction from the Vendor Aging report.
- Select Reports > Reports > Transaction Reports > Purchases & Accounts Payable > Vendor Aging report.
- Click Preview.
- Click on the invoice that corresponds to the invoice received from the vendor. The transaction will then be displayed in the Vendor Invoices (A/P) screen. Note: If you click on the transaction in the report and the Vendor Invoice (A/P) screen doesn't display, click on View and select Interactive. Then click on the transaction again.
- Take the check mark out of the On Hold check box now that the vendors invoice has been received.
- Change the Reference #, Date, and Terms fields to correspond to the information received on the invoice from the vendor.
Note: If you select the Copy Reference # to Invoice / Ref # option from the Options button, CenterPoint will copy the Vendor Invoice / Ref # entered on the Receive Purchase Orders screen to the Invoice / Ref # on each row of the AP Invoice created When this option is set on the Receive Purchase Order screen, it is also set on the Vendor Invoices (A/P) screen and vice versa.
- Verify that the Quantity and Amounts match the printed invoice from the vendor.
- Specify Freight and Sales Tax amounts, if any.
- Click Save to update the transaction. The transaction will now be available to select for payment.
If an AP invoice transaction is deleted that was created from a purchase order that was closed or canceled, the purchase order will be reopened. It can be closed or canceled by selecting Processes >
If a row on an AP invoice transaction is deleted that was created from a purchase order that was closed or canceled, the purchase order will be reopened. It can be closed or canceled by selecting Processes >
Delete an Invoice
- If an AP invoice transaction is deleted that was created from a purchase order that was closed or canceled, the purchase order will be reopened. It can be closed or canceled by selecting Processes > Purchases > Purchase Order Maintenance, right-click on the purchase order, and select either Cancel Order or Close Purchase Orders. A message will display when you delete the transaction, click OK to continue the deletion.
- If a row on an AP invoice transaction is deleted that was created from a purchase order that was closed or canceled, the purchase order will be reopened. It can be closed or canceled by selecting Processes > Purchases > Purchase Order Maintenance, right-click on the purchase order, and select either Cancel Order or Close Purchase Orders. A message will display when you delete the transaction, click OK to continue the deletion.
Frequently Asked Questions
Q: If there are items on the purchase order that will never be received or are partially received and will never be completely received how can the purchase order or purchase order line item be closed?
A: Follow the procedures below for closing line items on a purchase order or closing the entire purchase order:
- If you partially receive a line item on a purchase order and you will never receive the remaining portion of the quantity ordered for the line item, click the Purchase Complete check box on the line item and click Post to complete the receipt for this line item. If you receive other line items on the same purchase order, the line that was marked as Purchase Complete will not be editable.
- If you partially receive a line item on a purchase order with multiple line items and you will never receive the remaining portion of the quantity ordered for the line item, click the Purchase Complete check box on the partially received line item, click Post, and then click Close. From the List tab, select the purchase order, right-click, and select Close Purchase Orders.
- If you want to close a purchase order because you will never receive the line items or remaining portion of line items for a partially received purchase order, click the Purchase Complete button to automatically select the Purchase Complete check box on any line items where the check box isn't selected, click Post, and the purchase order will be closed.
|
Document: 3197 |
|---|