CenterPoint® Accounting for Agriculture
- Fixed Asset Import
Related Help

| 3297 | Product: | CenterPoint® Depreciation |
The Fixed Asset Import is used to import a previous system's fixed assets from a comma delimited (.CSV) file into CenterPoint Depreciation. The import will retrieve the assets from the comma delimited file and create the asset for the company and schedule identified in the Processes > Depreciation > Asset Entry - Previous Years screen in CenterPoint. Once validation of the file has successfully completed, the fixed assets are added into the database using the Asset Entry - Previous Years screen. The on screen process retrieves the assets from the grid and creates the assets in the database with the Federal depreciation schedules specified (Federal Farm, Federal Business or Federal Rental). The asset's depreciation schedule information will default to the default values for the capital asset type initially and are overridden with values from the imported asset if they exist.
Step 1: Prepare the Comma Delimited (.CSV) File Definition
Step 2: Prepare the Database for Importing (One-time Setup)
Step 3: Importing Fixed Assets
Step 4: Adding Additional Schedules to Imported Fixed Assets
Step 1: Prepare the Comma Delimited (.CSV ) File Definition
The Fixed Asset Import allows you to import the following data for fixed assets.
IMPORTANT requirements for the data to be imported:
- The data to be imported must be saved in a comma delimited (.CSV) file. If the data is currently held in an XLS or TXT file, it must first be converted to a .CSV file before proceeding.
- The first row in the comma delimited file must be a row of column headings matching the list below (do not include the - required for required fields). The column headings can be in any order.
- The file being imported must have all seven required fields listed below; Capital Asset Type, Acquisition Type, Asset Name, GL Account (must be in your source CenterPoint Depreciation database), Service Date, Listed, and Previous System Year.
- All entries in the .CSV file definition (except GL Account which has a separate validation by GL account abbreviation, number, or name) can be validated by either abbreviation or by name. All rows should either contain abbreviations or names and must be the same for all rows, for example if you choose to use Capital Asset Type abbreviations all other rows must also use abbreviations.
- Data is only required in the required fields. If a non-required column is in your .CSV file (for example, property class), the file must still include a blank field in that column. A non-required column does not need to be in the .CSV file.
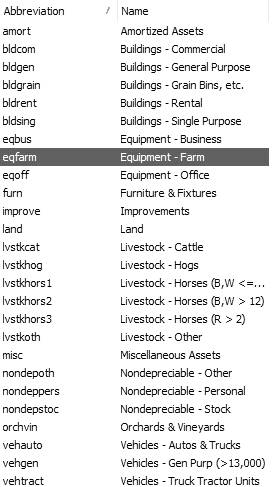
- Capital Asset Type (required) - The valid capital asset types are:
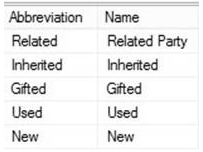
- Acquisition Type (required) - The valid abbreviations and names are:
- Asset Name (required)
- Abbreviation
- GL Account (required) - The import can validate GL Accounts by abbreviation, account number or by account name. All rows must either contain a GL Account abbreviation, account number or account name. GL Accounts listed in the .CSV file definition must already be in your CenterPoint Depreciation database.
- Service Date (required) - Must be less than or equal to the Previous System Year. Must be a valid date in the mm/dd/yyyy format.
- Total Basis - Must be a numeric value. (Must be a rounded dollar amount, no cents.)
- Units - Must be a numeric value.
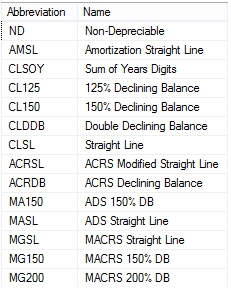
- Method - The valid methods are:
- Convention - The valid conventions are: Half Year = 0, Mid Quarter = 1, Mid Month = 2.
- Listed - (required) - The valid options are: Y, Yes, N or No.
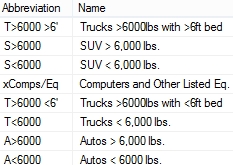
- Listed Type - The valid listed types are:
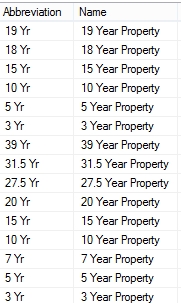
- Property Class - The valid property classes are:
- Percent Business Use - Must be between 0 and 100.
- Section 179 - Must be a numeric value. (Must be a rounded dollar amount, no cents.)
- SDA - Must be a numeric value. (Must be a rounded dollar amount, no cents.)
- Previous System Year (required) - This column must contain the year prior to your current tax year set in File > Administration > Current Depreciation Tax Year for every row in the file. For example, if you are starting CenterPoint Depreciation on 1/1/17 your current Tax Year would be set to 2017 and the Previous System Year in the .CSV file for every row in the file would be 2016.
- Previous Depreciation - Must be a numeric value. (Must be a rounded dollar amount, no cents.)
Step 2: Prepare the Database for Importing (One-time Setup)
Set the Default Schedules
A depreciation schedule allows you to define the type of tax schedule you will be using for depreciation. It works in conjunction with a capital asset type where you specify the start and end dates of a depreciation schedule, and the method, method years and property class each schedule will use to calculate depreciation transactions. CenterPoint includes common depreciation schedules by default, but these schedules should be reviewed.
- Verify the default schedules in File > Preferences > Depreciation > Default Schedules.
- If the default schedules are not applicable to your file definition, please contact Red Wing Software Technical Support.
Define the Client Type
- Select File > Preferences > Depreciation > Client Type.
- In the The services performed for this database include box, select either Complete Accounting or Tax Only.
- If this preference is set to Complete Accounting, all information related to adding or changing a fixed asset will be required, for example original/total cost, offsetting accounts, etc.
- If this preference is set to Tax Only, a new or changed fixed asset can quickly be added to CenterPoint without having to choose offsetting accounts or other required information.
- Click Save.
Define How Often to Depreciate Fixed Assets
Depreciation Frequency defines the number of times you wish to post depreciation during the year. Selecting the frequency that you want those depreciation transactions recorded makes sure that the transactions are only recorded in valid periods and that they are not duplicated in any one period.
- Select Setup > Companies. Edit the appropriate Company.
- Click on the Additional Detail tab.
- Under Depreciation Information, in the Depreciation Frequency field, select the appropriate option for your company. The options are Monthly, Quarterly, or Annually.
- Select the Calculate book and tax depreciation separately check box if you want the tax depreciation calculated annually on the fiscal year boundary and the book depreciation calculated on the frequency you selected in the Depreciation Frequency box.
- In the Ending Book Depreciation box, select the month that ends this reporting cycle if the Depreciation Frequency you selected is Quarterly or Annually.
- Click Save.
Set the Current Depreciation Tax Year
When the current tax year is set, it determines how many values in depreciation calculate and when you enter previous years' depreciation, CenterPoint will automatically use the year prior to the year set.
- Select File > Administration > Current Depreciation Tax Year.
- Enter the year you will be starting to use CenterPoint Depreciation in the Tax Year box. If you are starting to use CenterPoint Depreciation, for example, on 1/1/2017 and you are importing a .CSV file that contains entries for Previous System Year 2016, you would enter 2017 as your Tax Year.
- Click OK.
Backup Your Database
- Select File > Backup Database.
- Select your Save To location and accept or change the Save To File Name.
- Click Backup.
Step 3: Importing Fixed Assets
- Select Processes > Depreciation > Asset Entry - Previous Years. Only assets acquired from a previous year display.
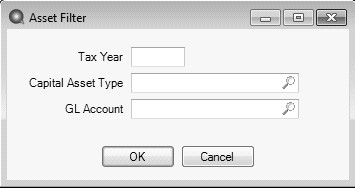
- The current Tax Year will display as the default.
- Click OK. The assets will display on the Asset Entry -Previous Years screen based on your filter selections.
- Select the Company that you are importing assets for.
- The Current Tax Year displays the current tax year set in File > Administration > Current Depreciation Tax Year. This field cannot be changed.
- Select the Offset Account that will be changed by this transaction.
- Enter the Depreciation Expense and Accumulated Depreciation accounts to use for the import .
- Click Import Assets.
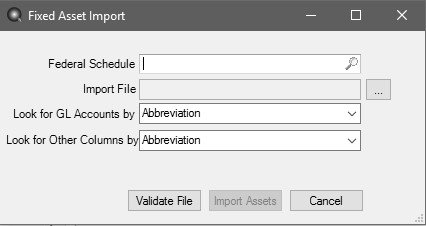
- Select a Federal Schedule (Federal Farm, Federal Business or Federal Rent).
- Select the Import File (.CSV file) created with the headers and required fields listed in the Comma Delimited (.CSV) File Definition section in this document). See step 1.
- In the Look for GL Accounts by box, select either Abbreviation, Name, or Account number depending on how your GL Accounts were defined in the GL Account column for each row in the .CSV file definition.
- In the Look for Other Columns by box, select either Abbreviation or Name depending on how your other columns were defined in the for each row in the .CSV file definition. Must be consistent by Abbreviation or Name across the .csv file. The name of the item and the abbreviation values in the import file are not case sensitive when validated against the values in CenterPoint.
- Click Validate File.
- If the Validation is successful, you will receive a Validation complete message, click OK, and then click Import Assets. If the validation is not successful, a Validation found some problems message will display, click OK. The Validation Errors window will display identifying the rows and specific problem in the row. Either the selections made on the Fixed Asset Import screen weren't selected properly or the .CSV file definition needs to change. Once changed, repeat steps 1-14 again.
- Click Save.
Adding Additional Schedules to Imported Fixed Assets
This is an optional step and should be used if you want to add additional schedules to your imported assets, since only Federal schedules were added during the import, for example State Business, State Farm or State Rent.
The mass update process can be used to update more than one fixed asset at a time to add additional schedules.
- Select Setup > Fixed Assets > Fixed Assets.
- From the List tab, select the fixed assets you want to update. Multiple fixed assets can be selected by pressing the CTRL key while you make your selections.
- Click Mass Update.
- The Mass Update Wizard window will open. The wizard will guide you through the process. Click Next.Note: Next proceeds through the mass update screens, Cancel exits the mass update screen and Back returns to the previous page of the mass update process. The Back button is in the upper-left side of the screen.
- On the Select the action to perform screen, select Add Schedule, and then click Next.
- In the Add Schedule box, select the additional schedule you want to add to the imported fixed assets.
- Select one or more Companies to add the schedule to and move them to the right side of the screen using the right arrow.
- In the Copy Schedule box, select the Federal schedule used to import the assets to be used to copy information from.
- Select the items you want to copy; Prior System Depreciation, Section 179, SDA, or Traded Basis.
-
Click Next.
- Click Finish.
Step 5: Verify the Imported Data
Determine your Client Type set in the Define the Client Type section above:
- If your Client Type is Tax Only, close the Fixed Asset Import screen and the Asset Entry - Previous Years screen and select Reports > Reports > Fixed Assets > Fixed Asset Listing and either Preview or Print the report and verify that the fixed assets that were to be imported are listed and all other information is as defined in the .CSV file definition.
or
If your Client Type is Complete Accounting:
- Close the Fixed Asset Import screen and then click the Schedules tab on the Asset Entry - Previous Years screen. Select the Schedule, and verify that the fixed assets that were to be imported are listed and all other information is as was defined in the .CSV file definition. One your verification is complete, click Record Previous Depreciation, and then click Close.
- Select Reports > Reports > Fixed Assets > Fixed Asset Listing and either Preview or Print the report and verify that the fixed assets that were to be imported are listed and all other information is as defined in the .CSV file definition.
Document: 3297