CenterPoint Accounting
- Using the Check Form Designer to Print on Blank Check Stock (MICR Encoding)
| Document #: | 3017 | Product: | CenterPoint® |
|---|
This topic explains how to use the Check Form Designer to print accounting and payroll checks onto blank check stock. The Check Form Designer allows you to completely customize the layout of your check. You can choose which information to include and where on the check it prints. You can also add your company/fund logo, include electronic signatures, and enable MICR encoding.
Prerequisite
The CenterPoint Check Form Designer module must be purchased and installed.
There are five steps to creating a customized check:
1. Import Company/Fund Logo (optional)
2. Setup Signatures (optional)
3. Setup Company/Fund Bank Information
Step 1: Import Company/Fund Logo (optional)
You can import your company/fund logo into CenterPoint and print it on AP and Payroll Checks. This is an optional step.
- Select Setup > Companies/Funds. Highlight your company/fund and click Edit.
- In the Company Logo area, click on Import.
- Select the file for your logo and click Open.
- Click Save.
Step 2: Setup Signatures (optional)
You can electronically sign checks with signatures imported into CenterPoint. You can assign two signatures per bank account and choose to include one or both signatures on a custom check design. Setting up Signatures is a two step process; importing and then setting security policies can be set to limit access to the signatures to only authorized users.
Step A. Import Signatures
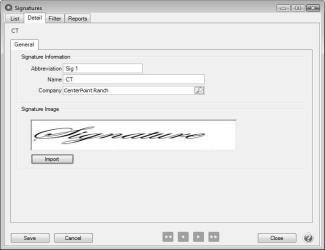
- Select Setup > Signatures. Click New.
- Enter an Abbreviation and Name for this signature.
- Select the Company/Fund this signature is for.
- Click Import. Select the file for this signature and click Open.
- Click Save.
- Repeat steps 1-5 for each signature that will be used on payroll or accounting checks.
Step B. Setup Security Policies for Signatures
Note: Database Security must already be setup. See the document Users & Security for more information on setting up database security. Signatures will not be included on checks printed by a user who does not have access to the company’s/fund's signatures.
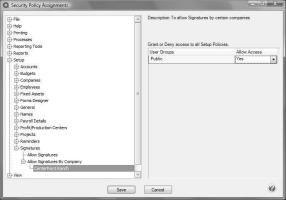
- Select File > Security > Security Policies.
- Expand Setup > Signatures > Allow Signatures by Company/Fund. Highlight the company/fund you are setting security for.
- To the right, select whether or not to allow access for each user group.
Step 3: Setup Company/Fund Bank Information
Additional information about your bank account is necessary in order for CenterPoint to print all the required information onto blank check stock, including the MICR encoding.
- Select Setup > Accounts > Accounts. Highlight your checking account and click Edit. Select the Detail tab.
- In the Company/Fund Specific Detail Information, highlight the appropriate company/fund in the box to the left. Enter any information you will need to print on your checks.
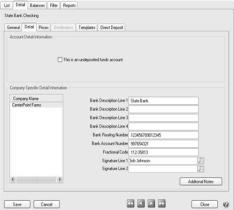
- Bank Description Line 1 – Enter the name of your bank
- Bank Description Lines 2-4 (Optional) – Additional bank information, usually address.
- Bank Routing Number – Your bank’s routing number, needed for MICR encoding.
- Bank Account Number – You bank account number, needed for MICR encoding.
- Fractional Code – Number assigned to your bank. Allows the bank to be identified if the routing number is not readable.
- Signature Line 1 – Select a signature to print if you wish to electronically sign checks.
- Signature Line 2 – Select a second signature if you wish to print two signatures on checks.
- Click Save.
Step 4: Customize the Check Layout
- Select Setup > Forms Designer > Check Form Designer.
- Go to File > Open, highlight the default stub types that you would like to customize and click Open. This will serve as a starting point for your custom check layout.
Note: CenterPoint does not have a Stub/Stub/Check (bottom check) option by default; however it is possible to set this up as a custom option. Open any of the default check types, then click on File > Settings. Select Stub/Stub/Check, click OK.
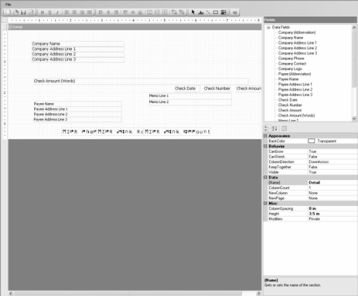
- The fields on the check can be dragged, resized, or deleted. The details of the field, including font, color, and alignment can be changed in the lower right-hand portion of the screen.
- New fields can be added to the check by dragging them from the fields list in the upper-right hand portion of the screen. Some common fields to add are:
- Company/Fund Logo
- Signatures
- Bank Description
- Bank Fractional Code
- When printing on blank check stock, there are likely to be text fields and lines that need to be added to your check. For example: “Pay to the order of” or a signature line.
- To add text, click on the Aa button on the toolbar. Then click and drag with your mouse on the check layout to create a text box. This box can be resized and dragged to the correct position. Change the text in the box from “Label” to the correct text in the details section in the lower right-hand portion of the screen.
- To add a line, click on the \ button on the toolbar. Click and drag on the check layout to create a line. The line can be resized and repositioned. The style and weight of the line can be changed in the details in the lower right-hand portion of the screen.
- The three fields for the MICR encoding are included on the check in the correct position. By default these fields are hidden and do not print. To print these fields, select them on the check layout and in the lower right-hand portion of the screen, change the behavior Visible to True.
Note: In order for MICR checks to be accepted by your bank, you will need to purchase MICR toner cartridges for your printer.
- At any time, to see a preview of what your custom check will look like, select File > Preview. Please note that logos do not display in the preview and signatures will just show “Signature.”
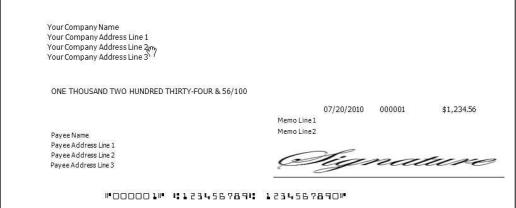
- When you are finished customizing the check layout, go to File > Save. Enter a Name for your new layout and click Save.
Step 5: Set Printing Preferences
Before CenterPoint can begin using your custom check layout, the Printing Preferences need to be changed to use your new check type. You can choose to use the new type for both Accounting and Payroll checks.
- Select File > Preferences > Vendor Invoices > Printing - Checks > Database tab for accounting checks or File > Preferences > Payroll > Printing - Checks > Database tab for Payroll checks.
- Change the Select Check Type to your new custom type.
- Make sure Print Check Number on Check and Print Company/Fund Name are both changed to Yes.
- Click Save.
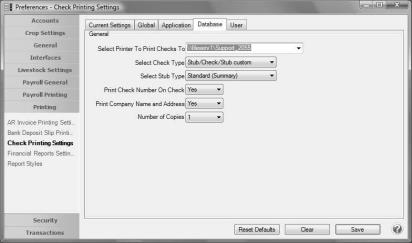
CenterPoint will now use your custom check layout when printing checks. To test this layout on your check stock, reprint a few checks by selecting Processes > Purchases > Print/Email Checks/Invoices or Processes > Reprint Payroll Checks. Changes can be made to your custom check layout by selecting Setup > Forms Designer > Check Forms Designer and opening your custom check type.
Frequently Asked Questions
Q: I have created a custom check layout. Is it possible to use this layout in more than one database?
A: Yes! When you create a custom check layout is only available in the database it was created in. However, you can export the check type and import it into another database.
- Select Setup > Forms Designer > Check Form Designer in the database with the new check layout.
- Select File > Open and open your custom check type.
- Select File > Save File As. Choose a location on your computer to save the file to and click Save.
- Open the database you want to import the check layout into. Select Setup > Forms Designer > Check Form Designer.
- Select File > Open File.
- Choose the file you saved in Step 3. Click Open.
- Select File > Save and save this check layout in the new database.
Q: Where can I purchase blank check stock and MICR toner cartridges?
A: Blank Check stock and MICR toner cartridges can be purchased from Computer Forms, Incorporated, our preferred forms provider. In CenterPoint, select Help > Order Checks and Forms or call 1-800-458-0158.