CenterPoint® Fund Accounting
- Exchange Goods/Services for Payment
Related Help
_24.jpg) Exchange Goods or Services for Payment Video - Duration: 6 min 47 sec
Exchange Goods or Services for Payment Video - Duration: 6 min 47 sec
Occasionally you may provide goods and/or services to a vendor in exchange for items that you have purchased from them. When this type of situation transpires, three transactions are required. One that records the items that were purchased, a second for the items that were sold, and a third that clears the two amounts so those invoices are not awaiting payment.
Step 1: Enter A/P Invoice for Purchases
Step 2: Enter A/R Invoices for Sales
Step 4: Mark the A/P Invoice as Paid in Exchange for the Goods/Services
Step 5: Mark the A/R Invoices as Paid in Exchange for Goods/Services Received
Step 1: Enter A/P Invoice for Purchases
When items are purchased from the vendor, an invoice would be entered the same as any other purchase. Please refer to the Enter a Vendor Invoice topic for step-by-step instructions for entering A/P Invoices into the system.
Step 2: Enter A/R Invoices for Sales
When items are sold to this same company/fund, a customer invoice should be entered for the goods/services. This is entered as an unpaid invoice. Please refer to the Enter Unpaid Sales Invoice topic for step-by-step instructions for entering an A/R Customer Invoice.
Step 3: One-Time Setup
Step A: Create an Exchange Account
This account will not carry a balance and is used to simply clear amounts for invoices that were paid for by exchanging goods/services instead of cash.
- Select Setup > Accounts > Accounts. Click New.
- Specify an appropriate number for this new Account. This is optional if you do not use account numbers.
- Specify "Exchange Account" or something similar in the Name field.
- Select Assets in the Type field, and Cash in the Category field. Click Save.
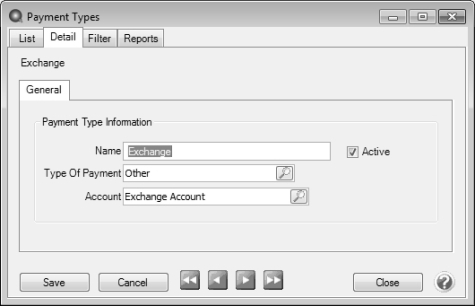
Step B - Setup a Payment Type
- Select Setup > General > Payment Types. Click New.
- Enter "Exchange" or something similar in the Name field.
- In the Type of Payment field, select Other as you will not be receiving cash or check payments for these A/R invoices.
- Specify your Exchange Account (setup in Step A) in the Account field.
Step 4: Mark the A/P Invoice as Paid in Exchange for the Goods/Services
In the example shown in Step 4 and 5, an electrician was hired to do $500 worth of wiring and the electrician purchased $450 in services from the Alpine Sports company. Both the A/R and A/P invoices have already been entered to record that purchase and sale. Below we'll mark the A/P invoice paid in exchange for what was sold.
- Select Processes > Purchases > Payments.
- Select the Exchange Account in the Bank Account field.
- Specify the appropriate Vendor in the Pay to the Order Of field.
- Select the Apply to Open Invoices button.
- In the Payment Amount field, specify the amount that is being "paid" by the exchange.
- Either click Apply (to have the system automatically select the invoices to be paid) or use the Pay boxes to select the invoices manually.
- Click OK to return to the main Payments screen.
- Select Save.
Step 5: Mark the A/R Invoices as Paid in Exchange for Goods/Services Received
- Select Processes > Sales > Receipts.
- Select the customer in the Received From field.
- In the Payment Type field, select the Exchange Type.
- Select the Apply to Open Invoices button.
- Specify the amount that is being exchanged for payment in the Receipt Amount field.
- Either click Apply (to have the system automatically select the invoices to be paid) or use the Pay boxes to select the invoices manually.
- Click OK to return to the main Receipts screen.
- Select Save.
|
Document: 3168 |
|---|

