CenterPoint® Fund Accounting
- Saved Notations
Related Help
Notations are a way to record additional user-defined text in transaction entry and are saved as part of the transaction. Sometimes notations are used repeatedly on many transactions. In that case, to save time and ensure accuracy, a notation can be saved and reused in other transactions. Transaction Search can be used to find all transactions that include that same notation. The notation prints on many reports in CenterPoint. It's also printed on the Standard (detail) check stub and the description area of a basic invoice.
Save a Notation
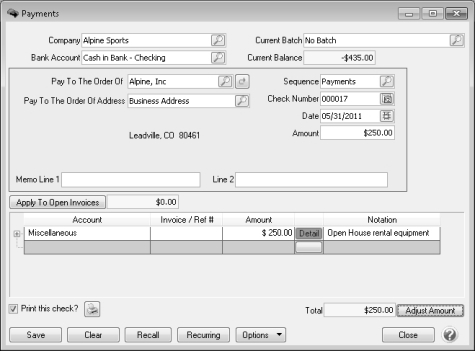
Each transaction screen includes a detail area where the accounts, items, quantities, etc are specified for the entry. Within that detail section, each line of data will include a detail button that is either Gray, Red or Green (depending on if additional details are required before the entry can be saved). Below is an example of a Payment transaction displaying the Detail button.
- From within any transaction screen, select the Detail button found in the detail section.
- Click Notation.
- On the Notations screen, under Available Notations, click Notations.
- From the List screen, click New.
- In the Abbreviation box, enter an optional 10 character abbreviation that you can easily identify the notation by. The abbreviation can be used during transaction entry to recall a transaction. If notation recall is selected, the abbreviation can be entered into the Notation box and CenterPoint will automatically display a matching notation, otherwise, it will display a list of saved notations.
- In the Name box, enter a name that you can easily identify the notation by. The name can be used during transaction entry to recall a transaction. If notation recall is selected, the name can be entered into the Notation box and CenterPoint will automatically display a matching notation, otherwise, it will display a list of saved notations.
- In the Notation box, enter a notation that will be used in transaction entry. When the notation is recalled during transaction entry, the full notation will become part of the transaction.
- Click OK to save the notation and return to the List tab, or click Close to save the notation and close the Notations screen.
- Click OK to return to the Detail screen.
Use a Saved Notation
- On any transaction screen, after you enter the Header and Detail Line information and the Detail button is Red or Green, click Detail.
- Click Notation.
- On the Notations screen, under Available Notations, select the notation you want to attach to this transaction, click the green arrow button to move the notation to the Notation list, and then click OK to close the Notations screen.
- Click OK to close the Detail screen and return to the transaction entry screen.
Change a Saved Notation
- From the Detail button on any transaction screen, click Notation.
- Click Notations. Select the notation you want to change, and then click Edit.
- Make any desired changes to the notation detail. Click Save to save your changes or Cancel to close the window without saving changes.
- Click Close to close the Notations screen.
- Click OK to return to the Detail screen.
Delete a Saved Notation
- From the Detail button of any transaction screen, click Notation.
- Click Notations. Select the notation(s) you want to delete, and then click Delete .
- At the "Are you sure you want the item deleted?" message, click Yes.
- Click Close.
- Click OK to return to the Detail screen.
|
Document: 3417 |
|---|

