CenterPoint® Fund Accounting
- Encumbrances
Related Help

Encumbrances are a tool to assist government officials so they do not overspend legally authorized appropriations (budgeted expenditures or budget capitalized expenditures). An encumbrance is created through a purchase order transaction in CenterPoint and can be entered prior to the budgeted period, for example a fiscal year. When a purchase order is approved, the encumbrance process begins and an entry is made on the Equity section of the Balance Sheet to debit a Fund Balance account and credit the Reserve for Encumbrances account (the approval date is when the encumbrance entry is made, as opposed to the purchase order date). Purchase Order receipts reduce encumbrance amounts. When goods and services are received on a purchase order, an Accounts Payable invoice is created and the encumbrance is reversed. Encumbrance amounts may be different than actual amounts on a purchase order, in which case the encumbrance can be adjusted.
One Time Setup: Encumbrance Preferences
Enter an Encumbered Purchase Order
Print or Email Purchase Orders
Step 1: One Time Setup: Encumbrance Preferences
Require Purchase Order Approval
When this preference is set, it changes the entry process for purchase orders. On the Processes > Purchases > Purchase Orders and Purchase Order Maintenance screens, the Approved by box will not be active and you will not be able to print or email a purchase order without an approval date.
- Select File > Preferences > Purchase Orders > Require Approval.
- Click the Database tab.
- In the Require Purchase Order Approval box, select Yes.
- Click Save.
Encumbrances Preference
This preference allows you to select a default Reserve for Encumbrances account. The Reserve for Encumbrances and Offset Accounts are used in general journal entries to book the reserve for encumbrances on the Balance Sheet.
- Select File > Preferences > Purchase Orders > Encumbrances.
- Click the Database tab.
- Select the Reserve for EncumbrancesAccount that will be used as the offset to the line items entered on an approved purchase order when the purchase order is encumbered.
- Select the Offset to Reserve Account.
- Click Save.
Enter an Encumbered Purchase Order
- Select Processes > Expenditures > Purchase Orders.
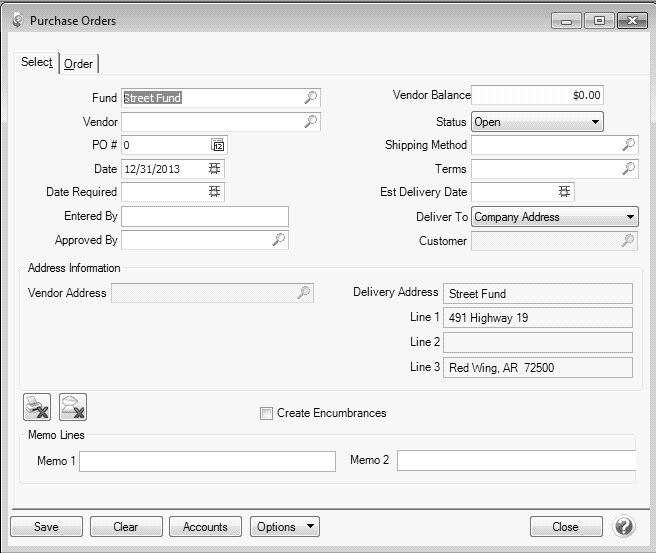
- Select the Vendor you are ordering the goods or service from. The vendor name and default terms are displayed.
- The default PO # is displayed based on the current value in the "Last Used Sequence" field in the Sequence assigned to the purchase order number field. Use the system-supplied PO number or enter a new one.
- Specify the Date for the purchase order. The date field defaults to today's date but can be changed as necessary. This is not the date the purchase order will be encumbered, the encumbrance process starts when the purchase order is approved on the Date Approved.
-
- Enter the name of the person responsible for placing the order in the Entered By field. This field is optional.
- The Approved By field will not be active because the Require Approval preference is set. When the preference is set the Processes > Expenditures > Approve Purchase Order screen is used to approve purchase orders. Once the purchase order is approved, the encumbrance process begins.
-
- Select the Shipping Method for shipping the goods being ordered. This is an optional field that can be printed on the purchase order.
- The Terms will be used to calculate a due date (and optional discount due date) when an invoice is created for the received goods.
-
- Normally the Deliver To field is set to Fund Address for a manually created purchase order, but there are three options available:
- Fund Address: The Delivery Address section of the purchase order will default to your funds location.
- Customer: This option is used if you'd like to drop ship the order to a customer. When Customer is selected, you will then select the appropriate Customer to ship to.
- Other: Allows you to manually specify an address to ship the order to.
- Select the Create Encumbrances check box to indicate that encumbrance general journal entries should be created when the purchase order is approved and received (right-click and select Set As Default to always check this box). The general journal entries created will be to the required Reserve for Encumbrances and Fund Balance accounts entered from the Accounts button on the purchase order (the defaults will be the accounts set in the File > Preferences > Purchase Orders> Encumbrances preference, but they can be changed). There can only be one Fund Balance and one Reserve for Encumbrances account per purchase order.
- The Email and Print buttons will not be active on an encumbered purchase order. Encumbered purchase orders can only be printed from Processes > Expenditures > Print Purchase Orders. This screen displays approved purchases only.
- The system will automatically bring you to the Order tab when you enter/tab off of the last field on the Select tab. Otherwise you can click on the Order tab manually.
- In the Account field, select the first account for your purchase by either typing in a portion of the account abbreviation or description, or click on the lookup button to display a list of accounts.
- Enter an optional Description.
- Specify an optional Quantity Ordered.
- Specify an optional Unit Cost. If you choose to use a unit cost, it will be multiplied by the Quantity Ordered to calculate the Amount..
-
- Continue entering additional lines for each item (account) that is being ordered from this vendor.
- If you need to change the default Accounts Payable, Freight, Sales Tax or Prepaid Vendor Purchase accounts (set in File > Preferences > Vendor Invoices > Default Accounts)
- Verify the information for accuracy and click Save to complete the order. Encumbered purchase orders cannot be printed from this screen, they must be printed from Processes > Purchases > Print/Email Purchase Orders. See the Print or Email Purchase Orders section of this document for more information.
Approve Purchase Orders
All entered and saved purchase orders that require approval will display on this screen. Purchase orders that have been previously approved, edited, and saved will also redisplay on this screen for approval. The Date Approved is the Encumbrance Date.
- Select Processes > Expenditures > Approve Purchase Orders.
- The Date Approved will display the current system date and can be changed. Purchase order dates must be the same or earlier dates than the "Date Approved". The Date Approved is the Encumbrance Date.
- Select the Approved By name. The list of names in this Lookup will be names marked as Employees.
- In the Purchases Type box, select All to display all types of purchase orders, Encumbrances Only to display purchase orders where the Create Encumbrances check box was selected during purchase order entry, or Unencumbered Only to display purchase orders where the Create Encumbrances check was not selected during purchase order entry.
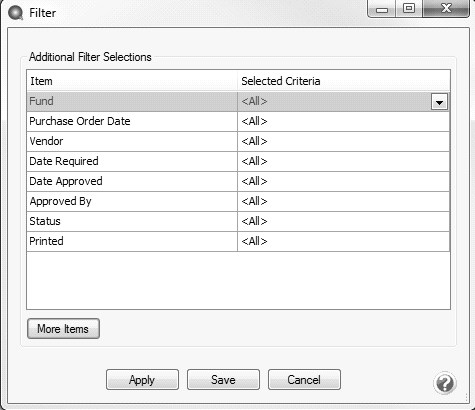
- To further filter the list of purchase orders that need to be approved, click the Filter button, select a filter selection, and then click OK.
- To review or edit a purchase order, double-click on the detail line in the grid or select the line and click the Edit button.
- To approve one or more purchase orders, click the Select check box. To approve all purchase orders, click the Select All button.
- Click Approve. The detail for encumbrance amounts are the purchase order line items. The purchase order increases (debits) an encumbrance. The General Journal entry created for encumbered purchase orders when the purchase order is approved will credit the Reserve for Encumbrances account and Debit the Fund Balance for the amount of the sum of the line items on the purchase order.
- Click Close.
Print or Email Purchase Orders
Step 1: One Time Setup: Email Preferences
- Select File > Preferences > Email Setup > Email Seutp.
- Select the Database tab at the top.
- Enter your “To/From” Email Address. This is the e-mail address used only for testing the SMTP settings. The Sent From address for purchase orders (when you e-mail a group of purchase orders) is set in Setup > General > Email Addresses, see Step 4 for more information.

- Once the To/From Email Address is entered, the system will try to auto fill the Server and Port. If it's unable to fill the info, you'll have to get the information from your network administrator. They can also let you know what you should select in the Require Login and Require secure connection (SSL\TLS) field.
- Click Test. An e-mail will be sent indicating the SMTP options have been set correctly. Verify that you received the CenterPoint: Testing SMTP Configuration email. See the Email Setup topic for additional information.
- Once the e-mail is received, select Save in the Preferences screen.
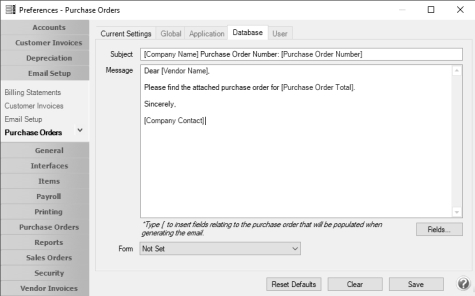
Step 2: Define a Default Subject and Message for E-mailed Purchase Orders (Optional Setup)
If you'd like to use the same e-mail Subject, Message, and Form each time you email a purchase order, it can be added to this preference. This preference also allows you to add Form Fields from the purchase order transaction data to the default Subject line or Message text.
- Select File > Preferences > Email > Purchase Orders.
- Select the Database tab at the top.
- Enter a default Subject and Message.
- If you want to insert Form Fields into the Subject or Message of the email, click the Fields button or type [ at the location the form field should be inserted. The available Form Fields for purchase orders are:
Company
Address 1Company
Address 2Company City, State, Zip Company Contact Company Email Company
FaxCompany
NameCompany
PhoneCompany Web Address Custom 1-8 Date
RequiredMemo 1 Memo 2 Payment Terms Payment Terms
AbbreviationPurchase Order Date Purchase
Order NumberPurchase Order Total Shipping Method Shipping Method
AbbreviationVendor Abbreviation Vendor Name
For example, you can customize the default Subject and Message for emailed purchase orders to include data fields from the purchase order data along with default text:
- In the Subject box, click Fields or type [,and then select Company Name.
- In the Subject box, type Purchase Order Number:, click Fields or type [,and then select Purchase Order Number.
- In the Message box, type Dear, click Fields or type [, select Vendor Name, and then type a comma.E.
- In the Message box, type Please find the attached purchase order for, click Fields or type [, and then select Purchase Order Total.
- In the Message box, type Sincerely,.
- In the Message box, click Fields or type [, select Customer Contact.
Note: To create paragraphs, press your Ctrl and Enter keys at the same time.
- Select a default Form for emailing sales orders. This form will be used to format the PDF file that will be attached to the email.
- Click Save.

Step 3: Purchase Order E-mail/Print Defaults
Prior to e-mailing a purchase order to a vendor, the vendor file must include an e-mail address and e-mail form options on the Email/Print tab.
If your vendors don't currently have e-mail addresses on the Email/Print tab in their record , use the following step to update their records individually.
- Select Setup > Names > Names or Setup > Vendors.
- Find the appropriate vendor and click Edit.
- Click the Email/Print tab.
- Click on the Email/Print tab. The Email Addresses and Options fields that are active will depend on the modules that you have purchased and registered and if the name is a vendor or a customer. Use these options to set up multiple e-mail addresses where invoices, statements, sales orders, and purchase orders can be sent for this vendor. You can also select how each e-mail is to be sent, No Email, Send "To..." (directly to the recipient), Send "CC..." (as a carbon copy), or Send "BCC..." (as a blind carbon copy, for example, the person sending the email may want to enter their own e-mail address so they have an audit trail of emails sent ). The Email Addresses and Options settings will be used to set the default image on the Email button on the Customer Invoices (Basic), Customer Invoices (Detail), Receipts, Sales Orders and Purchase Orders entry screens. An envelope image with a check mark on it will mean the form will be emailed and an Envelope image with a cross-through on it will mean the form will not be emailed.
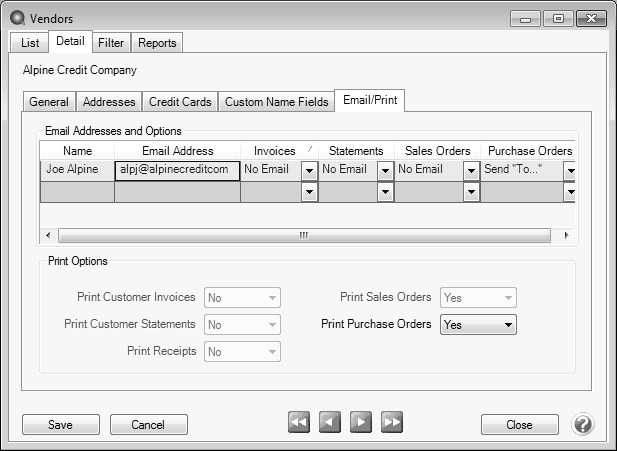
The Print Options fields that are active will depend on the modules that you have purchased and registered and if the name is a vendor a customer. The available fields are: Print Customer Invoices, Print Customer Statements, Print Receipts, Print SalesOrders, and Print Purchase Orders. Use these options to determine if invoices, statements, sales orders, and purchase orders should be printed for this customer. The Print Options settings will be used to set the default image on the Print button on the Customer Invoices (Basic), Customer Invoices (Detail), Receipts, Sales Orders and Purchase Orders entry screens. A printer image with a check mark on it will mean the form will Print and a Printer image with a cross-through on it will mean the form will not print.
- Click Save.
Step 4 - Sent From and Optional E-mail Addresses
You can optionally add e-mail addresses where messages and attached documents can be sent to; for example: internal staff, outside accountants, or other addresses that are not related to the vendor the transaction is entered for. You can also select how each e-mail is to be sent, directly to the recipient, as a carbon copy, or as a blind carbon copy or set a default "From" email address for each document type (invoice or print checks/invoices).
- Select Setup > General > Email Addresses.
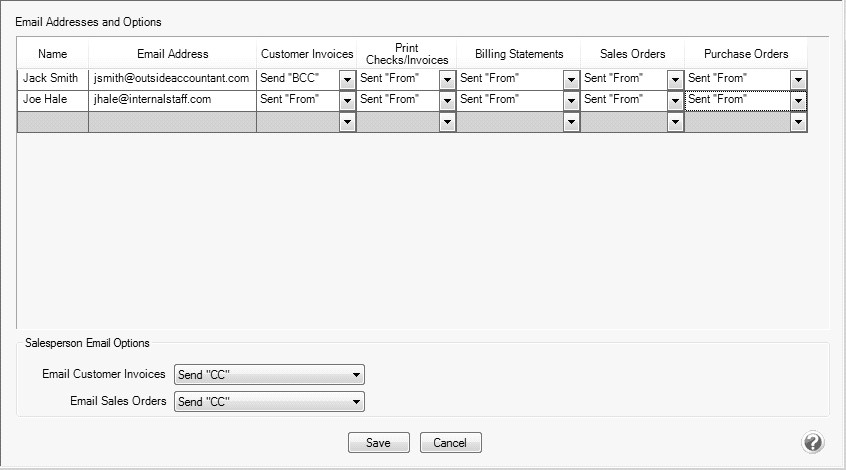
- Enter the Name, the Email Address, and select how Purchase Orders should be sent, No Email, Send "From..." (the default e-mail address the purchase order is sent from), Send "CC..." (as a carbon copy), or Send "BCC..." (blind carbon copy).
- Click Save.
Step 5: Print or Email Purchase Orders
- Select Processes > Expenditures > Print/Email Purchase Orders.
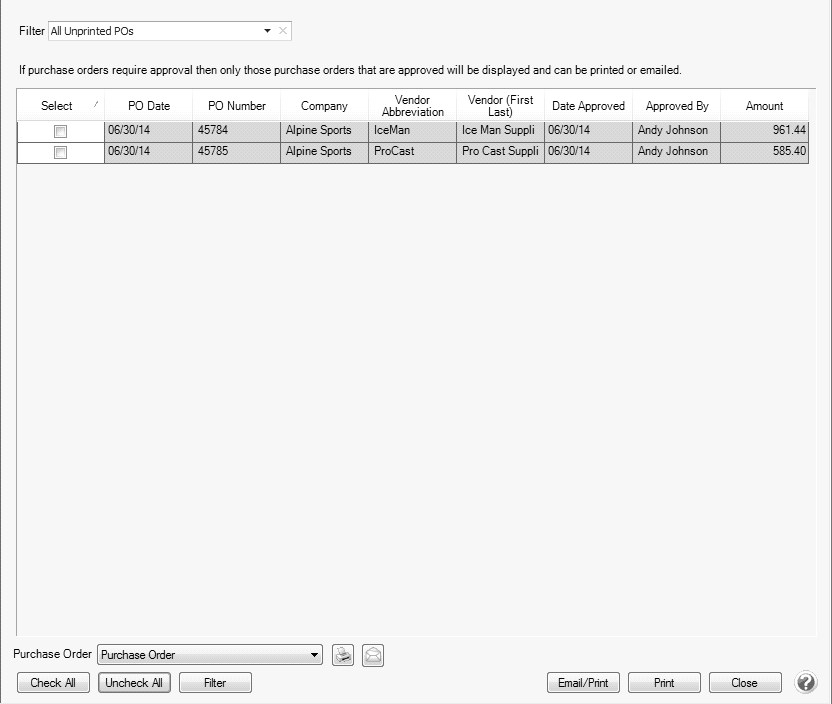
- All unprinted, approved purchase orders will display. If you would like to filter the list of purchase orders that display, click the Filter button, select your filter criteria, and either Apply the filter to the list (you will see Custom in the Filter box) or Save the filter so you can select the named filter in the Filter box.
- To select all purchase orders for printing, click Check All or select each purchase order you want to print. To unselect all purchase orders from the printing selection, click Uncheck All.
- Select the Purchase Order form type.
- Click the Printer icon to select the printer and the number of copies to print.
- Click the Envelope icon to change the defaults set in File > Preferences > Email Setup > Purchase Orders for the Subject, Message, and Form.
- Click Email/Printto email and/or print all selected purchase orders or click Print to print all selected purchase orders. Purchase orders will be printed and/or emailed based on the selections made for the vendor in Setup > Names or Setup > Vendors.
- Verify or change your Email Settings.
- Click OK.
- You will receive a Process Completed Successfully message when the invoice is e-mailed.
- Click Close.
Receive Purchase Orders
- Select Processes >
- Select the Purchase Order you want to receive. Only open purchase orders that are not on hold and have been approved are available for receipt.
- Once the PO is selected, the PO Number, PO Date, Vendor, andPO Total will be displayed.
- In the right corner, review the Receiving Information. This information will be used to create the vendor a/p invoice in CenterPoint. Unless you've already received an invoice from the Vendor, we recommend you leave the default values. Once the invoice is received from the vendor you will be able to correct the information by editing the a/p vendor invoice transaction. The Receipt/Invoice date entered cannot be before the purchase order date and if the File > Preferences > Purchase Orders > Require Approval preference is set and the purchase order was approved, the Receipt/Invoice date entered cannot be before the Approval date.
- Select the Place on Hold check box if you want to wait to create a vendor a/p invoice until the invoice is received.
- If you are using quantities, enter the Quantity Received. If an item was not received, leave the field at 0.0. Note: If all items were received for this purchase order, select Fill All at the bottom of the screen instead of entering the quantities manually.
- If the cost differs from the received cost, you can change it in the Amount field. This value should be the amount for the quantity received. The Unit Cost field will automatically recalculate based on the Amounts and Quantity Received.
- Repeat step 7 for each item received on this purchase order. Once all items that were received have been entered, click Post.
- Repeat step 6 for each item received on this purchase order. Once all items that were received have been documented, click Post.
- The posting process will create a vendor a/p invoice..
Frequently Asked Questions
Q: If there are items on the purchase order that will never be received or are partially received and will never be completely received how can the purchase order or purchase order line item be closed?
A: Follow the procedures below for closing line items on a purchase order or closing the entire purchase order:
- If you partially receive a line item on a purchase order and you will never receive the remaining portion of the quantity ordered for the line item, click the Purchase Complete check box on the line item and click Post to complete the receipt for this line item. If you receive other line items on the same purchase order, the line that was marked as Purchase Complete will not be editable.
- If you partially receive a line item on a purchase order with multiple line items and you will never receive the remaining portion of the quantity ordered for the line item, click the Purchase Complete check box on the partially received line item, click Post, and then click Close. From the List tab, select the purchase order, right-click, and select Close Purchase Orders.
- If you want to close a purchase order because you will never receive the line items or remaining portion of line items for a partially received purchase order, click the Purchase Complete button to automatically select the Purchase Complete check box on any line items where the check box isn't selected, click Post, and the purchase order will be closed.
Updating the Invoice Transaction Once the Vendor A/P Invoice is Received
Once the invoice is received from the vendor, it should be verified against the transaction created by the Receive Purchase Order process.
Edit an Invoice
- Edit the invoice created during the Receive Purchase Order process. Please refer to the Edit or Delete a Transaction topic for step-by-step instructions. In this example, we are going to edit the invoice by drilling down to the transaction from the Vendor Aging report.
- Select Reports > Reports > Transaction Reports > Purchases & Accounts Payable > Vendor Aging report.
- Click Preview.
- Click on the invoice that corresponds to the invoice received from the vendor. The transaction will then be displayed in the Vendor Invoices (A/P) screen. Note: If you click on the transaction in the report and the Vendor Invoice (A/P) screen doesn't display, click on View and select Interactive. Then click on the transaction again.
- Take the check mark out of the On Hold check box now that the vendors invoice has been received.
- Change the Reference #, Date, and Terms fields to correspond to the information received on the invoice from the vendor.
Note: If you select the Copy Reference # to Invoice / Ref # option from the Options button, CenterPoint will copy the Vendor Invoice / Ref # entered on the Receive Purchase Orders screen to the Invoice / Ref # on each row of the AP Invoice created When this option is set on the Receive Purchase Order screen, it is also set on the Vendor Invoices (A/P) screen and vice versa.
- Verify that the Quantity and Amounts match the printed invoice from the vendor.
- Specify Freight and Sales Tax amounts, if any.
- Click Save to update the transaction. The transaction will now be available to select for payment.
If an AP invoice transaction is deleted that was created from a purchase order that was closed or canceled, the purchase order will be reopened. It can be closed or canceled by selecting Processes >
If a row on an AP invoice transaction is deleted that was created from a purchase order that was closed or canceled, the purchase order will be reopened. It can be closed or canceled by selecting Processes >
Delete an Invoice
- If an AP invoice transaction is deleted that was created from a purchase order that was closed or canceled, the purchase order will be reopened. It can be closed or canceled by selecting Processes > Purchases > Purchase Order Maintenance, right-click on the purchase order, and select either Cancel Order or Close Purchase Orders. A message will display when you delete the transaction, click OK to continue the deletion.
- If a row on an AP invoice transaction is deleted that was created from a purchase order that was closed or canceled, the purchase order will be reopened. It can be closed or canceled by selecting Processes > Purchases > Purchase Order Maintenance, right-click on the purchase order, and select either Cancel Order or Close Purchase Orders. A message will display when you delete the transaction, click OK to continue the deletion.
Editing an Encumbered Purchase Order
- An encumbered purchase order cannot be edited when any receipts have been entered; the purchase order can only be viewed.
- If a purchase order is edited and saved before you've received lines on the purchase order, the original encumbrances journal entry is deleted.
- If a purchase order is deleted the encumbrances journal entry is also deleted.
- If a purchase order is edited, and you chose to save the edited purchase order, the Date approved is removed and it will require approval again.
Encumbrance Adjustments
This screen allows you to reduce individual purchase order line amounts and corresponding encumbrance journal entry amounts on purchase orders after a purchase order has been partially received but is still open for receiving additional amounts or to increase purchase order amounts and encumbrances.
- Select Processes > Encumbrances > Adjust Encumbrances.
- Select the Purchase Order you want to adjust. Only open approved purchase orders that were marked to Create Encumbrances during purchase order entry display in the look up.
- The Date Approved and Fund display from the selected purchase order.
- Enter the Adjustment Date. The Adjustment Date must be greater than or equal to the Date Approved.
- Enter or select the Adjustment Number.
- The Vendor number displays from the purchase order selected.
- The grid displays purchase order rows that are not completely received where the Create Encumbrances check box was selected during purchase order entry. All columns are display only except for the Adjust Quantity, Adjust Amount, and Purchase Complete columns.
- Enter the Adjust Quantity or Adjust Amount.Enter negatives to reduce and enter positives to increase. If the Adjust Quantity is entered, it is multiplied by the Unit Cost and the Adjust Amount will be displayed automatically but can be changed.
Note :Selecting the Purchase Complete check box calculates the remaining unreceived amount and quantity and displays the adjustment values and the Adjust Quantity and Adjust Amount boxes will not be active. This box can be unselected.
- Click Post. A journal entry will be made for all lines with adjustments that debits the Reserve for Encumbrances account and credits the Offset to Reserve account.
Close Encumbrance Periods
Use the following procedure to reverse (close) all encumbered purchase order amounts and corresponding encumbrance journal entries. When the encumbered purchase orders are closed, the Reserve For Encumbrance account is debited and the Fund Balance account is credited.- Select Processes > Encumbrances > Encumbrances - Close Period.
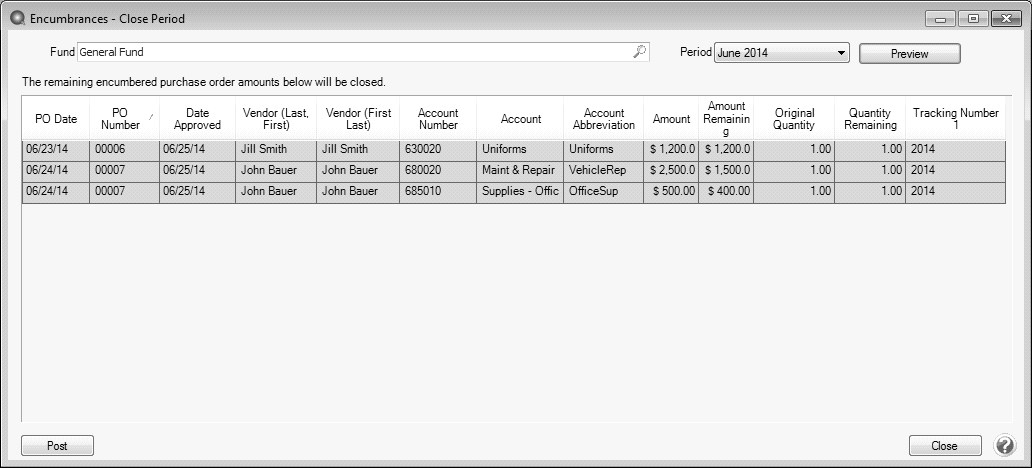
- Select the required Fund the period should be closed for.
- Select the Period you want to close. The Period box lists all database periods in reverse order.
- Click Preview.
- Click Post.
- Click Close.
Reopen Closed Period Encumbrances
Use the following procedure to open previously closed unreceived amounts from prior periods in new periods.
- Select Processes > Encumbrances > Open Previously Closed Encumbrances.
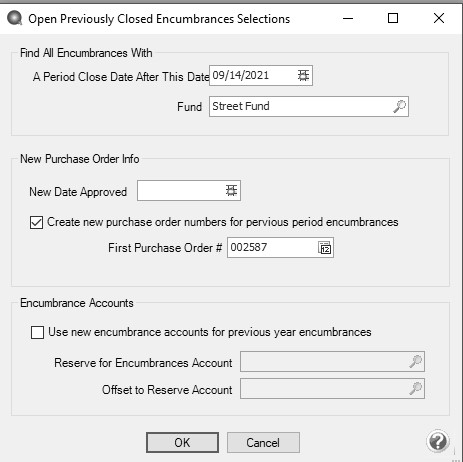
- The date of the last closed period will display in the Find All Encumbrances With a Period Close Date After This Date box. This date can be changed.
- The Fund that was last closed will display. The Fund can be changed.
- Enter or select a New Date Approved.
- If you want the previous period encumbrances to be renumbered when they are opened, select the Create new purchase order numbers for previous period encumbrances and enter the First Purchase Order # to start renumbering at.
- If you want to Use new Encumbrance accounts for previous year encumbrances, select the check box and enter a new Reserve for Encumbrances Account and Offset to Reserve Account (the default will display from File > Preferences).
- Click OK.
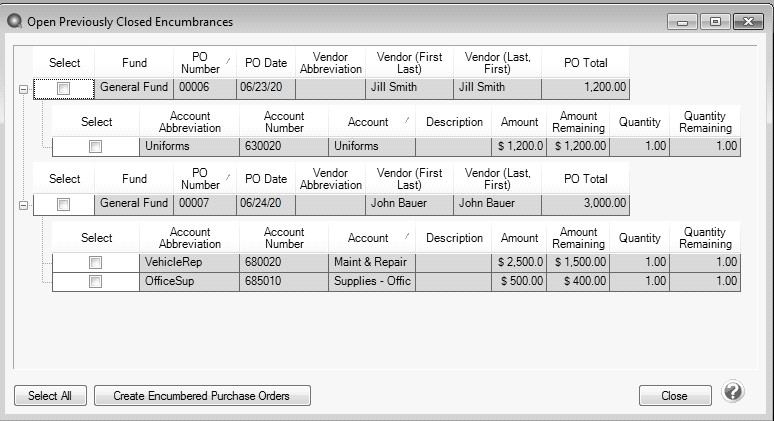
- The Open Previously Closed Encumbrances screen will display with previously closed unreceived encumbered purchase orders based on the selections made on the previous screen.
- Click the Select check box for the purchase orders you want to open or click Select All to open all purchase orders.
- Click the Create Encumbered Purchase Orders button. A journal entry will be made to debit the Offset to Reserve account and credit the Reserve for Encumbrances account specified on the previous screen.
- Click Close.
Document: 3243 |
|---|