CenterPoint Fund Accounting
- QuickBooks Data Transfer
Related Help

QuickBooks master data can be imported into CenterPoint by following this procedure. The master file data that can be imported includes Accounts, Fixed Asset Items, Classes (CenterPoint profit centers), Vendors, Customers, Other Names (CenterPoint vendors and customers), Payroll Earnings, Payroll Deductions, Employers, Employees, and Initial Balances (CenterPoint beginning balances).
Step 1: Installing the QuickBooks Data Transfer
- Close all other programs prior to starting the installation of CenterPoint.
Note: If you already have CenterPoint installed, but did not choose to install the QuickBooks data transfer (migration), you will need to run the installation again before the QuickBooks data transfer (migration) will be available. Insert the CD into your CD drive or double-click the download installation package. When prompted, select Modify Available Options and continue with step 8.
- Insert the CenterPoint CD into your CD drive or double-click the downloaded install package CenterPointAgSetup.exe, CenterPointSetup.exe, CenterPointFundSetup.exe, or CenterPointPayrollSetup.exe file.
- Wait while the contents of the setup package are verified.
- If you receive an Application Requirements screen, click Next to install the necessary requirements. Wait while the requirements are installed.If you are prompted to restart your computer, click OK. The computer will restart and the installation will automatically resume. This process may repeat depending on the number of requirements you need to install.
- On the Welcome screen, click Next to continue.
- On the License Agreement screen, select the I accept the terms of the license agreement check box, and then click Next to continue.
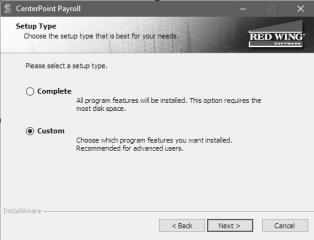
- On the Setup Type screen, select Custom, and then click Next to continue.
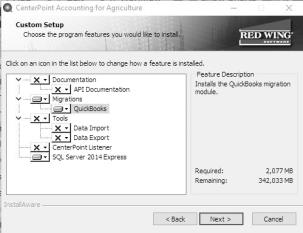
- Select the down-arrow under Migrations and next to QuickBooks, select Entire feature will be installed on local hard drive, and then click Next until the installation begins.
- Open CenterPoint.
- If the Module Configuration Manager does not display automatically, select File > Administration > Module Configuration Manager.
- Verify that QuickBooks Migration is selected and then click OK.
Step 2: Transferring QuickBooks Information to CenterPoint
- Select File > New > Data Transfers > QuickBooks.
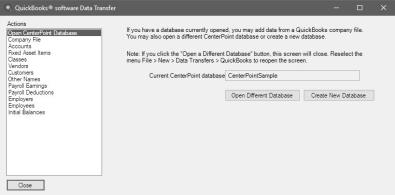
- If you have a CenterPoint database open, you can add data from a QuickBooks company file.
- If QuickBooks data should be added to a different database, click Open Different Database, select a different database from the Open Database screen, and then click Open. Reselect File > New > Data Transfer > QuickBooks to open the QuickBooks software Data Transfer screen again.
- If QuickBooks data should be added to a new database, click Create New Database.
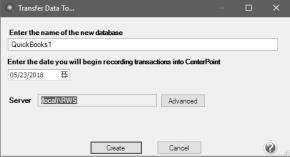
- Enter the name of the new database. The database name identifies the entire database; it will be your database file name. For example, Red Wing Accounting (do not enter a file extension in the database name; an extension of .mdf is automatically appended to the file name). The name can be up to 30 alpha-numeric characters. The database name must be at least five characters. The database name is used in the Open, Close, and Backup database menu selections.
- Enter the date you will begin recording transactions into CenterPoint.
- Click Create. At the database created successfully message, click OK.
- On the Open Database screen, select the new database and then click Open.
- If prompted, click OK to configure modules and then click OK at the Configuration completed successfully message.
-
From the left side of the screen, select Company File. CenterPoint allows multiple companies within a single database. Import a QuickBooks company and all associated files, and then repeat steps 2 - 11 for any additional companies. If you are migrating a Standalone Payroll database, the company cannot be changed since payroll integration works with a single QuickBooks company file. If a different company is selected, the integration will not work correctly. The company can be changed only if you are changing the location of the existing company file.
Note: The first time the CenterPoint company is opened, the same QuickBooks company file must also be open. To access and read the data within the QuickBooks company file, the CenterPoint Integration must first be authorized.
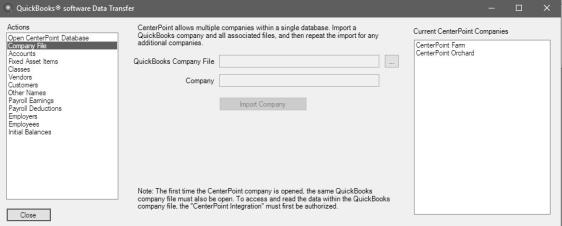
- Click
 and select the QuickBooks Company File you want to import into CenterPoint.
- In QuickBooks, a QuickBooks - Application Certificate screen will display.
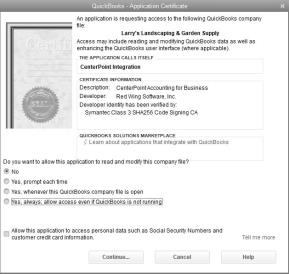
- Select Yes, always; allow access even if QuickBooks is not running.
- At the Are you sure you want to give this app access to your data even when QuickBooks isn't running? message, click Yes.
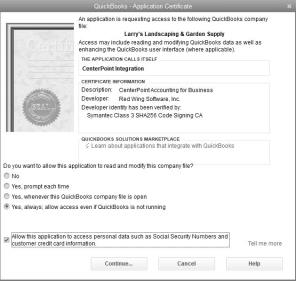
- Select the Allow this application to access personal data such as Social Security Numbers and customer credit card information check box.
- Click Continue.
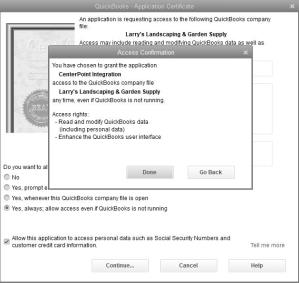
- Click Done.
- In CenterPoint, click Import Company.
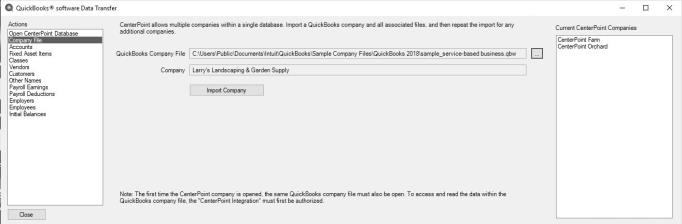
- The QuickBooks company will display under the Current CenterPoint Companies on the right side of the screen.
- On the left side of the screen, under Actions, select Accounts.
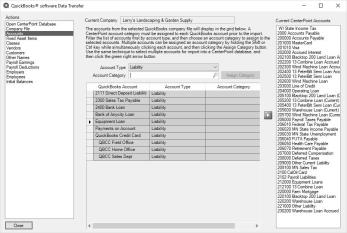
- In the Account Type filter, select an account type, for example Assets, Liabilities, Revenue, etc. When an account type is selected, the list of account categories will also be filtered.
- Each QuickBooks account that you wish to transfer to CenterPoint must first be assigned an account category. Select the QuickBooks accounts that you wish to assign an account category to. Selected accounts will display in blue. Multiple accounts can be selected by holding the Shift and Ctrl key while simultaneously clicking each account.
- In the Account Category box, select the account category that the account(s) should be assigned to.
- Click Assign Category.
- Click the green right arrow to transfer the accounts. The accounts will display under the Current CenterPoint Accounts list.
- Repeat the process of assigning an account category to all accounts you want to transfer from QuickBooks to CenterPoint. The selection of accounts, assigning account categories, and transferring to CenterPoint can be repeated as many times as needed.
- On the left side of the screen, under Actions, select Fixed Asset Items.
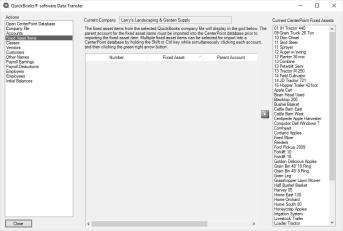
- Select the QuickBooks fixed asset items that you wish to transfer from QuickBooks to CenterPoint. Selected fixed asset items will display in blue. Multiple fixed asset items can be selected by holding the Shift and Ctrl key while simultaneously clicking each fixed asset item.
- Click the green right arrow to transfer the fixed asset items. The fixed asset items will display under the Current CenterPoint Fixed Assets list.
- On the left side of the screen, under Actions, select Classes.
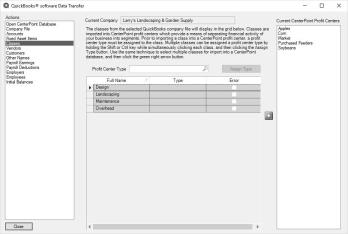
- QuickBooks classes transfer to CenterPoint profit centers.
- Each QuickBooks class that you wish to transfer to CenterPoint must first be assigned a profit center type. Select the QuickBooks class that you wish to assign a profit center type to. Selected classes will display in blue. Multiple classes can be selected by holding the Shift and Ctrl key while simultaneously clicking each class.
- In the Profit Center Type box, select the profit center type that the class should be assigned to.
- Click Assign Type.
- Repeat the process of assigning a profit center type to all classes you want to transfer from QuickBooks to CenterPoint.
- Select the QuickBooks classes that you wish to transfer from QuickBooks to CenterPoint. Selected classes will display in blue. Multiple classes can be selected by holding the Shift and Ctrl key while simultaneously clicking each class.
- Click the green right arrow to transfer the classes. The class will display under the Current CenterPoint Profit Centers list.
- On the left side of the screen, under Actions, select Vendors.
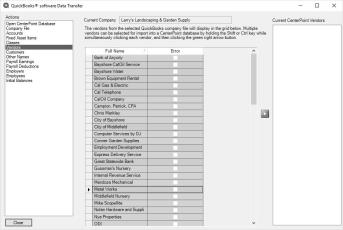
- Select the QuickBooks vendors that you wish to transfer from QuickBooks to CenterPoint. Selected vendors will display in blue. Multiple vendors can be selected by holding the Shift and Ctrl key while simultaneously clicking each vendor.
- Click the green right arrow to transfer the vendors. The vendors will display under the Current CenterPoint Vendors list.
- On the left side of the screen, under Actions, select Customers.
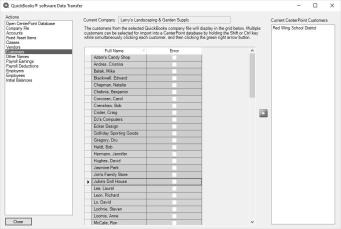
- Select the QuickBooks customers that you wish to transfer from QuickBooks to CenterPoint. Selected customers will display in blue. Multiple customers can be selected by holding the Shift and Ctrl key while simultaneously clicking each customer.
- Click the green right arrow to transfer the customers. The customers will display under the Current CenterPoint Customers list.
- On the left side of the screen, under Actions, select Other Names.
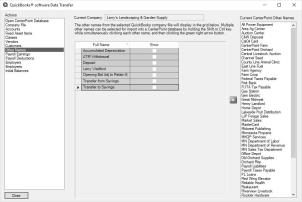
- QuickBooks other names transfer to CenterPoint vendors and customers.
- Select the QuickBooks other names that you wish to transfer from QuickBooks to CenterPoint. Selected other names will display in blue. Multiple other names can be selected by holding the Shift and Ctrl key while simultaneously clicking each other name.
- Click the green right arrow to transfer the other names. The other names will display under the Current CenterPoint Other Names list.
Note: If you do not use QuickBooks Payroll, skip steps 7-10 and then continue with step 12.
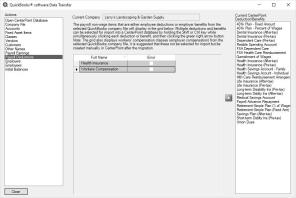
- On the left side of the screen, under Actions, select Payroll Earnings.
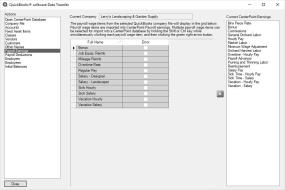
- Select the QuickBooks payroll earnings that you wish to transfer from QuickBooks to CenterPoint. Selected payroll earnings will display in blue. Multiple payroll earnings can be selected by holding the Shift and Ctrl key while simultaneously clicking each payroll earnings.
- Click the green right arrow to transfer the payroll earnings. The payroll earnings will display under the Current CenterPoint Earnings list.
Note: When QuickBooks payroll earnings are transferred to CenterPoint earnings, they are automatically assigned a unique Abbreviation in CenterPoint. The abbreviations can be reviewed and changed in Setup > Payroll Details > Earnings. CenterPoint pay stubs also include the earnings abbreviation that can be reviewed/changed in Setup > Payroll Details > Pay Stub Translations for the Pay Stub Item of Earnings in the Translation Abbreviation column for the selected language.
- On the left side of the screen, under Actions, select Payroll Deductions.
- Select the QuickBooks payroll deductions that you wish to transfer from QuickBooks to CenterPoint. Selected payroll deductions will display in blue. Multiple payroll deductions can be selected by holding the Shift and Ctrl key while simultaneously clicking each payroll deduction.
- Click the green right arrow to transfer the payroll deduction. The payroll deductions will display under the Current CenterPoint Deductions/Benefits list.
Note: When QuickBooks payroll deductions are transferred to CenterPoint deductions, they are automatically assigned a unique Abbreviation in CenterPoint. The abbreviations can be reviewed and changed in Setup > Payroll Details > Deductions & Benefits. CenterPoint pay stubs also include the deduction abbreviation that can be reviewed/changed in Setup > Payroll Details > Pay Stub Translations for the Pay Stub Item of Deducitons & Benefits in the Translation Abbreviation column for the selected language.
- On the left side of the screen, under Actions, select Employees.
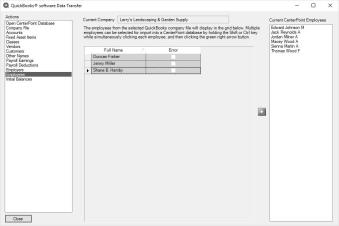
- Select the QuickBooks employees that you wish to transfer from QuickBooks to CenterPoint. Selected employees will display in blue. Multiple employees can be selected by holding the Shift and Ctrl key while simultaneously clicking each employee.
- Click the green right arrow to transfer the employees. The employees will display under the Current CenterPoint Employees list.
Note: When QuickBooks employees are transferred to CenterPoint employees, they are automatically assigned a unique Abbreviation in CenterPoint. The abbreviations can be reviewed and changed in Setup > Employees.
- On the left side of the screen, under Actions, select Employers.
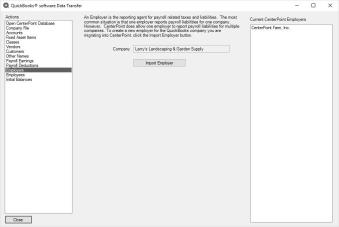
- Select the QuickBooks employers that you wish to transfer from QuickBooks to CenterPoint. Selected employers will display in blue. Multiple employers can be selected by holding the Shift and Ctrl key while simultaneously clicking each employer.
- Click the green right arrow to transfer the employers. The employers will display under the Current CenterPoint Employers list.
- On the left side of the screen, under Actions, select Initial Balances.
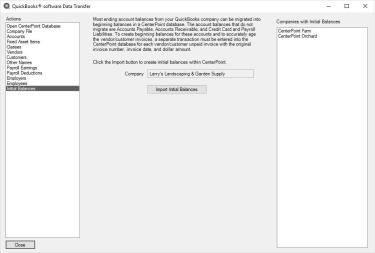
- Click Import Initial Balances.
- Click Close.
|
Document: 3338 |
|---|