CenterPoint® Fund Accounting
- Loan Setup & Processing
Related Help

Loans are normally defined as a long term liabilities as they will take more than a year to pay back. By properly using the system, you can always know the current principal owed on a loan, annual interest expenses for the loan, etc.
Step A - Create a Loan Payable Account
Step A - Create a Loan Payable Account
A liability account should be created for each outstanding loan. The balance of the Loan Payable account will normally agree with the principal balance on your lenders records.
- Select Setup > Accounts > Accounts.
- Click on the New button.
- If using Abbreviations and/or account Numbers, specify for this account.
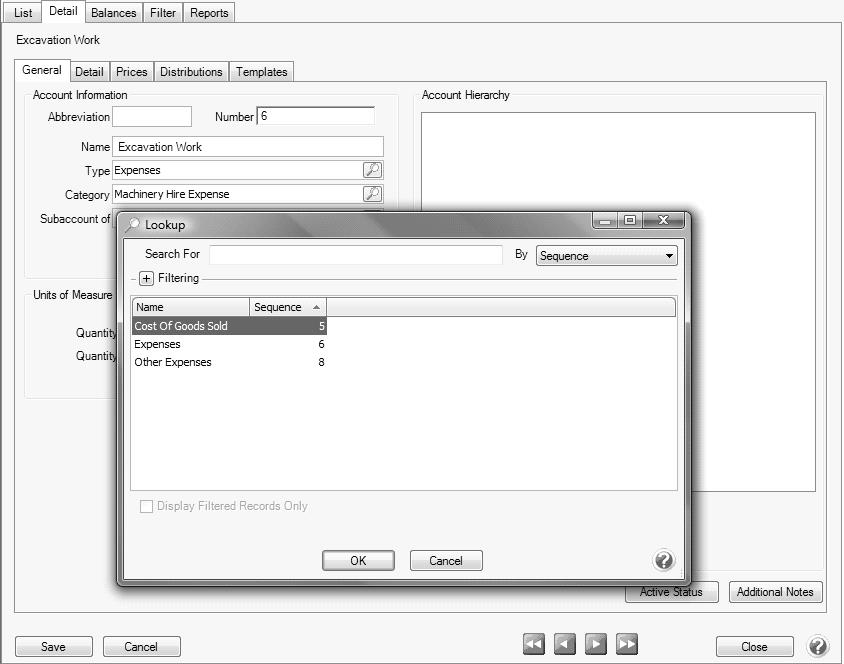
- In the Name box, enter up to 30 characters of required information that describes the account.
- Select Liabilities in the Type field and Long Term Debt in the Category field.
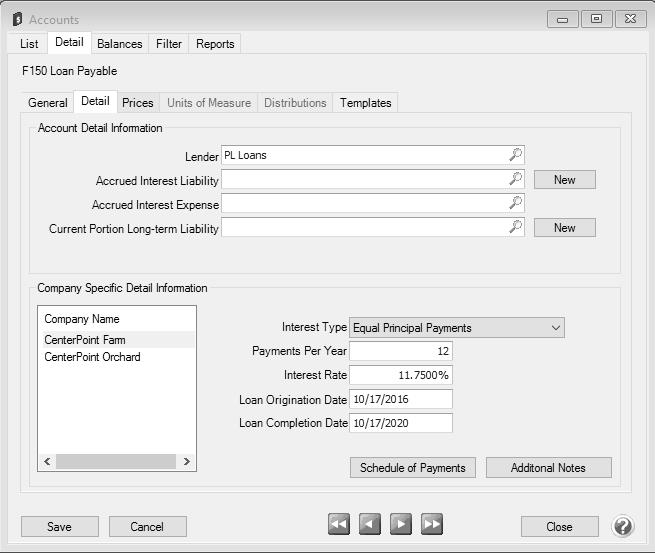
- Select the Detail tab
- Specify the Lender that issued the loan.
- In the lower right portion of the screen, specify the appropriate Interest Type. Refer to your accountant or banker if you are unsure which Interest Type to select.
- Specify the number of payments that are required each year in the Payments Per Year field and the Interest Rate.
- Specify the Loan Origination and Loan Completion Dates.
- Click Save.
Step B - Recording the Receipt of a Loan
Purchase with a Loan & Down Payment
If a loan is attained for a specific purchase, the payment transaction can record the purchase and the loan. In this example, an F150 truck was purchased for $45,000. It was paid for with a $3000 cash down payment and a $42,000 loan.
- Select Processes > Purchases > Payments.
- Enter a normal payment transaction (for step-by-step instructions, refer to the Enter a Payment topic.).
- In the Amount field, specify the amount of the down payment.
- In the first line of the grid, specify the asset that was purchased in the Account field.
- Enter the purchase price in the Amount field.
- The difference between the down payment and the purchase price will be displayed as a negative in the 2nd line of the grid. Select the Loan Account created for this loan.
- Click the Print button. (An image of a printer displays on the button. A green check mark means the payment will be printed and a red X means the payment will not be printed.) The selections set in File > Preferences > Vendor Invoices > Printing Checks will display and can be changed. Select whether the check should be printed when the transaction is saved (for real-time transactions) or a batch is posted (for batch transactions). To set your default for the Print button, right-click on the button and select Set As Default. To override the Print button default, click the Print button and change the settings on the Print Settings screen.
- Click Save to complete the transaction.
Purchase with a Loan (No Down Payment)
If a loan is attained for a specific purchase, but the transaction did not involve a down payment, then a General Journal Entry will be used to record the purchase. In this example, we purchases a John Deere Tractor for $48,000. It was paid for with a $48,000 loan (no down payment). The bank charged an additional $86.00 in loan fees.
- Select Processes > General Ledger Entries.
- In the Name field, specify the lender.
- In the Date field, specify the loan origination date.
- In the first line of the grid, specify the loan Account created for this particular loan.
- Enter the total amount of the loan in the Credit field.
- In the second line of the grid, specify the asset that was purchased in the Account field.
- Enter the purchase price in the Debit field.
- If any additional fees were charged by the vendor, they will display in the 3rd line of the grid (total loan amount - purchase price). Select the appropriate account for the fees.
- Click Save to complete the transaction.
Operating Loan
The cash proceeds from a loan are deposited directly into the checking account for future purchases.
- Select Processes > Sales > Receipts.
- Enter a normal receipt transaction (for step-by-step instructions, refer to the Enter a Receipt topic.).
- In the Received From field, specify the lender.
- In the Amount field, specify the amount received from the lender.
- In the first line of the grid, specify the loan Account created for this particular loan.
- Enter the amount received from the lender in the Amount field.
- Click Save to complete the transaction. The transaction will increase the cash account balance and record the principal amount of the loan.
Step C - Making a Loan Payment (without accrued interest)
- Select Processes > Purchases > Payments.
- Enter a normal payment transaction (for step-by-step instructions, refer to the Enter a Payment topic.).
- In the Amount field, specify the entire amount of the payment.
- In the first line of the grid, specify the liability Account for this specific loan.
- Enter the amount of the principal being repaid in the Amount field. Note: if you are unsure of how much principal is being repaid with this transaction, we recommend you contact the bank or create an amortization schedule in CenterPoint (Reporting Tools > Amortization Schedule).
- The difference between the payment and the principal will be displayed in the 2nd line of the grid. Select the Interest Expense Account for this line. Hint: click on the Detail button and specify the loan in the Associated Account field, if in the future you'd like to easily see the total interest that was paid on just this loan. Click OK to close the Detail screen.
- If the Print button has a green check mark on it, a check will be printed for the down payment amount.
- Click Save on the main payment screen to complete the transaction.
|
Document: 3100 |
|---|