CenterPoint® Fund Accounting
- Remove Transaction History
Related Help

Historical transaction data can be removed from older, larger databases while maintaining open accounts receivable, accounts payable, customer deposits, prepaid vendor purchases up to and including the month and year (period) selected. It is generally recommended to maintain at least five fiscal years of comparative data in the current database. If there are multiple companies with different fiscal year end months, it is recommended to select a fiscal year end month from the company with the earliest fiscal year end. If the fiscal year end is not December, start up payroll history will be maintained from the beginning of the calendar year up to and including the selected month and year.
This process could be quite lengthy depending on the size of the database, number of years of data, and the number of companies. So, it is suggested that the process should be run when the accounting system can be down for several hours.
- Open the CenterPoint database the historical transactions will be removed from.
- Print the following reports:
- Reports > Reports > Financial Statements:
- Balance Sheet – Current Period and the Remove History Date
- Cash Balance Sheet (only if using cash tax basis reporting) – Current Period and the Remove History Date
Market Value Balance Sheet (only if maintaining market values) – Current Period and the Remove History Date
- Income Statement – Current Year and Prior Year
- Cash Income Statement (only if using cash tax basis reporting) – Current Year and Prior Year
- Statement of Cash Flows - Current Year and Prior Year
- Reports > Reports > Transaction Reports:
- Purchases & Accounts Payable > Vendor Aging
- Sales & Accounts Receivable > Customer Aging (Accounts Receivable and Customer Deposit balances) – Current Date
- Inventory (if using the Inventory / Advanced Inventory Module)
- Inventory Stock Status
- Inventory Valuation
- Reports > Reports > Financial Statements:
- Select File > Backup > Backup Database. Select the CenterPoint database the historical transactions will be removed from. and complete the backup.
-
Select Setup > Accounts > Accounts > Balances tab.
- Click the Beginning Period button.
- Right-click in the account list and select Repost From this Period Forward. If you have multiple companies in your database you will need to select each company and complete this process. Depending on the number of years and number companies in the database, this could be a fairly lengthy process.
-
Rerun the Balance Sheet and Inventory reports and compare with the reports you printed in step 2. Reconcile any differences before continuing.
- Select File > Administration > Database Utilities > Remove Transaction History.
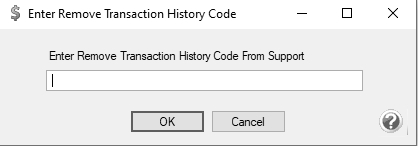
- Call the Red Wing Software Technical Support department and discuss the Remove Transaction History process. Once the Customer Support Technician ensures a back up is in place, you will be provided with a code.
- In the Enter Remove Transaction History Code From Support box, enter the code provided in Step 6.
-
Click OK.
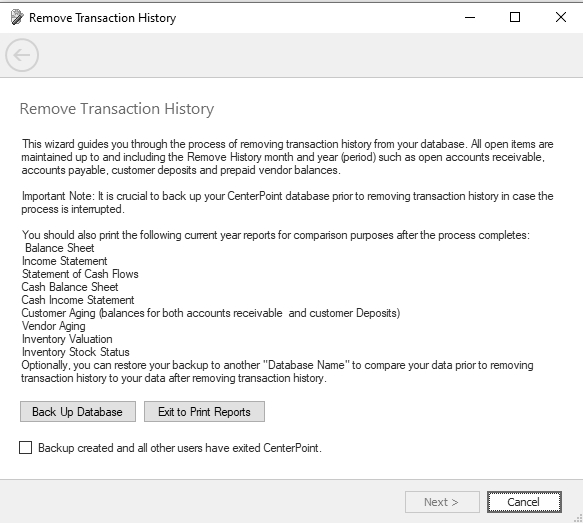
- Select the Backup created and all other users have exited CenterPoint check box and then click Next to continue.
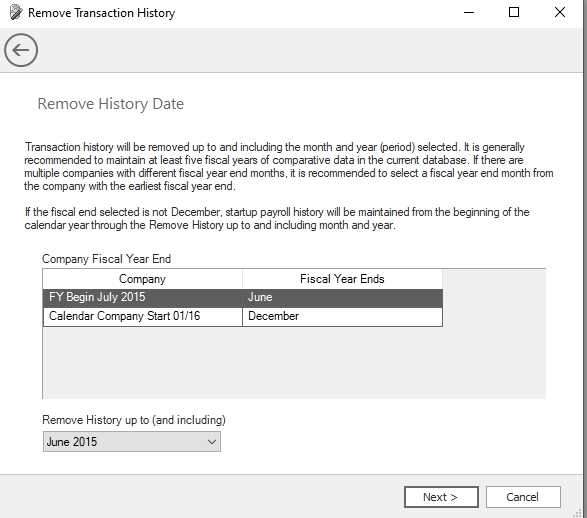
- Select the Remove History up to (and including) month and year. If there are multiple companies with different fiscal year end months, it is recommended to select a fiscal year end month from the company with the earliest fiscal year end. If the fiscal year end is not December, start up payroll history will be maintained from the beginning of the calendar year up to and including the selected month and year.
- Click Next to continue.
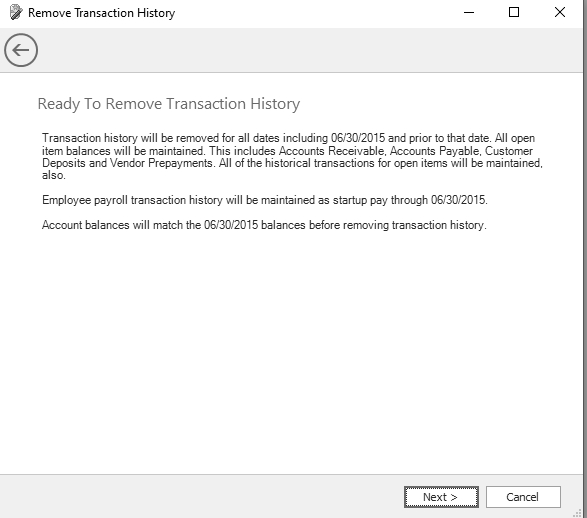
- Verify the transaction history removal dates on the Ready to Remove Transaction History screen. After the dates are verified, click Next to continue.
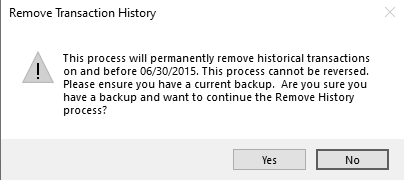
- Verify the transaction history removal date on the Remove Transaction History screen and confirm that you have a current backup. After the verification, click Yes to continue.
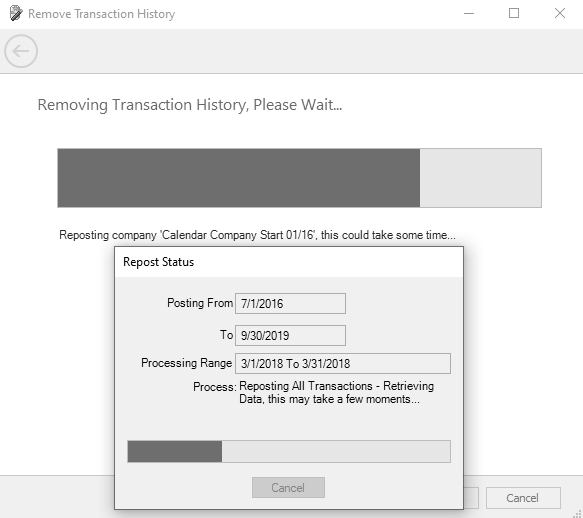
- The Removing Transaction History, Please Wait.... screen displays. The removal process make take some time based on the size of the database and the associated transaction data.
- When the process is complete, the Removing Transaction History Complete screen will display.
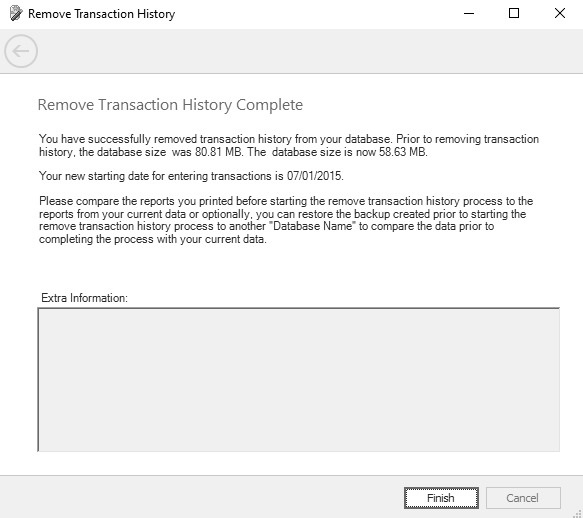
- If a bank deposit or bank reconciliation was retained, but had transaction data removed during this process, the details will display in the Extra Information section of the Remove Transaction History Complete screen. These entries will need to be reviewed by the user.
- Click Finish.
- Go back to Reports > Reports and reprint or export the reports you ran in step 2, and compare. Reconcile any differences.
|
Document: 3449 |
|---|