CenterPoint Payroll
- Time Import
| Document #: | 3054 | Product: |
CenterPoint Payroll |
|---|
Time Import is an additional payroll module that is purchased separately. It allows you to import time worked from any time entry program that can output an ASCII file.
The system reads the time entry program) ASCII input file and updates the CenterPoint Payroll time sheets. Once posted, you can list, modify, add or remove transactions from the Processes > Time Sheets screen, just as though they were entered directly into CenterPoint Payroll.
You can define a Fixed Width, Fixed Width Random Access, or Delimited file format for the definition file. On the Definition tab, you set up the mapping definitions so the records from the source file will import into CenterPoint time sheets correctly. There are some differences in the way you enter your mapping definitions depending on the file format.
Step 1: Create a Time Import Definition (One time setup)
Option 1: Create a New Time Import Definition
Option 2: Import an Existing Time Import Definition (E2 Shop Tech, Hand Trak, Time Plus users)
Step 2: Import Time from a Time Entry Program
Tabs General Definition Mapping Fixed Values
Prerequisite
You must have the Time Import module purchased and registered in the module configuration manager (File > Administration > Module Configuration Manager) prior to starting this process.
Step 1: Create a Time Import Definition (One time setup)
A Time Import Definition defines what will be imported from the time entry program and what fields should be brought into CenterPoint Payroll. You can create a definition to match the ASCII file produced by your time entry program.
Note: If hours for multiple earnings are in different columns in the Time entry program file, multiple import definitions will need to be created.
Option 1: Create a New Time Import Definition
- Select Setup > Payroll Details > Time Import Definitions. Click New.
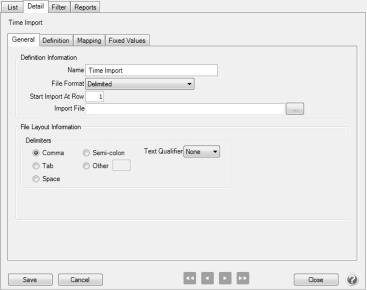
- Enter a Name for your import definition.
- Select the File Format of the file created by your time entry program (Import File).
- Fixed Width - Each record is a fixed length but the record is followed by a CR/LF pair of characters.
- Fixed Width Random Access - No CR/LF pairs at the end of each record and no field separators within each record.
- Delimited - All fields are separated with a user defined character (normally a comma) and the records are followed with a CR/LF pair of characters.
- In the Start Import At Row box, enter the record number on your import file that CenterPoint Payroll should start the import at. Typically imports start on row 1 if there is no header record or row 2 if a header record exists in the import file.
- In the Import File box, enter the default location of the import file. This is optional.
- The File Layout Information portion of the screen will differ depending on what File Format was selected.
- Fixed Width - This section is blank, there is no additional information needed.
- Fixed Width Random Access - In the record length box, enter the defined record length. Since random access files are created as one long string of characters that have no identifiers between the file records, you must define the length of each record.
- Delimited - Under Delimiters, select the delimiter character. If the delimiter character is comma, select the Text Qualifier character.
- Click the Definition tab to set the mapping definitions. The mapping definition is used to specify how fields in your Import File relate to fields in CenterPoint Payroll.
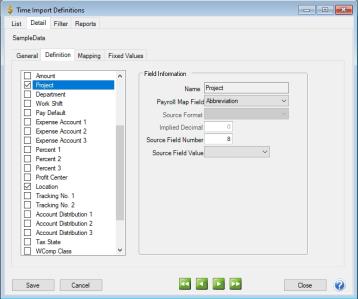
- On the left side of the screen, select the CenterPoint Payroll fields that will need to be imported from you import file. Once a field is selected on the left, the Field Information is displayed on the right side of the screen.
- Payroll Map Field - Select the property you want to map to. The options vary depending on the field selected. For Example, if the Employee code in your import file is the same as the Employee Abbreviation in CenterPoint, select Abbreviation. If the code from your entry program does not match anything in CenterPoint select Custom Mapping. If this field is not in your import file, but you want to assign the same value for every record, select Fixed Value.
- Source Format - Only available on certain fields. For example, Date will allow you to select the date format.
- Implied Decimal - Only available if Implied Decimal is selected for Source Format. Enter the number of places reserved for numbers right of the decimal in your import file.
- Source Field Number - Available for Delimited file formats. Enter the field or column number for this item in your import file. For example, if Employee is the 2nd field in your import file, enter 2.
- Source Field Value - Available for either fixed width file format. In the start box, enter the starting position for this field. In the Length box, enter the number of characters in that field.
- If Custom Mapping was selected in the Payroll Map Field for any imported items, click the Mapping tab to assign your own designation of time codes to CenterPoint Payroll items.
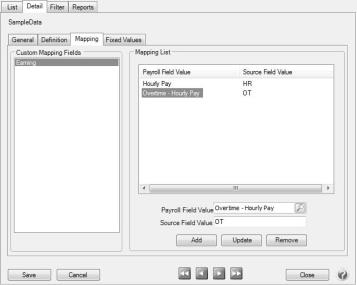
- Under Custom Mapping Fields, select the item you assigned the custom mapping property to. In this example, Earning.
- In the Payroll Field Value box, select the CenterPoint Payroll field value you want to map. In the Earning example, Payroll Field Values would be Hourly, Salary, Overtime, etc.
- Enter the Source Field Value for this field exactly as it appears in your import file. For example, if Overtime is on your import file as OT, enter OT.
- Click Add to add this mapping.
- Repeat steps 11 - 13 for each possible value for the field. For example, add all your possible earning codes.
- Repeat steps 10 - 14 for each custom mapping field.
- If Fixed Value was selected in the Payroll Map Field for any imported items, click the Fixed Values tab.
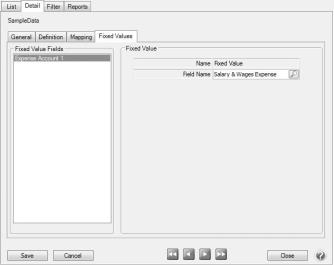
- For each Fixed Value Field, enter the Field Name that should be imported for every record.
- Click Save.
Option 2: Import an Existing Time Import Definition
CenterPoint Payroll has predefined definitions for commonly used time entry programs including E2 Shop Tech, Hand Trak and Time Plus. Instead of creating a new Time Import Definition as described in Option 1, these definitions can be imported. You can also import a definition that was exported from a different database, or if Red Wing Software Technical Support sent you a custom Time Import Definition File.
- Select Setup > Payroll Details > Time Import Definitions. Click Import Definition.
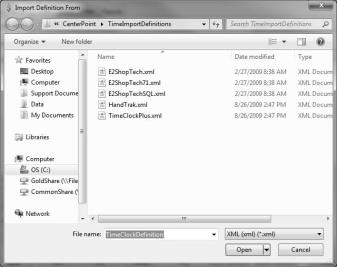
- Select the Definition you wish to import and click Open. If you are using E2 Shop Tech and your employee codes have 3-digits, select E2ShopTech. If your employee codes have 4-digits select E2ShopTech71. If you are importing a different file, select the location on your computer where that file is saved.
- Follow the on-screen instructions on the Import TimeDefinition screen. Normally changes are not needed and you can click Next or Finish.
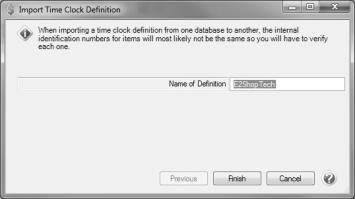
- Click OK when the Definition has imported successfully.
Step 2: Import Time from a Time Entry Program
- Export time from your time entry program. This will create your import file. Be sure to note where the file was saved to and what it was named. If you need assistance with creating the ASCII file, please contact the time entry program provider.
- Select Processes > Time Sheets. Click Time Import.
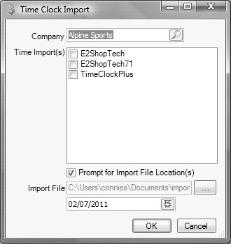
- Select the Company.
- All available Time Import Definitions display. Select the Time Import(s) that you want to process (multiple imports are processed in succession). Your selections will be recalled the next time you perform a Time Import.
- Select the Prompt for Import File Location(s) check box to be prompted for the location of the selected Time Import Definition as it is processed. If the check box is not selected, imports use the location specified in the Time Import Definition.
- If specified in your Time Import Definition, the Import File location will fill in automatically. If not, use the Lookup button to select the correct import file.
- If your Time Import Definition does not include the date worked information, a Date field will display. Enter the date you want to use on the time sheets.
- Click OK.
- Click OK when the Time Import Successful message displays. If the selected Time Import Definition fails, remaining Definitions will be processed and a summary of failed definitions display after all import processes are complete.
- You can now modify the time sheets created by the import by selecting an employee's name and clicking Edit.
- To print a report to review the time sheet entries, select Reports > Reports > Payroll Data Reports > Time Sheets.
- If necessary, you can delete the imported time so it can be re-imported.
- Select Processes > Time Sheets.
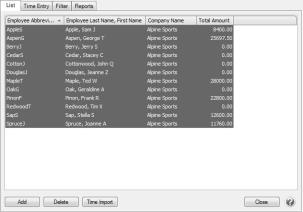
- Select the employees you wish to delete time from. Multiple employees can be selected by holding the Ctrl key on your keyboard while you click. To select all employees, highlight the first name on the list, hold the Shift key and select the last name.
- Click Delete. Time can now be imported again.