CenterPoint Accounting
- Backup and/or Restore a Network Database
| Document #: | 3018 | Product: | CenterPoint® |
|---|
Use the procedures below to backup your networked accounting and/or payroll data from a workstation. If you have payroll and accounting in the same database, the backup process will backup all data. It is important to note that when backing up from a remote SQL server, the path must be a network path and cannot be a local path.
To revert your current company data back to the data included in a CenterPoint backup, use the Restore instructions found at the end of this document.
Make backups frequently. Also, it is VERY IMPORTANT to keep a set of up-to-date backup copies off site. In case of theft, fire, flood or other major catastrophe, you’ll always have a complete record of your business finances.
If you are using CenterPoint in a single-user environment, please refer to the Backup and/or Restore a Single User Database document.
Prerequisites
Complete the following setup on your network prior to backing up CenterPoint from a workstation. For assistance on any of the prerequisite steps, please contact your Network Administrator.
- Create a shared folder where the data will be backed up to. This can be on any workstation or at the server.
- Apply full permissions to that shared folder so users on the network are able to write files to that location. See the Frequently Asked Questions section of this document for more information.
Backup a Network Database from a Workstation
- On the File menu, select Backup Database.
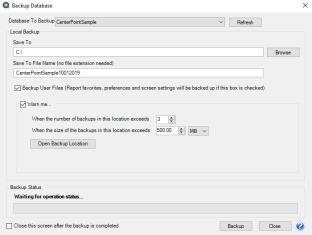
- In the Database To Backup box, select the database that you want to backup. The database that is currently open will automatically display.
- The Save To box defines where the backup will be saved to (after a successful backup the location is remembered the next time a backup is performed). If you want to save the backup file to a different location, click Browse, and then select the shared folder created in the Prerequisite step.
- In the Save To File Name box, the file name for the backup file will be "databasenameMMDDYYYY" (no file extension is needed). The database name plus the date of the backup will make it easy to identify which backup file you may need to use for a restore and it will prevent backups from being overwritten. This file name can be changed to whatever you like. If multiple backups are performed the same day, the Save To File Name will increment to ensure that it is unique and does not already exist in the Save To location.
- If you want to back up your screen settings, report favorites, and database preferences so they are available to restore if needed, leave the Back Up User Files check box selected. This option will prevent you from redefining your specific user files, favorites, and database preferences if a restore is necessary. If you always want this check box selected, right-click on the Back Up User Files check box and select Set As Default.
- If you want to be warned when the Save To backup location you are storing backups to exceeds a specified number of files or amount of space, leave the WarnMe check box selected. When the check box is selected, and then specify the conditions about when you want to be warned:
- In the When the number of backups in this location exceed box, enter a number between 0 - 99.
- In the When the size of the backups in this location exceeds box, enter a number between 0.00- 999.99 and select either MB (megabyte) or GB (gigabyte)
- Setting either value to 0 disables that specific warning. For example, setting the When the number of backups in this location exceed box to zero will not warn you about the number of backups, but you will continue to be warned about the size of the backups according to your When the size of the backups in this location exceeds setting.
- If you want to Close this screen when the backup completed, select this check box.
- Click Backup and the data will be backed up to the shared folder.
- At the Backup Completed Successfully message, click OK.
- Select File > Preferences > General.
- Select Backup.
- Under Backup, in the Backup on Exit box, select Yes.
Restore a Network Database from a Workstation
Use this procedure to restore a backup of your networked accounting and/or payroll data from a workstation. If you have payroll and accounting in the same database, the restore process will restore all data back to the point the backup was completed. This will overwrite all existing data in the selected database.
- On the File menu, select Restore Database.
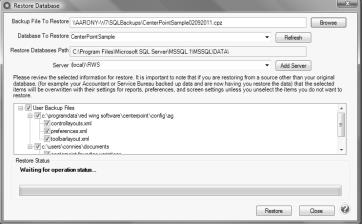
- In the Backup File To Restore box, select the backup file in the shared folder. Click Browse to locate the file you want to restore. The file name for the backup file is "databasename.cpz".
- The database name should automatically display in the Database to Restore box. This can be changed if you'd like to rename the database.
- The Restore Databases Path will also automatically display. This is the location on the server where the data will go.
- In the Server field, select the SQL server you would like the database restored to. The server name should end in \RWS.
- If you selected to restore a database that had the Back Up User Files option selected when the back up was performed, all of the user files will display. Please review the items that are included in the back up. It is important to note that if you are restoring from a source other than your original database, (for example your Accountant or Service Bureau backed up data and are now having you restore the data) that the selected items will be overwritten with their settings for reports, preferences, and screen settings unless you unselect the items you do not want to restore.
- Click Restore. At the You are trying to restore database "Databasename." If the database exists, all the current data will be overwritten with the restore database's data and cannot be retrieved. Do you want to continue? message, click Yes to continue restoring the database, or click No to cancel the restore procedure.
- At the Restore Completed Successfully message, click OK. The Restore Database screen will close automatically.
Frequently Asked Questions
Q: Can I perform a network backup without all users having full permissions to the shared backup folder?
A: Yes. To specify the users that can perform a network backup:
- The shared backup folder must be on the same machine that contains the CenterPoint data to be backed up.
- Determine which user/service is running SQL:
- Select Start > All Programs > Microsoft SQL Server (select the version that contains the data) > Configuration Tools > Microsoft SQL Server Configuration Manager.
- On the left side of the SQL Server Configuration Manager screen, select SQL Server 2005 (or 2008) Services.
- On the right side of the screen, right-click on SQL Server (RWS) (or the instance you use for the CenterPoint data), and then select Properties.
- Note which account is listed in the Built-in account box and then click Cancel.
- Close the SQL Server Configuration Manager screen.
- Select the backup folder. On the Sharing and Security tabs, set full permissions for BOTH the user/group running CenterPoint and the Built-in account you noted in Step 2-d (if the Built-in account was Network Service, give full permissions to "Network Service," if the Built-in account was Local System, give full permissions to "System").
- Once the permissions are set, only the users you gave full control to will be able to back up the data.
Q: I previously successfully backed up a CenterPoint database to my specified Save To network location, but now I am receiving a compression failed error message when backing up to the same Save To network location. What causes this error?
A: The read/write rights to the Save To backup location have changed. CenterPoint does not determine your read/write rights, that is a function of your PC network administrator. If the backup was working previously, contact your network administrator to review/change your read/write rights to the backup location.