CenterPoint® Payroll
- Add a
Related Help

This topic describes how to add a module to an existing install of CenterPoint, for example the Accounts Receivable, Inventory or Direct Deposit modules.
Prerequisite
Before a module can be added to CenterPoint, the current version of CenterPoint must be installed and the module must be purchased before it can be configured for use. See the detailed Installation Instructions by selecting Help > CenterPoint Help > Menu > Installation and Registration .
Note: These instructions cover multiple program verticals for CenterPoint, for example, CenterPoint Accounting for Agriculture and CenterPoint Accounting. The name "CenterPoint" is used to refer to any of the program verticals. When information applies to a specific program vertical for CenterPoint, the specific program vertical name will be used.
- Start CenterPoint.
- If the Module Configuration Manager screen displays, click OK. The Module Configuration Manager screen will only display if you are installing CenterPoint for the first time, or if you are installing an update that contains a new module.
- The CenterPoint product must be reregistered to recognize ownership of the additional module. Select Help > Product Registration > CenterPoint Registration to register. Note: For detailed registration instructions, refer to the Register CenterPoint help topic.
- Once the registration is complete, then you are ready to add the new module to your databases. Select File > Administration > Module Configuration Manager.
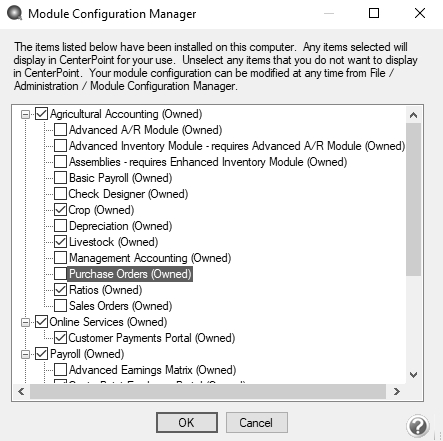
- Select the additional module(s) you purchased, and click OK.
- Close and restart CenterPoint. At this point all of the new menu items associated with that module will be displayed.
- When new modules are added to CenterPoint, you should review the columns that are available to the transaction entry screens for customization. For example, if you are adding the Inventory module, you may want to add Unit Cost, Qty Available, etc. to the A/R and A/P Invoice Entry screens. For step-by-step instructions on how to add/remove columns from data entry screens, please refer to the Customizing the Columns Displayed in Transaction Entry Grids section of the Shortcuts/Time Savers in Transaction Entry topic by selecting Help > CenterPoint Help > Menu > Customization and Navigation > Shortcuts/Time Savers in Transaction Entry.
|
Document: 3137 |
|---|