CenterPoint® Payroll
- Garnishments
Related Help
_24.jpg) Garnishment Setup and Processing Video - Duration: 12 min 15 sec
Garnishment Setup and Processing Video - Duration: 12 min 15 sec
A garnishment is a mandated deduction withheld from an employee’s wage. An example is child support. The employer withholds the garnishment from the employee’s wages. The amount withheld is paid by the employer to the appropriate agency.
A payroll liability account is assigned to the garnishment deduction. When the employee’s payroll check posts, the payroll liability account is increased by the amount of the garnishment. The employer pays the invoices when due.
The liability account assigned to the Garnishment deduction controls who the liability is paid to. If multiple employees need garnishments deducted and they are paid to different agencies, then multiple deductions and liability accounts must be setup.
Step A - Create a Deduction for the Benefit (one-time setup):
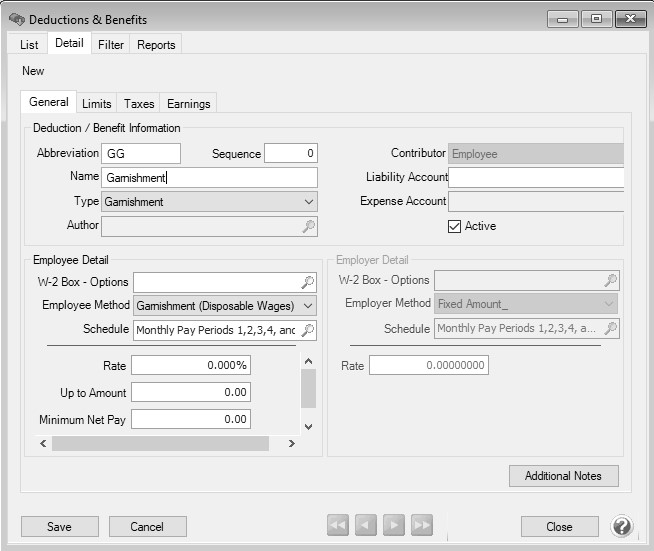
- Select Setup > Payroll Details > Deductions & Benefits.
- Click New.
- Enter an Abbreviation (up to ten unique characters of information) that you can easily identify the deduction/benefit by. For example, CS for Child Support.
- In the Name box, enter up to 35 characters of required information that describes the deduction/benefit.
- Select Garnishment in the Type box.
- In the Sequence box, enter the order the garnishment should be deducted from the check, for example Sequence 1 will be deducted before a garnishment assigned a Sequence 2.
- In the Liability Account box, select the liability account this deduction/benefit should post to. The Liability Account also controls who the garnishment is paid to.
- To add notes to this deduction/benefit, click Additional Notes, enter the notes, and then click OK.
- For a garnishment, the W-2 Box - Options will normally be left blank.
- In the Employee Method box, select the default Garnishments (Disposable Wages) or to calculate a garnishment as a percentage of the employees gross wages, select Garnishment (Gross Wages).
- In the Schedule box, select when the garnishment should be deducted from the employee's pay. For example, if this garnishment is withheld every pay check, use the schedule Monthly Pay Periods 1,2,3,4,5. If it's withheld only once a month, select Only 1st Pay Period of Month. Deduction and benefit schedules allow you to select a schedule of when to calculate a deduction and/or benefit for employees on a pay run. Schedules are a grouping of one or more deduction/benefit frequencies. When a frequency is selected on a pay run, CenterPoint Payroll determines which schedules apply for each employee. If the frequency is contained in a schedule, then the deduction/benefit will be calculated on the pay run.
- The Rate, Up to Amount and Minimum Net Pay boxes should all remain at zero when setting up the garnishment. When the garnishment is added to an employee, the rates and amounts will be specified on their record.
- Employee Deduction Limits provide an additional way to stop the calculation. If the garnishment has an annual limit or a lifetime limit, click on the Limits tab and select the Use Limit box. The amounts should remain zero. When the garnishment is added to an employee, the limits can be specified on their record.
- Click Save.
Step B - Add the Garnishment to the Employee Record
- Select Setup > Employees.
- Select the employee requiring the garnishment and click Edit.
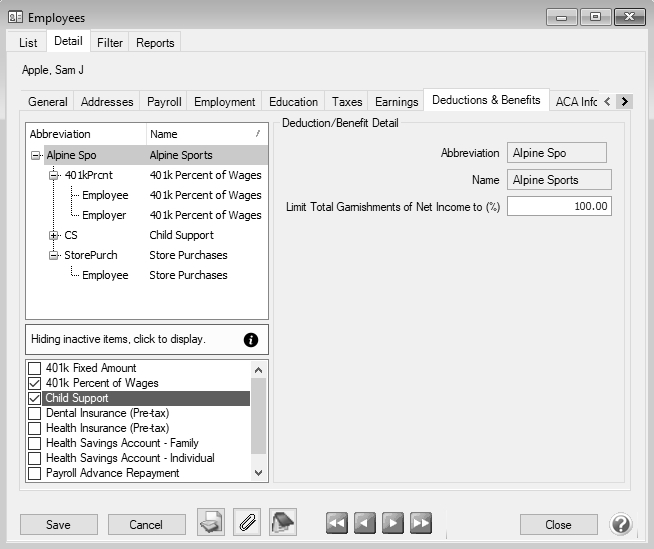
- Select the Deductions & Benefits tab.
- The list of available deductions and benefits list at the bottom of the screen. Select the garnishment deduction in the bottom list. The garnishment will then automatically be included in the list of deductions and benefits for this employee at the top of the screen.
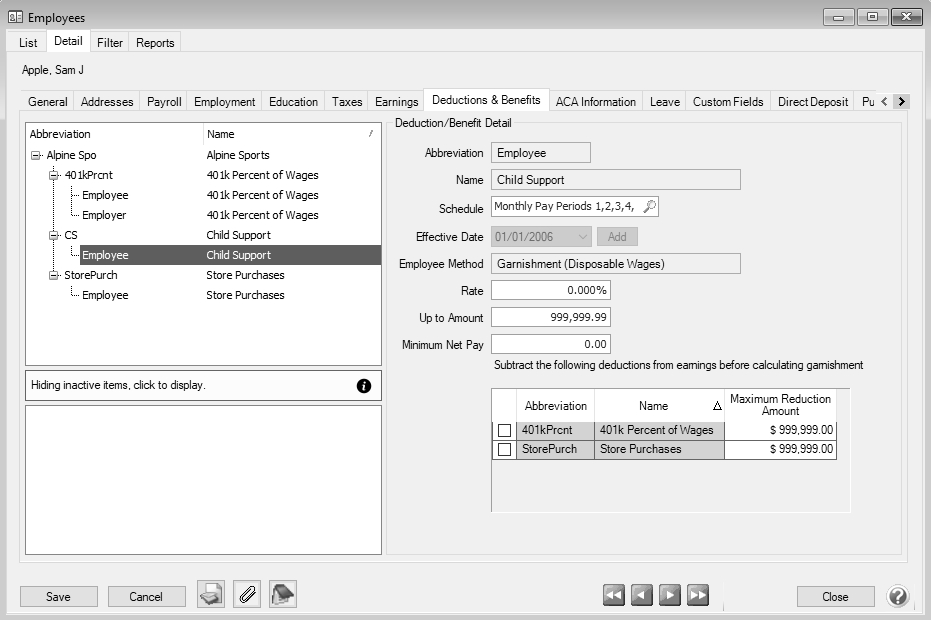
- Select the garnishment from the employees list (upper-left) and click on the Employee line within it. The Deduction/Benefit Detail for this garnishment will be displayed on the right side of the screen.
- Enter the percentage that was ordered for this garnishment in the Rate field.
- In the Up to Amount box, enter the dollar amount that the contribution will be calculated up to when using a percentage. For example, if the garnishment is 5% of an employee's gross pay, with the garnishment amount not to exceed $500, enter $500 in this box. If the garnishment was ordered as an amount, enter the ordered amount in the Up to Amount field.
- In the Minimum Net Pay box, enter the dollar amount that the net pay will not be allowed to fall below. If a garnishment calculates an amount that will cause the Net Pay to be less than the entered amount, the garnishment will only deduct the amount that will leave the employee at the entered value and no more. For example, if the Minimum Net Pay is set to $225.00, an employee's Net Pay is $250.00, and a garnishment calculates to be $50.00; the garnishment will only deduct $25.00. The Minimum Net pay will be compared to the Net Pay after any preceding garnishments (determined by the Sequence Number set on the Garnishment deduction).
- Select any deduction that should be subtracted prior to calculating this garnishment.
- If appropriate, specify the Limits.
- To add notes to this employee, click the Notes icon (
 ), enter the notes, and then click OK. When notes are added from the Additional Notes icon, the icon will display with a yellow background.
- Click Save.
Additional Information
Reports Used to Review Garnishment Deductions and Payments
Deduction reports can be printed for garnishments from Reports > Reports > Payroll Data Reports. For each of the reports listed below, you can select Report Selections for the Pay Dates and garnishment Deduction you wish to review.
-
Deductions & Benefits Liability - This report groups by deduction and shows the deduction and benefit amounts paid or unpaid for each pay run in the selected date range.
-
Employee Deductions & Benefits - TThis report shows the total deduction and benefit amounts for each employee on the pay runs in the selected date range.
-
Employee Deductions & Benefits (Detail) - This report lists employee deductions and benefit by pay date.
Paying the Garnishment Liability
When a payroll is processed that deducts monies which will in turn be paid to another party, CenterPoint automatically creates liability invoices for those amounts. Invoices can be selected for payment based on their Due Date, Discount Date or Invoice Date.
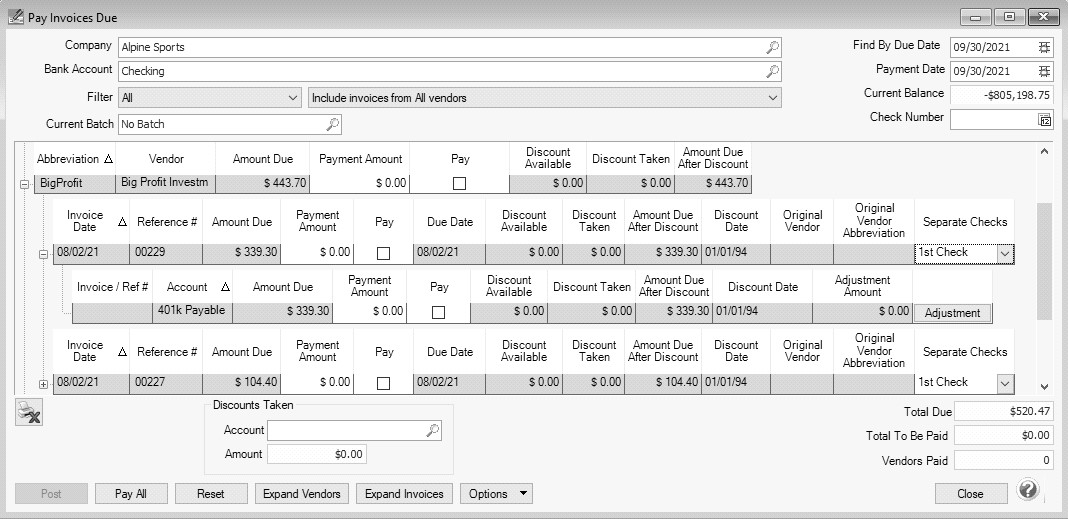
- Select Processes > Payroll > Pay Invoices Due.
- The criteria fields at the top of the Pay Invoices Due screen controls which invoices will be displayed below and available to be selected for payment.
- In the Company/Fund box, enter the company/fund name that you want to view open invoices for.
- In the Bank Account box, enter the bank account that will be decreased by this payment transaction.
- In the Filter box, select Payroll Liabilities.
- In the next filter box, select which vendor invoices should display Include invoices from All vendors, No ACH Vendor Invoices Included, or Include ACH Vendors Only.
- In the Find By Due Date box, There are three options available for the Find By field (Findby Due Date or Find by Invoice Date). Choose the appropriate option by clicking on the Options button at the bottom of the screen (the option that was selected the last time you paid invoices due will display). Once an option is selected, enter the appropriate date in the Find By field.
- In the Payment Date field, enter the date to use on the checks.
- Verify the first Check Number (Advice Number).
- All open invoices that meet the criteria selected in step 1-2 will display for all vendors in the Pay Invoices Due grid (outstanding invoices that are on hold will not display).
Note: When you expand invoices to the lowest level for a vendor, you can determine if the payroll liability is a 941, 943, or Other liability in the Liability Type column. If the Liability Type column is not displayed, right-click, select Add/Remove Columns, select Liability Type, and then click OK.
- If you want to see any changes that may have been made to invoice amounts, for example if the Pay Invoices Due screen was left open and a transactions was changed, right-click on the grid and select Refresh. The grid will be cleared and redisplayed using the information from the top of the screen.
- To see all open invoices for the vendors displayed, click Expand Vendors. To see all open invoice detail for the vendors displayed, click Expand Invoices.
- Begin selecting which invoices to pay. There are various ways invoices can be selected to pay:
- Click on the Pay All button to select all invoices for all vendors displayed.
- To select all invoices for a single vendor, select the Pay box for that vendor.
To select individual invoices for a single vendor;
- Click on the + button for the appropriate vendor to display all of the open invoices for that vendor.
- Place a check mark in the Pay box for each invoice that should be paid.
- To partially pay an invoice, enter the amount to be paid in the Payment Amount field for that particular invoice.
Note: If you edit a payment that has partially paid invoices that have been placed on hold, a yellow message bar will be displayed at the top of the edit screen indicating that the payment cannot be edited.
- If the amount owed is different than the invoices total (For example, it is not uncommon for the invoices created during a pay run (for payroll liabilities) to differ slightly from the actual amount owed due to rounding.) the payment amount can be adjusted. If the amount owed is different, click on the Adjustment button for the invoice(s) and enter the amount you want to pay in the Actual Amount To Pay box. The adjustment amount will display in the Adjustment box. Enter the ExpenseAccount that the adjustment amount will post to, and then click OK.
- If you want to print multiple checks to the same vendor in a check run, in the Select Checks drop-down list, select which check the invoice should be included on 1st Check - 5th Check.
- The Total Due box displays the total of all of the unselected open Accounts Payable invoices in the Pay Invoices Due grid.
- The Total To Be Paid box displays the total of all open Accounts Payable invoices selected to be paid in the Pay Invoices Due grid.
- The Vendors Paid box displays the total number of vendors paid in the Pay Invoices Due grid.
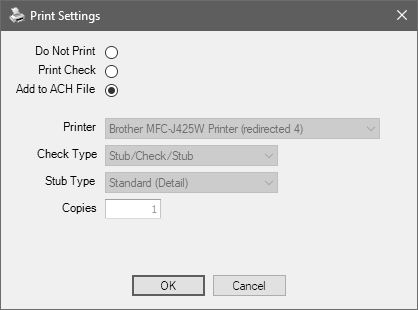
- Click the Print button. (An image of a printer displays on the button. A green check mark means the check will be printed and a red X means the check will not be printed.) The selection set in File > Preferences > Printing > Checks is will display and can be changed.. Select whether you want to immediately print a check for the payments when you click Post. To set your default for the Print button, right-click on the button and select Set As Default. To override the Print button default, click the Print button and change the settings on the Print Settings screen.
- When the filter is used to Include ACH vendors only, the ACH icon will replace the Printer icon. Click the ACH icon
 to display the Print Settings screen.
- When the filter is used to Include ACH vendors only, the ACH icon will replace the Printer icon. Click the ACH icon
- Select Add to ACH File to make an electronic payment. Click OK.
- Click Post to finish saving these selected transactions.
Setup the Employee Direct Deposit to Include Garnishment Deduction Information
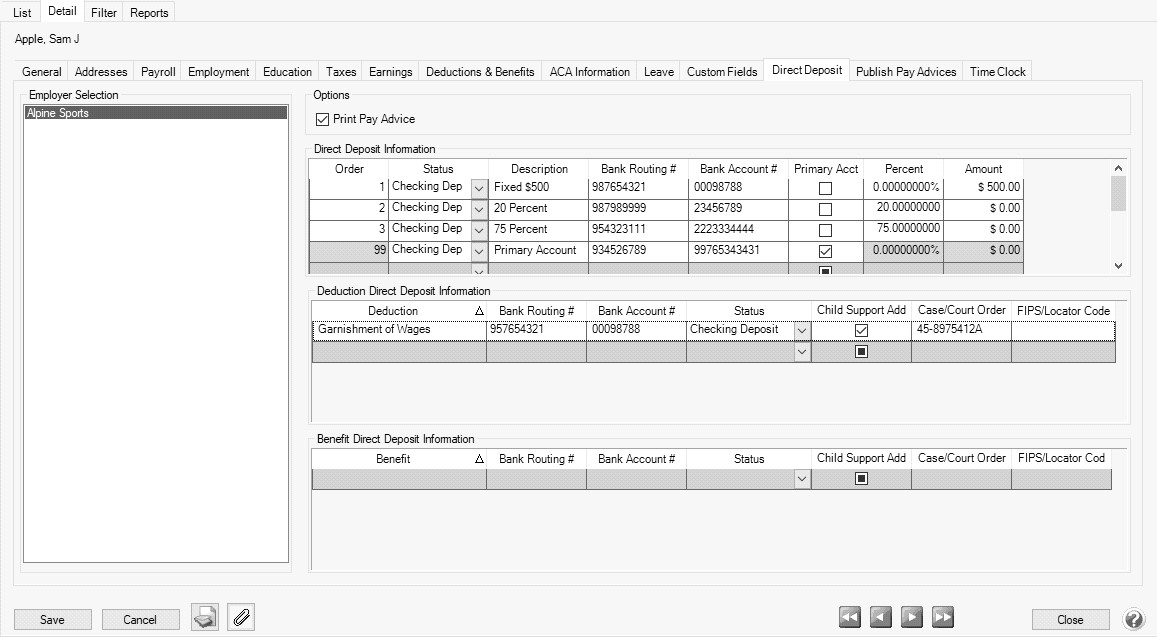
- Select Setup > Employees. Select the employee you want to add/change direct deposit information for, and then click Edit.
- Select the Direct Deposit tab.
- Under Employer Selection on the left side of the screen, select the Employer.
- Under Options, if you use Payroll Web Services or another process for notifying employees about their pay and do not want to print pay advices, unselect the Print Pay Advice check box.
- The Direct Deposit Information grid is used to specify the employee’s bank account information. You must enter at least one detail line for each employee. If the employee requests that their payroll check be deposited into multiple bank accounts, multiple lines can be added to the grid.
- Order - Employee direct deposits can be prioritized by the number entered in this column from lowest to highest. For example, if you are directly depositing funds into 4 accounts for an employee and you've selected Order 1, 2, 3, the first account deposited into would be the one where the Order was assigned to 1, then 2, then 3, and then the selected Primary account which is always assigned 99 by the system and cannot be changed.
- Status – Select the first account that the check will be deposited into. If the Status on any of the accounts is set to a pre-note option, then the first payroll processed will create a pre-note file that will be used by the bank to validate the direct deposit information (the employee will still receive a printed check for the first payroll). The options for the status field are:
- Not Active - Deposit is inactive and should not be included in the direct deposit file.
- Checking Deposit (Transaction Code 22) – Used when a portion of the employee's net pay is deposited into the employee’s checking account.
- Checking Pre-Note (Transaction Code 23) – Used for performing a test run to the employee’s checking account.
- Savings Deposit (Transaction Code 32)– Used when a portion of the employee's net pay is being deposited into the employee’s savings account. See the Frequently Asked Questions section of this document if you need to deposit a percentage of an employee's gross pay for more information.
- Saving Pre-Note (Transaction Code 33) – Used for performing a test run to the employee’s saving account.
- Loan (Transaction Code 52) - Used when a portion of the employee's net pay is deposited into a loan account.
- Loan Prenote (Transaction Code 53) - Used when performing a test run to the employee's loan account.
- Check - The employee has opted to receive a portion of their pay via a physical check.
Note: An employee's direct deposit status will be set to Active if any of the direct deposits listed have a status that is not "Not Active".
- Description - A default description of the deposit status will display, for example Checking Deposit, Savings Deposit, etc. This description can be changed to help identify the direct deposit accounts in the event you have multiple savings accounts, for example Traditional Savings, Christmas Club Savings, etc. The description can be included on the check stub with the add-on Payroll Check Stub Designer module.
- Bank Routing # - Enter the employee’s bank transit/routing number (assigned by the American Banking Association) for where the deposit is to be made or check is printed from. This number is eight digits plus a ninth "check" digit. CenterPoint will verify that the routing number is a valid ABA number and display a warning if it is not. You can choose to continue with your entry if the number is invalid.
- Bank Account # - Enter the employee’s bank account number for where the deposit is to be made or check is to be printed from.
- Primary Account – If this is the primary account for the deposit, select this check box. All other accounts will have some sort of amount or percentage on them. After the specified amounts and percentages are taken, the remainder will be deposited into the primary account. One account must be marked as the primary account or you will not be able to save the record.
- Percentage & Amount – For accounts that are not the primary account for this deposit, you can enter a percentage (of net, if you need to directly deposit a percentage of gross, see the Frequently Asked Questions section of this document.) or specific amount of the total check that you want to be deposited into this account. The remainder will get distributed to additional accounts.
Note: If a fixed amount is specified when the Status = Check and there is not enough pay to cover the amount, then the check would only be generated for the available amount. If there is no pay remaining for the check, then no check will be generated.
- The Deduction Direct Deposit Information grid is used to select deductions for the employee and enter bank routing and account numbers for them along with an appropriate deposit status. When the Direct Deposit File is generated (either manually or via a Payroll posting), any selected deductions that have been used on the pay run for the employee will be included in the file as additional PPD Entry Detail records per the NACHA File Format.
- Select a Deduction that you want to directly deposit. Deductions can only be listed one time in the grid. Deductions cannot be deleted from Setup > Payroll Details > Deductions & Benefits until the deduction is first removed from the Deduction Direct Deposit Information grid.
- Bank Routing # - Enter the employee’s bank transit/routing number (assigned by the American Banking Association) for where the deposit is to be made. This number is eight digits plus a ninth "check" digit. CenterPoint will verify that the routing number is a valid ABA number and display a warning if it is not. You can choose to continue with your entry if the number is invalid.
- Bank Account # - Enter the employee’s bank account number for where the deposit is to be made.
- Status – Select the first account that the deduction will be deposited into. If the Status on any of the accounts is set to a pre-note option, then the first payroll processed will create a pre-note file that will be used by the bank to validate the direct deposit information (the employee will still receive a printed check for the first payroll). The options for the status field are:
- Not Active - Deposit is inactive and should not be included in the direct deposit file.
- Checking Deposit (Transaction Code 22) – Used when the deduction amount is being deposited into a checking account.
- Checking Pre-Note (Transaction Code 23) – Used for performing doing a test run to a checking account.
- Savings Deposit (Transaction Code 32)– Used when the deduction amount is being deposited into a savings account.
- Saving Pre-Note (Transaction Code 33) – Used for performing a test run to a saving account.
- Loan (Transaction Code 52) - Used when the deduction amount is deposited into a loan account.
- Loan Prenote (Transaction Code 53) - Used when performing a test run to a loan account.
- Child Support Addenda - Select this check box if an ACH addenda record or a NACHA addenda record is needed to provide supplemental data such as an account holder or additional information to provide payment to the receiver or RDFI (Receiving Depository Financial Institution).
- Case/Court Order- If the Child Support Addenda check box is selected, enter up to 20 characters for the required case identifier element which is the IV-D case number or court order number. The case identifier always refers to the identification number of the case in the state receiving the EFT/EDI transaction.
- FIPS/Locator Code - If the Child Support Addenda check box is selected, enter up to seven characters that uniquely identify the county or equivalent in the United States to properly identify the child support payment. The Federal Information Process Standard (FIPS) code refers to the FIPS Code of the SDU receiving the transaction. It is five characters when indicating both the state and county codes. It is seven characters when indicating state, county, and local codes. Most states no longer use the FIPS code for incoming payments.
- Click Save.
|
Document: 3128 |
|---|

