CenterPoint® Payroll
- CenterPoint Payroll JobBOSS2 Interface
Related Help

JobBOSS2 has been programmed to interface with CenterPoint Payroll, allowing you to export time information from JobBOSS2 into CenterPoint payroll in the form of Time Sheets.
In JobBOSS2, time information is entered for the shop employees, which is then exported to a data file and imported into CenterPoint Payroll. There, the hours can be adjusted if necessary and non-hourly employees can be processed. Once the payroll has been completed in CenterPoint Payroll, the resulting financial transactions can then be imported back into JobBOSS2 in the form of “manual” paychecks and a Journal Entry for all non-cash items such as the employer’s expense for social security. This is done by creating an external posting file within CenterPoint Payroll that is then imported back into JobBOSS2.
Note: The interface WILL NOT merge master data files from JobBOSS2 to CenterPoint Payroll such as G/L accounts, employees, departments, etc. All such information must be set up separately in CenterPoint Payroll and MUST EXACTLY MATCH how they were set up in JobBOSS2 for the interface to work properly.
This topic contains the following information:
Configuring CenterPoint Payroll for the JobBOSS2 Shop System Interface
Selecting CenterPoint Payroll as the JobBOSS2 Interface
Exporting Time and Attendance Tickets from JobBOSS2
Importing JobBOSS2 Time and Attendance Tickets into CenterPoint Payroll
Exporting Payroll General Journal Entries from CenterPoint Payroll
Configuring CenterPoint Payroll for the JobBOSS2 System Interface
- Verify the CenterPoint Payroll Hardware Requirements. The CenterPoint Payroll hardware requirements are normally less stringent than the JobBOSS2 requirements. If you have questions, they can be directed to the Red Wing Software Technical Support center at 800-732-9464.
- Follow one of the installation instructions for CenterPoint Payroll:
- From your desktop, click the CenterPoint Payroll desktop icon, select File > Open, and then select your CenterPoint Payroll database.
- In CenterPoint Payroll, select Setup > Employees. Make sure that the Abbreviation field in CenterPoint Payroll EXACTLY MATCHES the Employee Number field in JobBOSS2.
- CenterPoint allows alphanumeric values, but you must enter a numeric value only in order for the interface to make a proper match.
- Abbreviations must be 4-digits; therefore, employee numbers in JobBOSS2 must also be 4-digits.
- The leading number cannot be a 0 (zero).
- Select Setup > Accounts > Accounts and verify that the defined JobBOSS2 accounts EXACTLY MATCH those in CenterPoint Payroll.
- Select Setup > Profit Centers/Locations > Profit Centers and verify that the defined JobBOSS2 profit centers EXACTLY MATCH those in CenterPoint Payroll.
- The Profit Center Abbreviation cannot exceed ten characters in JobBOSS2 as this is the field size limit for CenterPoint Payroll.
- Select Setup > Payroll Details > Work Shifts and verify that the defined JobBOSS2 Shift Code Numbers EXACTLY MATCH the Abbreviation and Shift Number in CenterPoint Payroll.
- The Work Shift Name, Times, and Days must all EXACTLY MATCH between JobBOSS2 and CenterPoint Payroll.
- Select Setup > Payroll Details > Departments and verify that the defined JobBOSS2 Departments EXACTLY MATCH the Departments in CenterPoint Payroll.
- Department codes have a maximum length of eight characters in CenterPoint Payroll, so the Department codes in JobBOSS2 must also be eight characters.
- Department codes are case sensitive.
- If you are exporting Time Tickets, the export will use the Department on the work center rather than from the employee. Be sure to set Departments on the work centers in JobBOSS2.
- If you are using Direct Deposit, select Setup > General > Numbering Sequences and make sure the numbering sequence is set differently from the check numbers being used in Accounts Payable. When a company uses Direct Deposit, these entries will export to JobBOSS2 as manual checks, so they cannot have duplicate check numbers.
- JobBOSS2 payroll rates must match the Earning codes in CenterPoint Payroll.
- If you export Attendance Tickets from JobBOSS2, there are two options available regarding identifying earning codes types.
- If the option to Force All Regular Hours To Regular Earnings Code Below is selected on the interface screen for Attendance Tickets, you will need to make sure RegHrs and Overtime earning codes are created in CenterPoint Payroll. Any time sheet records marked as Overtime in JobBOSS2 will be imported into the Overtime earnings type in CenterPoint Payroll. All other records will be imported as the RegHrs earnings type. To set up earning codes in CenterPoint Payroll, select Setup > Payroll Details > Earnings:
- The first earning code must be set up as RegHrs (case sensitive), select the Work Shifts Apply check box, select the Pay Overtime check box, and select Overtime as the Overtime Earnings. The Expense Account must match the GL account on the Attendance Ticket.
- The second earning code must be set up as Overtime (case sensitive), and then select the Work Shift Apply box. The Expense Account must match the GL account on the Attendance Ticket.
- If the option to Force All Regular Hours To Regular Earnings Code Below is not selected, all non-overtime hours will use their Attendance Code as the earnings type and CenterPoint Payroll will have to be set up accordingly in CenterPoint Payroll from Setup > Payroll Details > Earnings. Overtime hours will still be imported as noted above.
- If the option to Force All Regular Hours To Regular Earnings Code Below is selected on the interface screen for Attendance Tickets, you will need to make sure RegHrs and Overtime earning codes are created in CenterPoint Payroll. Any time sheet records marked as Overtime in JobBOSS2 will be imported into the Overtime earnings type in CenterPoint Payroll. All other records will be imported as the RegHrs earnings type. To set up earning codes in CenterPoint Payroll, select Setup > Payroll Details > Earnings:
- If you export Attendance Tickets from JobBOSS2, there are two options available regarding identifying earning codes types.
Note: If you choose not to use RegHrs Overtime, then the Attendance Codes in JobBOSS2 must match the Earnings Codes in CenterPoint.
Selecting CenterPoint Payroll as the JobBOSS2 Interface
- In JobBOSS2 select the red Settings tab, open the System drop-down menu, and select Company Maintenance.
- Select your company from the grid and click Edit.
- Click Defaults.
- From the Interfaces section, click the Red Wing / CenterPoint option.
- Click OK.
- Click Save to save your changes and exit Company Maintenance.
Exporting Time and Attendance Tickets from JobBOSS2
The following process uses Time and Attendance Tickets as a demonstration, but the same steps can be used to export Time Tickets as well.
- In JobBOSS2, select the blue Data Entry tab, open the Shop Floor Control drop-down menu, and select Time And Attendance.
- Click Export.
- Enter a Begin Date and End Date. Only time and attendance tickets from that date range will export.
- Select the Limit Employee Number Field To 3 Digits In Length check box.
-
Select the Force All Regular Hours To Regular Earnings Code Below check box.
- It is highly recommended that you check this box so that you can name your payroll rate anything you prefer and ensure the hours get assigned to the proper earnings code within CenterPoint.
- This does not apply to Time Ticket exports.
- Enter / Verify the Regular Earnings Code as RegHrs.
- Enter / Verify the Overtime Earnings Code as Overtime.
-
Click Export.
- A TXT file will download to your personal computer.
Importing Time and Attendance Tickets into CenterPoint Payroll
- In CenterPoint Payroll, select Setup > Payroll Details > Time Import Definitions. Click Import Definition.
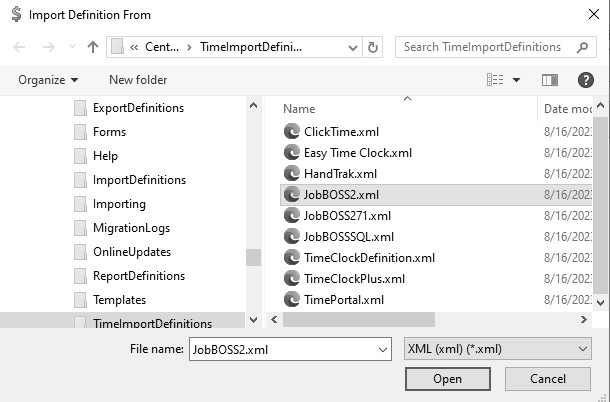
- Select the Definition you wish to import and click Open. If you are using JobBOSS2 and your employee codes have 3-digits, select JobBOSS2. If your employee codes have 4-digits select JobBOSS271.
- Follow the on-screen instructions on the Import TimeClock Definition screen. Normally changes are not needed and you can click Finish.
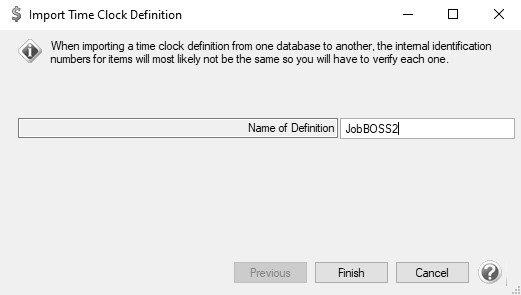
- Click OK when the Definition has imported successfully.
- To print a report to review the time sheet entries, select Reports > Reports > Payroll Data Reports > Time Sheets.
- If necessary, you can delete the imported time so it can be re-imported.
- Select Processes > TimeSheets.
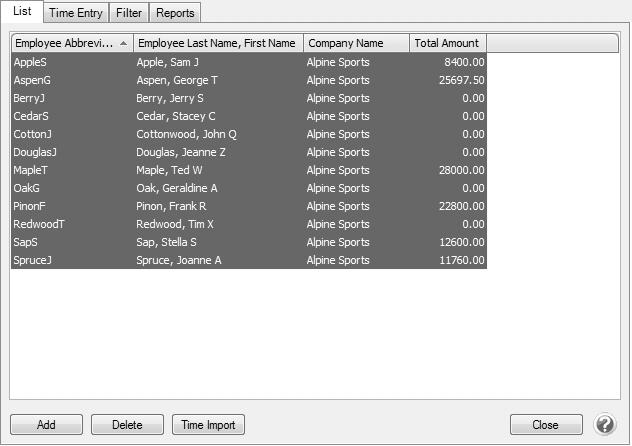
- Select the employees you wish to delete time from. Multiple employees can be selected by holding the Ctrl key on your keyboard while you click. To select all employees, highlight the first name on the list, hold the Shift key and select the last name.
- Click Delete. Time can now be imported again.
- If necessary, you can delete the imported time so it can be re-imported.
- Follow the Processing a Pay Run/Pay Employees using Time Sheets topic to process a pay run using the imported JobBOSS2 Time and Attendance Tickets.
Exporting Payroll General Journal Entries from CenterPoint Payroll
- In CenterPoint Payroll, select File > Export.
- Expand the JobBOSS2 selection and then select JobBOSS2.

- Under Report Selections, in the Selected Criteria column, select the Transaction Date (Pay Date or Pay Date range) box.
- In the Selected Criteria column, in the Include Only box, select whether to include Unexported Transactions, Exported Transactions, or All transactions.
- In the Selected Criteria column, in the Export File Name box, leave the default C:\redwing.imp or select a new location/name to save the export file.
- Click Export.
Importing Payroll Journal Entries to JobBOSS2
- Select the blue Data Entry tab, open the AP drop-down menu, and select Check Writing.
- Click Import.
- Click Upload File to search for and select your import document you selected in Step 5 in the Exporting Payroll General Journal Entries from CenterPoint Payroll section.
- Select a Bank Code.
- Select a Vendor Type.
- Click OK.
- Verify the import totals by either viewing individual check records or running the Check Summary report.
|
Document: 3460 |
|---|