CenterPoint® Accounting
- Understanding & Using the Depreciation Module
Related Help

Set the Default Schedules (one-time setup)
Define How Often to Depreciate Fixed Assets (one-time setup)
Quickly Add a Fixed Asset for the Current Year
Add a Fixed Asset with a Trade(s)
Update more than One Fixed Asset at the Same Time (Mass Update)
Change the Status of a Fixed Asset
Suspend Depreciation for a Fixed Asset
Post Depreciation Transactions
Add locked date to depreciation calculations
Prerequisite
You must have the Depreciation add-on module or Standalone Depreciation purchased and registered in the Module Configuration Manager (File > Administration > Module Configuration Manager) to proceed with the steps in this topic.
Depreciation Overview
Depreciation is an income tax deduction that allows a taxpayer to recover the cost or other basis of certain property. It is an annual allowance for the wear and tear, deterioration, or obsolescence of the property.
Most types of tangible property (except, land), such as buildings, machinery, vehicles, furniture, and equipment are depreciable. Likewise, certain intangible property, such as patents, copyrights, and computer software is depreciable.
In order for a taxpayer to be allowed a depreciation deduction for a property, the property must meet all the following requirements:
- The taxpayer must own the property. Taxpayers may also depreciate any capital improvements for property the taxpayer leases.
- A taxpayer must use the property in business or in an income-producing activity. If a taxpayer uses a property for business and for personal purposes, the taxpayer can only deduct depreciation based only on the business use of that property.
- The property must have a determinable useful life of more than one year.
Even if a taxpayer meets the preceding requirements for a property, a taxpayer cannot depreciate the following property:
- Property placed in service and disposed of in the same year.
- Equipment used to build capital improvements. A taxpayer must add otherwise allowable depreciation on the equipment during the period of construction to the basis of the improvements.
- Certain term interests.
Depreciation begins when a taxpayer places property in service for use in a trade or business or for the production of income. The property ceases to be depreciable when the taxpayer has fully recovered the property's cost or other basis or when the taxpayer retires it from service, whichever happens first.
A taxpayer must identify several items to ensure the proper depreciation of a property, including:
- The depreciation method for the property.
- The class life of the asset.
- Whether the property is "Listed Property".
- Whether the taxpayer elects to expense any portion of the asset.
- Whether the taxpayer qualifies for any "bonus" first year depreciation.
- The depreciable basis of the property.
The Modified Accelerated Cost Recovery System (MACRS) is the proper depreciation method for most property. Additional information about MACRS, and the other components of depreciation are in Publication 946, How to Depreciate Property on the www.irs.gov website.
A taxpayer must use Form 4562, Depreciation and Amortization, to report depreciation on a tax return.
Set the Default Schedules (one-time setup)
A depreciation schedule allows you to define the type of tax schedule you will be using for depreciation. It works in conjunction with a capital asset type where you specify the start and end dates of a depreciation schedule, and the method, method years and property class each schedule will use to calculate depreciation transactions. CenterPoint includes common depreciation schedules by default, but these schedules should be reviewed.
- Select File > Preferences > Depreciation > Default Schedules.
- The Default Depreciation Schedules are AMT, Federal Business, and State Business. Select the schedules that are specific to your business.
- Click Save.
- To add a new schedule, select Setup > Fixed Assets > Depreciation Schedules and then click New. To review or change an existing schedule, highlight the schedule and click Edit.
Define How Often to Depreciate Fixed Assets (one-time setup)
Depreciation Frequency defines the number of times you wish to post depreciation during the year. Selecting the frequency that you want those depreciation transactions recorded makes sure that the transactions are only recorded in valid periods and that they are not duplicated in any one period.
- Select Setup > Companies. Edit the appropriate Company.
- Click on the Additional Detail tab.
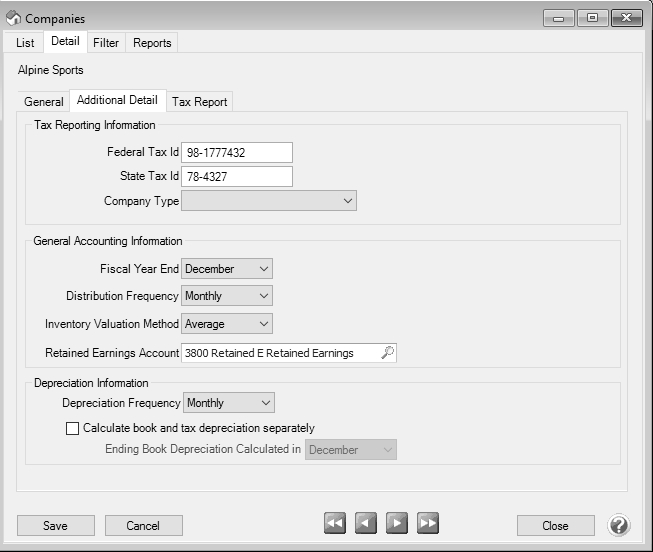
- Under Depreciation Information, in the Depreciation Frequency field, select the appropriate option for your company. The options are Monthly, Quarterly, or Annually.
- Select the Calculate book and tax depreciation separately check box if you want the tax depreciation calculated annually on the fiscal year boundary and the book depreciation calculated on the frequency you selected in the Depreciation Frequency box.
- In the Ending Book Depreciation box, select the month that ends this reporting cycle if the Depreciation Frequency you selected is Quarterly or Annually.
- Click Save.
Set the Current Depreciation Tax Year
When the current tax year is set, it determines how many values in depreciation calculate and when you enter previous years' depreciation, CenterPoint will automatically use the year prior to the year set.
- Select File > Administration > Current Depreciation Tax Year.
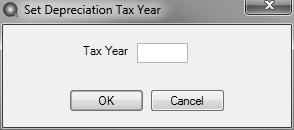
- Enter the current TaxYear. This value is set to the current Year when the Depreciation module is first installed. Any year between 1900 and 2299 may be entered.
- Click OK. When the OK button is clicked, a convention compliance check is performed automatically. If any of the compliance validation tests fail, the Compliance Validation screen displays. You can make some changes to assets from this screen for some tests, but not all. Other changes that cannot be made from this screen will need to be made after closing the Compliance Validation screen. See the Compliance Validation topic for more information.
Quickly Add a Fixed Asset for the Current Year
The Asset Entry screen allows you to quickly add or change assets for the current service tax year after the initial depreciation beginning balances have been entered into the Asset Entry - Previous Years screen (see the Set the Current Depreciation Tax Year section of this document for more information).
- Select Processes > Depreciation > Asset Entry. Assets acquired with a service date between the start and end date range of the current tax year in the database display.
- Select the Company that acquired the fixed asset.
- The Current Tax Year displays the current tax year set in File > Administration > Current Depreciation Tax Year. This field cannot be changed. The Current Tax Year will also display in the title bar when the Depreciation module is installed. For example, the title bar will display as "CenterPoint Accounting for Agriculture - [Database Name] - Current Tax Year: 2013".
- Select the Bank Account that will be changed by this transaction.
Note: To display this Bank Account each time you use this screen, right-click and select Set As Default.
- For new assets, enter the Depreciation Expense and Accumulated Depreciation accounts to use in the acquisition transaction.
Note: If you want the new asset entry transaction to post to accounts other than the default accounts displayed at the top of the screen, use the Depreciation Expense and Accumulated Depreciation lookup columns in the data entry grid. When you click the Save button, the accounts used in the resulting acquisition transaction for the new fixed asset will be posted to the accounts selected in the columns instead of the default accounts at the top of the screen.
Note: To display these accounts each time you use this screen, right-click and select Set As Default.
- In a new row, enter or select the GL Account for the fixed asset. The list will only include postable Fixed Asset accounts.
- Enter the Asset Name.
- The Asset Abbreviation value will default to the next sequence from the Abbrv Sequence selection made at the top of this screen.
- Enter the Service Date (the date you placed the asset in service).
- If the new asset is the result of a trade, see the Add a Fixed Asset with a Trade(s) section below.
- If the new asset is an Improvement, select the fixed asset that this acquisition improves.
- Enter the Cash/Boot amount. This is the additional value of the asset other than that coming from trades. This will be the amount where the bank account is offset by the fixed asset.
- The Total Basis will be calculated and will display the Trade Amount + the Cash/Boot Amount.
- Enter the original Units. The default units display as 1.00. This value will update the Original Units on the Fixed Asset Detail.
- Select the Acquisition Type, the options are: Gifted, Inherited, New, Related or Used. When an acquisition type is selected, the Active status for the asset and company will be set to Active for the selected company.
Note: To use SDA (Special Depreciation Allowance) the Acquisition Type must be New.
- Select the Capital Asset Type (Capital Asset Types can be created or changed in Setup > Fixed Assets > Capital Asset Types) and verify that the recovery period years, method, etc. are what you expect.
- If you want to change from the default depreciation schedule(s) set in File > Preferences > Depreciation > Default Schedules, click the Schedules button and select the depreciation schedule(s) for this fixed asset, use the green arrows to move the schedule(s) to the Selected column, and then click OK. The selected schedules will display in the Schedules column.
- If you need to change the % Business Use from year to year for MACRS method assets, right-click on the asset, click Edit, select the Depreciation Schedules tab, and then click the %BU History button. Enter the Tax Year(s) (the valid range is from the tax year following the tax year the asset was acquired and beyond) and % Business Use (the range will be 51% to 100% if the initial percentage was greater than 50% or 0% to 100% if the initial percentage was less than or equal to 50%). Click OK.
- Click Save.
- Click on the Schedules tab to add more information such as Section 179, SDA, etc. The Federal schedule chosen in preferences will be the default on the Schedules tab (If a state schedule is added to a database, the address of the company in the database will set the state used to determine specific state rules that will override federal regulations for the state schedule used). All assets are included on the Schedules tab and the values for the schedules are used regardless of the methods that are used on those schedules. Depreciation is saved and recalculated each time you move from one box on the screen to another.
- Click Record Depreciation to post depreciation for the period and company (the company must be setup to post depreciation annually) selected at the top of the Asset Entry screen. If depreciation transactions have already been calculated for the last month of the company's fiscal year for the current tax year, the transactions will be reversed and recalculated for the company and period.
Add a Fixed Asset with a Trade(s)
- Follow Steps 1-10 of the Quick Asset Entry for the Current Year section above.
- Click the Trades button, select the asset that was traded.
Note: You cannot update trades on assets that are themselves traded.
Assets with a Personal Property class 20 years or less and placed in service after 12/31/2017 cannot have trades to acquire them.
- If the asset was placed in service after 12/31/2017 and the property class of the capital asset type is personal property for a federal farm and has a life of less than 20 yrs, the traded asset will be sold not traded. The following screen will display.

- In the Traded Asset box, select the asset that you traded for this asset.
- Click Add.
- Select a required Gain Account. Right-click and select Set as Default if all traded assets use the same account.
- Select the Trade Account which is a wash account for the trade allowance amount. This account must be an asset with a Cash account category. Right-click and select Set as Default if all traded assets use the same account.
- Enter the Trade Allowance amount which is the trade in value of the traded asset(s). This entry can be left at zero.
- Click OK. The grid will display the Trade Amount (this is the total of the undepreciated book value of the assets that will not continue depreciating their own schedule but whose value is added to the new asset).
- When the new asset is saved, a single transaction is created per new asset. The journal created will be saved as the net of the debits and credits to the Trade Allowance account, which will be zero. A credit will be entered to the Trade Allowance account on the new asset (requiring the asset itself to be a higher debit amount). A debit is entered to the Trade Allowance account to the sold asset which affects the gain the same as a cash entry would be for a sale of an asset without a trade. The sale journals for each trade will be the same as an entry in the Distribution grid but the Trade Allowance account is substituted for the Cash account.
- If the asset was placed in service before 1/1/2018 and the property class of the capital asset type is personal property for a federal form has a life of more than 20 yrs or for all other capital asset types, the following screen will display.

- In the Traded Asset box, select the asset that you traded for this asset.
- ClickAdd.
- Determine if you want to Continue to depreciate this asset on its own schedule.
- Assets that have this check box selected will not change the value of the new asset. When an asset is traded and continues to depreciate on its own schedule, the Disposition Date of the traded asset will be updated with the service date of the new asset and the Disposition Type is set to Trade.
- Trades involving assets with prior trades will be handled in CenterPoint as follows:
Note: You cannot update trades on assets that are themselves traded.
If you trade Asset 1 for Asset 2 and chose to continue to depreciate Asset 1, and then purchased Asset 3 and chose to trade Asset 2 into Asset 3 without selecting the Continue to Depreciate check box, the remaining undepreciated basis will be rolled from Asset 1 and Asset 2 into Asset 3.
- Assets that do not have this check box selected will be added in the journal entries for the purchase of the new asset. Three journal entries are created:
- The first journal entry is created that credits the traded asset with its account balance in the period that includes the trade date. The Tax Amount is filled in with the value from the modified cash account balance.
- The second journal entry is created to the Accumulated Depreciation account for the traded asset debiting the account by the sum of the Depreciation Amount of the schedule that adjusts book value as calculated factoring in the trade. The Tax Amount would be set to the sum of the Depreciation Amount from the schedule adjusting modified cash.
- The third journal entry is created to the new asset with where the amount debited is the difference from the first journal entry created minus the amount from the second journal entry created. The tax amount is also the tax amount from the first journal entry minus the tax amount form the second journal entry.
- Click OK. The grid will display the Trade Amount (this is the total of the undepreciated book value of the assets that will not continue depreciating their own schedule but whose value is added to the new asset).
Note: You cannot update trades on assets that are themselves traded.
Sell a Fixed Asset
The Asset Disposition screen allows you to quickly enter assets that have been disposed of during the course of a year. It also displays asset disposition history that can be edited or deleted.
- Select Processes > Depreciation > Asset Disposition.
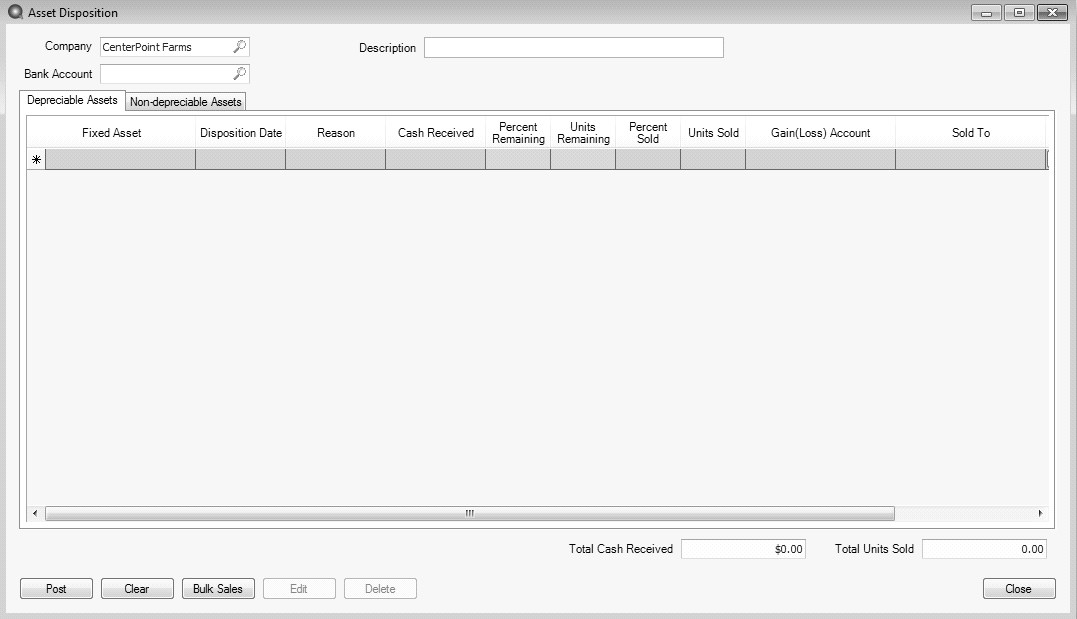
- Select the Company that is disposing of the fixed asset.
- Select the BankAccount that will be changed by this transaction.
Note: To display this Bank Account each time you use this screen, right-click and select Set As Default.
- Enter the Description. This field will be used to create a batch. One transaction batch is created for all of the assets disposed on this screen.
- If you need to make several asset dispositions on the same date to the same gain account and person for the same reason, click the Bulk Sales button and follow Steps 5-12 or if you are disposing of assets with different disposition dates, accounts, etc. continue with Steps 13-27.
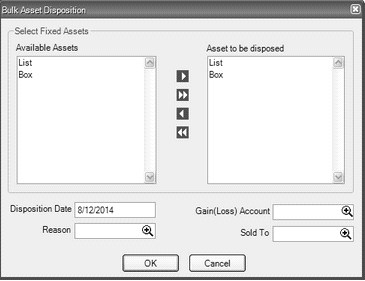
- From the Available Asset column, move the asset(s) to be disposed to the Asset to be disposed column by using the arrow keys.
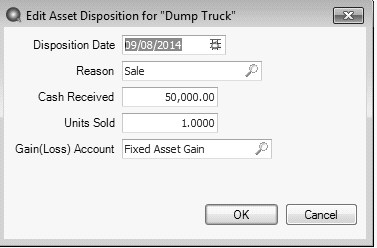
- Enter the Disposition Date, Reason, Gain (Loss) Account, and Sold To.
- Click OK . A row will be created on the grid for each of the assets you moved to the Asset to be disposed column with the same values for each row for the Disposition Date, Reason, Gain (Loss) Account, and Sold To field entered in Step 7.
- Verify the information on the grid and enter the additional information for each asset.
- If the fixed asset(s) you are disposing of has assets improving it, the Improvements button will display in yellow. Click the Improvements button if it is yellow to display a list of assets (depreciable or non-depreciable) that improve the asset. Any assets on this screen that are checked will display as new lines on the Disposition screen with values copied from the improved asset line when you click OK.
- The Total Cash Received and Total Units Sold are displayed at the bottom of the screen.
- Click Post. One transaction batch is created for all assets disposed on the Disposition screen. Each row on the grid creates one general journal (accrual) transaction with one subdivision and up to four journal entries. If you have a fixed asset with a balance of 10,000 and an accumulated depreciation balance of -9,000 and you received 3,000 cash, the difference between the debit and credit entries will be the Gain(Loss). The example below displays the journal entries created.
- Click the Depreciable Asset tab if the asset is depreciable or click the Non-Depreciable Asset tab if the asset is a non-depreciable asset .
- Select the Fixed Asset you want to dispose of. On the Depreciable Asset tab, the only fixed assets that will display in the list are those that have a ending book value greater than 0 in the latest period. On the Non-Depreciable Asset tab, the only fixed assets that will display in the list are non-depreciable postable asset accounts.
- Enter the Disposition Date. The disposition date must be in the range of the current tax year.
- Select the Reason. The options are Basis Reduction, Casualty/Theft, Death, Gifted, Installment Sale, Junked, Sale, and Trade. The Disposition Reason will be saved on individual disposition transactions. For example, you may dispose of multiple units of one asset (cattle) with different Disposition Reasons (Death, Sale, Trade, etc.).
- Enter the Cash Received for the disposed asset.
- The Percent Remaining box displays the remaining percent available for sale. The Percent Remaining will be adjusted to reflect other entries for the same asset in the grid as they are entered.
- The Units Remaining box displays the remaining units available for sale. If you are entering the sales in date order, the Units Remaining will be adjusted to reflect other entries for the same asset in the grid as they are entered.
- Enter the Percent Sold. This column indicates the percent disposition of the remaining asset when the sale is posted. You can enter a value in this box or it will be calculated based on the units sold. When you tab off of this box, the units sold are recalculated by dividing this value by 100 and multiplying it by the units remaining before the sale. The value in this column now becomes the percent disposition. The default value for this box is 100.
- Enter the Units Sold.
Note: The percent or quantity being disposed of cannot exceed the units or percent remaining.
- Select the Gain (Loss)Account for the disposal.
Note: To display this Gain(Loss) Account each time you use this screen, right-click and select Set As Default.
- Select the name you Sold To.
- If the fixed asset you are disposing of has assets improving it, the Improvements button will display in yellow. Click the Improvements button if it is yellow to display a list of assets (depreciable or non-depreciable) that improve the asset. Any assets on this screen that are checked will display as new lines on the Disposition screen with values copied from the improved asset line when you click OK.
- The Total Cash Received and Total Units Sold are displayed at the bottom of the screen.
- Click Post. One transaction batch is created for all assets disposed on the Disposition screen. Each row on the grid creates one general journal (accrual) transaction with one subdivision and up to four journal entries. If you have a fixed asset with a balance of 10,000 and an accumulated depreciation balance of -9,000 and you received 3,000 cash, the difference between the debit and credit entries will be the Gain(Loss). The example below displays the journal entries created.
| Journal | Debit Amount | Credit Amount |
|---|---|---|
| Fixed Asset | 10,000 | |
| Accumulated Depreciation | 9,000 | |
| Bank Account | 3,000 | |
| Gain(Loss) | 2,000 |
- Click Close.
- If you need to edit or delete posted fixed asset disposition history, click either the Depreciable Asset tab if the asset is depreciable or click the Non-Depreciable Asset tab if the asset is a non-depreciable asset .
- Select the fixed asset that you need to edit or delete disposition history for.
- If you need to edit the history, click Edit. Change the asset disposition history and click OK.
- If you need to delete the history, click Delete. At the Delete this Disposition, are you sure message, click YesThe disposition transaction will be reversed and removed from the grid.
Change a Fixed Asset
- Select Setup > Fixed Assets > Fixed Assets.
- Double-click on the fixed asset and modify the details.
- If you need to change the % Business Use from year to year for MACRS method assets, click the %BU History button. Enter the Tax Year(s) (the valid range is from the tax year following the tax year the asset was acquired and beyond) and % Business Use (the range will be 51% to 100% if the initial percentage was greater than 50% or 0% to 100% if the initial percentage was less than or equal to 50%). Click OK.
- Click Save. When the Save button is clicked, a convention compliance check is performed automatically. If the convention compliance check fails for a company-schedule combination the convention for the assets are changed according to the rules found in the current convention compliance check.
Note: Traded assets can be changed in Setup > Fixed Assets > Fixed Assets for a limited number of fields that do not affect the remaining depreciation (for example, Abbreviation, Description, Asset Name, and Asset Account), to change any other fields:
- For a pre-2018 fixed asset the trade must be removed from the new asset, make the changes, and reestablish the trade on the new asset.
- For personal property fixed assets placed in service after 12/31/2017, click the Update Trades button, and then click the Delete Purchase button. The purchase and trade entries will be removed (however, the fixed asset will remain and you may want to rename to Do Not Use or inactivate this fixed asset). Then, re-enter the correct fixed asset and all associated details through Asset Entry again.
Traded assets cannot be modified in Fixed Asset Mass Update or in Asset Entry because CenterPoint records the remaining basis of an asset when it is traded on a new asset as part of the new assets basis. That value is then used to compute SDA, Section 179 and depreciation.
Update more than One Fixed Asset at the Same Time (Mass Update)
The mass update process can be used to update more than one fixed asset at the same time. You can mass update various types of information; replace schedules, add schedules, remove schedules, or recalculate depreciation.
Note: We recommend you do a backup of your database prior to starting the mass update process.
- From the List tab, select the fixed assets you want to update. Multiple fixed assets can be selected by pressing the CTRL key while you make your selections.

- Click Mass Update.
- The Mass Update Wizard window will open. The wizard will guide you through the process. Click Next.Note: Next proceeds through the mass update screens, Cancel exits the mass update screen and Back returns to the previous page of the mass update process. The Back button is in the upper-left side of the screen.
- Select the type of item you'd like to change and click Next:
- Replace Schedule - Replaces one schedule of a particular type (Federal, State, Book, AMT, etc.) with another.
- Select the Schedule Type, existing schedule of that type to Replace, select the new schedule of that type to replace With, and then select the Companies to replace the schedule for.
- Add Schedules - Allows you to add a new schedule to multiple assets.
Select the Add Schedule, select one or more Companies to add the schedule to, select the Copy Schedule to be used to copy information from, select the items you want to copy; Prior System Depreciation, Section 179, SDA, or Traded Basis. Note: Depreciation schedules can be added to traded assets or non-depreciable assets through Mass Update.
- Remove Schedules - Allows you to remove a schedule from multiple assets.
- Select the Schedule to remove and then select the Companies to remove the schedule from.
- Replace Schedule - Replaces one schedule of a particular type (Federal, State, Book, AMT, etc.) with another.
- Recalculate Depreciation - Used when instructed by Technical Support to recalculate depreciation for selected assets only.
- Transfer Assets - Used to transfer assets from one company to another and adjust the depreciation taken for the company the asset was transferred from as well as the company it was transferred to based on the months remaining in each year from the transfer date (short year) .The transfer also requires a gain/loss account.
- For example, if you transfer assets from "Company A" that has a company type of Corporation with a fiscal year end date of 6/30/18 on 6/30/18 to "Company B" that has a company type of Partnership with a calendar year end date:
- The assets from Company A will be fully depreciated for the calendar year 7/1/17 - 6/30/18 and all financial reports will reflect the full depreciation.
- The assets transferred to Company B on 6/30/18 will be depreciated from 7/1/18 - 12/31/18 (the calendar year end date of Company B) and all financial reports will reflect a short year of depreciation. The transferred assets will be depreciated for an entire year from 1/1/19 - 12/31/19.
Important Notes:
- Prior to using the Transfer Assets mass update function, it is highly recommended that a backup is performed as the result of the transfer cannot be reversed.
- Prior to using the Transfer Assets mass update function, print a Balance Sheet and a Fixed Asset Listing for the company assets are being transferred from.
- After using the Transfer Assets mass update function, print a Balance Sheet and a Fixed Asset Listing for the company assets were transferred to and the company assets were transferred from. These reports should be compared to the reports that were printed prior to the transfer of assets.
- Fully depreciated assets will transfer with equal purchase price and accumulated depreciation amounts for a net of zero.
- Assets that have been disposed of prior to the transfer will not be transferred.
- Sold or assets that have already been transferred will not be included in a transfer..
-
Click Finish.
Delete a Fixed Asset
The Delete button completely removes a fixed asset from the system. You can delete fixed assets only if the database is a Tax Only database (if the database is not a Tax Only database, all depreciation schedules will be removed from the asset and it will be made inactive for all companies), the fixed asset was placed in service in the current year and has not been involved in a trade, and the periods in which transactions including the fixed asset are not locked. Fixed assets that do not meet this criteria will not be deleted, because the fixed asset history or other records are linked to it in the system. If you have a fixed asset that is no longer being used, but does have historical activity, please see the Change the Status of a Fixed Asset section below.
- Select Setup > Fixed Assets > Fixed Assets.
- Select the asset
- At the "Are you sure you want the item deleted?" message, click Yes.
Change the Status an Existing Fixed Asset
Fixed assets that are no longer being used, but have history, can be deactivated. Fixed assets can be active for some companies and not for others. Fixed Assets cannot be activated if the higher level account is inactive.
- Select Setup > Fixed Assets > Fixed Assets.
- Select a fixed asset, right-click and select Activate/Deactivate, select the
- Click Save to save the name and return to the List tab, or click Close to save the name and close the Names screen.
Suspend Depreciation for a Fixed Asset
When depreciation is suspended depreciation is terminated for the asset on all schedules in the current tax year and all future years. Depreciation cannot be turned back on in subsequent years. The asset can be sold or traded while depreciation is suspended. To begin depreciating the asset again, it must be disposed of and reacquired.
Note: Suspending depreciation on an asset also suspends depreciation for any assets traded to acquire the asset that are continuing to depreciate.
- Select Setup > Fixed Assets > Fixed Assets.
- Select the fixed asset and then click the Asset Detail tab.
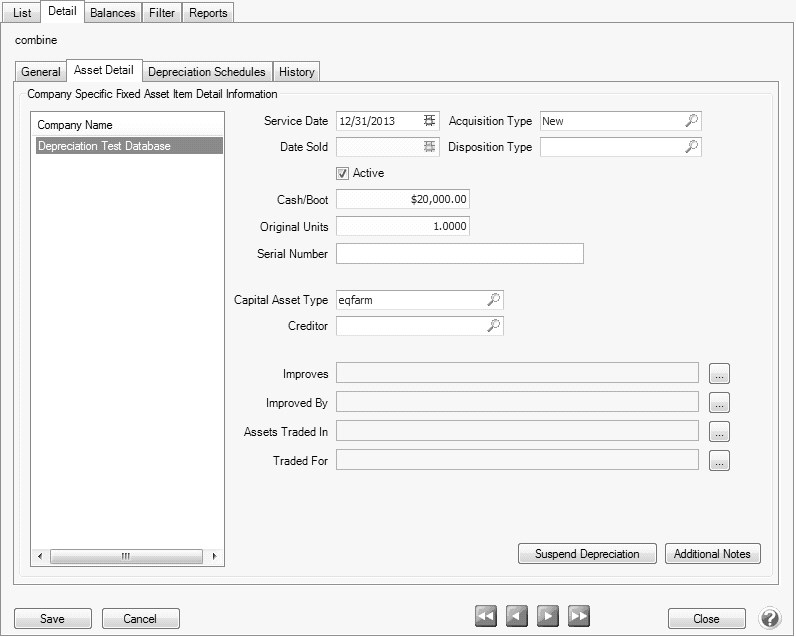
- Click the Suspend Depreciation button.
- A message describing what can/cannot occur for a suspended fixed asset displays, click Yes to suspend the fixed asset or click No to cancel suspension.
- The bottom of the Asset detail tab will display the message, Depreciation Suspended with a yellow background color. If the depreciation year has changed since the depreciation was suspended the message will inform you of the year depreciation was suspended.
- Click Save.
Post Depreciation Transactions
- Select Processes > Depreciation > DepreciationTransactions.
- Click Create New.
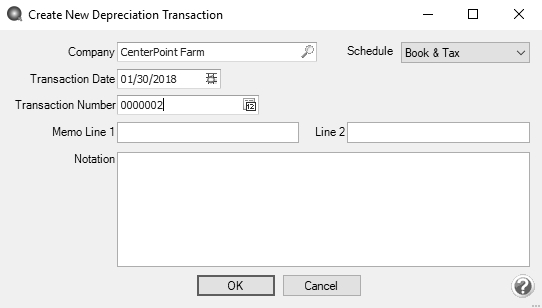
- In the Company box, enter the company name that the depreciation transactions should be created for. The company selection controls the depreciation frequency used in the depreciation transaction (Setup > Companies > Additional Detail tab > Depreciation Frequency).
- If you selected to calculate book and tax depreciation separately, in the Schedule box select which you want to calculate Book or Tax depreciation. If you are not calculating the depreciation separately, the Schedule box will display Book & Tax and you will not have an option to change the Schedule. After depreciation transactions are created, the List tab will display how the transactions were calculated in a Schedule Calculated column.
- The Transaction Date will automatically display the appropriate next depreciation transaction date (defaults to the first day in the next period since the last depreciation transactions were calculated).
- In the Transaction Number box, enter the transaction number for the depreciation transactions or click the sequence number icon and select the next available sequence number. See the Maintaining Sequence NumbersMaintaining Sequence Numbers topic for more information.
- Enter an optional Notation.
- Click OK. Each fixed asset with depreciation lists and can be expanded to view the journal for that item.
- Depreciation expense is debited and the accumulated depreciation asset assigned to the fixed asset is credited. You may want to have an accumulated depreciation asset for each asset group used to summarize your fixed assets.

- Click Post to complete the transaction.
- From the List tab, you can perform the following actions on a posted transaction:
- Review posted transactions: Select the posted transaction and click Review.
- Reverse and recalculate a posted transaction: Select the posted transaction, click Recalculate, select the Reverse and Recalculate option, click OK, and then click Post. The current depreciation transaction recalculates using the same date, company, transaction number, and notation. Reverse posted transactions: Select the posted transaction, click Delete, and then click Yes. All depreciation transactions for the company and date will be reversed.
- Add depreciation transactions for assets not previously calculated: Select the posted transactions, click Recalculate, select the Add depreciation transactions option, click OK, and then click Post.
- Previous System Depreciation: Enter a transaction number and click OK to reverse any previously created transactions to record depreciation expense for assets depreciated in another system and create a new set of transactions based on current information from fixed assets. The new transactions can be reviewed or deleted.
Note: You can also post depreciation for the period and company (the company must be setup to post depreciation annually) selected at the top of the Asset Entry screen from the Processes > Depreciation > Asset Entry > Schedules tab by clicking the Record Depreciation button. If depreciation transactions have already been calculated for the last month of the company's fiscal year for the current tax year, the transactions will be reversed and recalculated for the company and period.
Add Locked Date to Depreciation Calculations
The File > Administration > Current Depreciation Locked Year menu selection allows you to specify a year that will lock calculations from being made in that year or a prior year.
In the calculation process, when the locked date is greater than or equal to the service date or the current tax year of the asset, the depreciation values display with the existing depreciation values. From that point on, no depreciation values can be added or adjusted by an acquisition, disposition, trade or calculation through the locked date. An asset's schedule information can only be modified from Setup > Fixed Assets > Fixed Assets > Depreciation Schedules tab in the tax year the asset was placed in service (if acquired and placed in service in CenterPoint) or if started in another system, the current tax year is less than or equal to the last year from that system, in addition the current tax year must also be greater than the Depreciation Locked Year.
A Locked Status column can be displayed on the Review Calculations screen in Setup > Fixed Assets > Fixed Assets .> History tab
- Select File > Administration > Current Depreciation Locked Year.
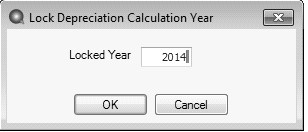
- In the Locked Year box, enter the year that you want to lock depreciation calculations from being made in that year or prior years.
- Click OK.
Enter a New Client's Depreciation Information and History
This screen is used as a getting started point for entering depreciation beginning balances that were calculated in a previous system, for a migration, or initially starting with a new client (for example, if you are currently in the 2015 tax year, you would want to use this screen to enter all assets with service dates prior to 2015).
After the initial assets are entered, all other asset entry should be completed using the Asset Entry screen in the service tax year. See the Set the Current Tax Year and Quickly Add a Fixed Asset for the Current Year sections of this document for more information.
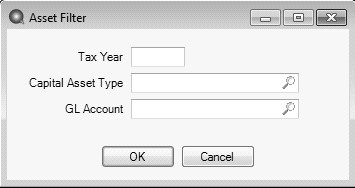
- Select the Tax Year. The Current Tax Year will display as the default.
- Select the Capital Asset Type you want to filter your assets by. This is an optional selection.
- Select the GL Account you want to filter your assets by. This is an optional selection.
- Click OK. The assets will display on the Asset Entry -Previous Years screen based on your filter selections.
Note: To make Filter changes without exiting the Asset Entry - Previous Years screen, click the Filter button.
- Select the Company that acquired the fixed asset.
- The Current Tax Year displays the current tax year set in File > Administration > Current Depreciation Tax Year. This field cannot be changed.
- Select the Offset Account that will be changed by this transaction.
Note: To display this account each time you use this screen, right-click and select Set As Default.
- For new assets, enter the Depreciation Expense and Accumulated Depreciation accounts to use in the acquisition transaction.
Note: To display these accounts each time you use this screen, right-click and select Set As Default.
- In the Abbrv Sequence box, select the sequence that should be used to automatically set the fixed asset's abbreviation. Note: See the Numbering Sequences topic for more information.
- In a new row, enter or select the GL Account for the fixed asset. The list will only include postable Fixed Asset accounts.
- Enter the Asset Name.
- The Asset Abbreviation value will default to the next sequence from the Abbrv Sequence selection made at the top of this screen.
- Enter the Service Date (the date placed you placed the asset in service).
- Enter the Total Basis.
- Enter the original Units. The default units display as 1.00. This value will update the Original Units on the Fixed Asset Detail.
- Select the Acquisition Type, the options are: Gifted, Inherited, New, Related or Used. When an acquisition type is selected, the Active status for the asset and company will be set to Active for the selected company.
- Select the Capital Asset Type. Capital Asset Types can be created or changed in Setup > Fixed Assets > Capital Asset Types.
- Click the Schedules button to review the default schedule set in File > Preferences > Depreciation > Default Schedules or to select the depreciation schedule(s) for this fixed asset, use the green arrows to move the schedule(s) to the Selected column, and then click OK.
- Click Save. After the Save is complete, you can click on the Schedules tab to add more information such as Section 179, SDA, etc.
- Click the Schedules tab and select the appropriate schedule. All assets are included on the Schedules tab and the values for the schedules are used regardless of the methods that are used on those schedules. Depreciation is saved and recalculated each time you move from one box on the screen to another.
Note: The Schedules grid can be customized for your specific situation by right-clicking and selecting Add/Remove Columns and selecting the specific columns you need for your data entry. The grid can also be sorted by clicking on the column header you want to sort the grid by.
- If the capital asset type allows changes, enter or select:
- Method - This box displays the available depreciation methods.
- Listed - This check box indicates whether this asset is listed property.
- Listed Type - This box displays the available listed property types:
- Autos < 6,000 lbs.
- Autos > 6,000 lbs.
- Trucks < 6,000 lbs.
- Trucks > 6,000 lbs. with < 6 ft. bed
- Trucks > 6,000 lbs. with > 6 ft. bed (this is the default when a new asset is entered as a listed property)
- SUV < 6,000 lbs.
- SUV > 6,000 lbs.
- Computers and Other Listed Equipment
- % Business Use - This box can contain numbers between 0 and 100 with two decimal places. The default value on a new schedule will be set to 100. A Section 179 deduction is not allowed if the percentage business use is 50% or less. If an asset is marked as listed property and the value entered into this box is 50% or less, the value in the Section 179 box is changed to 0 and the Section 179 box will not be active.
- Previous Depreciation - Enter the total of depreciation previously taken using a different system. The amount will be validated by the system and cannot exceed the Original Cost - SDA - Section 179. For CLS, ACRS and MACRS methods.
- SDA - This check box will not be active when:
- Click the Record Previous Depreciation button to open the Previous System Depreciation screen to reverse any previously created transactions to record depreciation expense for assets depreciated in another system and create a new set of transactions based on current information from fixed assets. Click OK.
Frequently Asked Questions
Q: What is the difference between the Asset Entry and Asset Entry - Previous Years screens?
A: The differences are outlined below:
- Asset Entry - Previous Years screen - This screen is used as a getting started point for entering depreciation beginning balances that were calculated in a previous system, for a migration, or initially starting with a new client (for example, if you are currently in the 2015 tax year, you would want to use this screen to enter all assets with service dates prior to 2015). See the Enter a New Client's Depreciation Information and History section of this document for detailed information.
- Asset Entry screen - After the initial assets are entered into the Asset Entry - Previous Years screen, all other asset entry should be completed using the Asset Entry screen in the service tax year. See the Set the Current Tax Year and Quickly Add a Fixed Asset for the Current Year sections of this document for detailed information.
Q: Can the grids that display in Asset Entry or Asset Entry - Previous Years be customized?
A: Yes, the grids can be customized for your specific situation by right-clicking and selecting Add/Remove Columns and selecting the specific columns you need for your data entry. The grid can also be sorted by clicking on the column header you want to sort the grid by. The drop-down box to the right of the navigation controls can also be used to determine the number of fixed assets to display per page - the selections are 10, 25, 50, 75 (default), and 100.
Q: I always use the same Bank and GL accounts on the Asset Entry and Asset Entry - Previous Years screens, is there a way to automatically have the accounts display?
A: To display these accounts each time you use this screen, right-click and select Set As Default.
Q: When I'm on the Schedules tab in Asset Entry, there isn't a Save button; how do I save an entry?
A: Every entry is automatically saved when you press the Tab key.
Q: How do I see the assets my trades are linked to or make adjustments to my trades?
A: From the Asset Entry screen, right-click and select Adjust Trade/Cash Boot, and either select the Review Trades to view the assets your trades are linked to or Update Trades to make adjustments to the trades. Note: You cannot update trades on assets that are themselves traded.
Q: Where do I print Fixed Assets reports from?
A: You can print or preview Fixed Asset reports from Reports > Reports > Fixed Assets.
Q: How can I verify the setup of a fixed asset from the reports screen?
A: Most reports previewed from the Reports > Reports > Fixed Asset screen have drill-down functionality. When you click on a detail line in a fixed asset report, the Fixed Asset screen will display with that asset's information.
Q: Where can I verify a disposition?
A: You can verify a disposition from Setup > Fixed Assets > History tab > Review Dispositions or on the Fixed Asset Dispositions- Federal Basis report printed from Reports > Reports > Fixed Assets.
Q: How can I adjust previous system amounts and original units?
A: Previous system amounts and original units can be changed in depreciation tax only databases by selecting Setup > Fixed Assets > Fixed Assets > History tab. Under Purchases, the amounts for the original purchasing transactions will display and can be changed in the Change Quantity to and Change Amount to boxes. The purchases can be reviewed by clicking the Review Purchases button.
Q: Why can't I drill-down in a Fixed Asset report?
A: When you preview a report from Reports > Reports > Fixed Assets, make sure that the View setting is set to Interactive.
Q: What does the Abbreviation in the Ending Value D column mean on the Fixed Asset Listing - Federal Basis report printed from Reports > Reports > Fixed Assets?
A: The abbreviation is for the Disposed Reason and B=Basis Reduction, C=Casualty/Theft, D=Death, G=Gifted, I=Installment Sale, J=Junked, and S=Sale.
Q: Which reports will help me verify depreciation information for my tax forms?
A: The following reports will help verify depreciation information:
Form 4562
- Reports > Reports > Fixed Assets > Fixed Asset Listing - Federal Tax Basis
- Reports > Reports > Fixed Assets > Depreciation & Amortization - Federal Basis (Form 4562)
Form 4797
- Reports > Reports > Fixed Assets > Fixed Asset Disposition - Federal Tax
Q: How can I look at my depreciation projection for future years?
A: Print the 5 Year Depreciation Projection - Federal Basis report from Reports > Reports > Fixed Assets.
Q: Why does a fixed asset I sold still appear on this years' reports?
A: If you traded, sold, or disposed of a fixed asset it will remain on this years' reports until you have posted the current year depreciation and change into the next tax year.
Q: Is there a way to remind me to post my current year depreciation?
A: Yes, follow the instructions below:
- Select Setup > Reminders and then click New.
- Enter the reminder Message. Note: This is the text that will automatically pop up reminding you to do your depreciation transactions.
- Select a Type of Scheduled Reminders.
- In the Assign Users area, select those users who should be reminded to record the depreciation transactions.
- Click on the Scheduled tab.
- In the Activate this Reminder field, select Monthly.
- In the Day of the Month to Run Reminder field, enter 30.
- In the Select Months to Activate this Reminder box on the right, select the months that correspond to the frequency selected in Step B. For example, if you chose quarterly, then select the last month of each quarter. If you chose annually, select just December.
- Click Save.
Q: How do I know if a compliance validation fails and if it does fail what the failure means?
A: Fixed assets are evaluated for their compliance with depreciation tax law for a given company, schedule and year placed in service. The Compliance Validation screen displays the following columns:
- Results - The values in the Results column are either Passed or Failed and indicate whether the assets evaluated in the test comply or do not comply with the test.
- Test - The test column is a short description of the test.
- Description - The Description column gives a longer but still brief description of the test. The following are the name and description of each test:
If a fixed asset fails a compliance test, it will have a red background. Select the failed test and click Display Details to display the Results tab for more information about the failed compliance test.
Under the Compliance Tests section, a detailed description displays about what the test is and what it means to the assets placed in service in the selected year.
The grid displays information applicable to the test for the assets involved in the test and additional information that helps to identify the compliance problem. Assets that are not compliant with the selected test will have a red background. To select only the assets that are not compliant, select the Display only non-compliant assets check box.
Under the Action section, the action you can take to make the asset comply for the test will display. Select the Display only non-compliant assets check box to view only the assets that are not compliant.
Select each non-compliant asset, make the appropriate change and then click Update. To re-run the compliance test, click Back.
Q: Are compliance validation tests performed when printing or previewing Fixed Asset reports?
A: The compliance validation is performed automatically when the following reports are processed (all validations are performed except for the Depreciation Posted validation):
- Fixed Asset Listing
- Beginning Fixed Asset Listing
- Fixed Asset Reconciliation
- Fixed Asset Acquisitions
- Fixed Asset Dispositions
- Depreciation and Amortization
If any of the compliance validation tests fail during the processing of the report, the Compliance Validation screen displays. You can make some changes to assets from this screen for some tests, but not all. Changes made will affect the report that is being processed. Other changes that cannot be made from this screen will need to be made after closing the Compliance Validation screen. The report will continue to be produced with unchanged values. The report will likely need to be processed again once the changes are made.
Q: I know compliance validation tests are run automatically by CenterPoint in certain situations, is it possible to run the compliance validation manually?
A: To perform compliance validation from the Processes menu:
- On the Processes menu, point to Depreciation, and then click Compliance Validation.
- The first Company and Depreciation Schedule in the list will automatically be selected, but can be changed.
- Select the Tax Year.
- In the grid, verify the Result of the test. Failed compliance tests will display with a red background.
- To view more information about a failed test, select the test and then click Display Details.
- Select the asset that failed the compliance test.
- View the Action that can be taken to make the asset compliant. Change the asset as the action suggests.
- Click Update.
- Click Back.
To perform compliance validation from the Fixed Asset screen:
- On the Setup menu, point to Fixed Assets, and then click Fixed Assets.
- Select the fixed asset you want to validate.
- Click Edit.
- Select the Depreciation Schedules tab.
- Click Compliance.
- Select the Company, Depreciation Schedule and Tax Year.
- In the grid, verify the Result of the test. Failed compliance tests will display with a red background.
- To view more information about a failed test, select the test and then click Display Details.
- Select the asset that failed the compliance test.
- View the Action that can be taken to make the asset compliant. Change the asset as the action suggests.
- Click Update. Click Back.
Q: Can I take SDA in the the Planting Year with a Future Year Service Date for orchards/vineyards?
A: Please see the Orchards and Vineyards - Taking SDA in the Planting Year with a Future Year Service Date topic for more information.
End of Year Processing
Follow the instructions below to end your depreciation tax year:
- Follow the Post Depreciation Transactions section in this document for each Depreciation Frequency you set in the Define How Often to Depreciate Fixed Assets section in this document (Setup > Companies > Additional Detail tab > Depreciation Frequency box). For example, if you set the Depreciation Frequency to Monthly, you will need to perform this step 12 times, if you set it to Quarterly, you will need to perform this step 4 times, if you set it to Annually, perform this step once).
- After all of your depreciation transaction for the current tax year are posted, select File > Administration > Current Depreciation Tax Year, enter the next tax year, and then click OK.
Reference for Most Common Property Recovery Periods
| Recovery Period in Years | |||
|---|---|---|---|
| Assets | GDS | ADS | CenterPoint Capital Asset Type |
| Agricultural Structures (single purpose) | 10 | 15 | Buildings - Single Purpose |
| Amortization | 15 | 0 | Amortized Assets |
| Automobiles | 5 | 5 | Vehicles - Autos & Trucks (Autos less than 6000 lbs |
| Calculators and Copiers | 5 | 6 | Equipment - Office |
| Cattle (dairy or breeding) | 5 | 7 | Livestock - Cattle |
| Communication Equipment | 7 | 10 | Equipment - Farm |
| Computer and Peripheral Equipment | 5 | 5 | Equipment - Office |
| Drainage Facilities | 15 | 20 | Miscellaneous Assets |
| Farm Buildings | 20 | 25 | Buildings - General Purpose |
| Farm Machinery and Equipment | 5(new) 7 (used) |
10 | Equipment - Farm |
| Fences (agricultural) | 7 | 10 | Equipment - Farm |
| Goats and Sheep (breeding) | 5 | 5 | Livestock - Other |
| Grain Bin | 7 | 10 | Equipment - Farm |
| Hogs (breeding) | 3 | 3 | Livestock - Hogs |
|
Horses (age when placed in service) |
|
|
|
|
Breeding and Working (12 years or less) |
7 | 10 | Livestock - Horses (B, W <=12) |
|
Breeding and Working (more than 12 years) |
3 | 10 | Livestock - Horses (B, W >=12) |
|
Racing Horses |
3 | 12 | Livestock - Horses (R>2) |
| Horticultural Structures (single purpose) | 10 | 15 | Buildings - Single Purpose |
| Land (Non-Depreciable) | 0 | 0 | Land |
| Logging Machinery and Equipment | 5 | 6 | Miscellaneous Assets (choose the correct years when adding the asset) |
| Non-depreciable | 0 | 0 |
Non-depreciable - Other Non-deprecialble - Personal Non-depreciable - Stock |
| Non-residential real property | 39 | 40 | Buildings - Commercial |
| Office Furniture, Fixtures, and Equipment (not calculators, copiers, or typewriters) | 7 | 10 | Equipment - Farm |
| Paved Lots | 15 | 20 | Miscellaneous Assets |
| Residential Rental Property | 27.5 | 40 | Buildings - Rental |
| Tractor Units (over-the-road) | 3 | 4 | Vehicles - Truck Tractor Units |
| Trees or Vines Bearing Fruit or Nuts | 10 | 20 | Orchards & Vineyards |
| Truck (heavy duty, unloaded weight 13,000 lbs. or more) | 5 | 6 | Vehicles - General Purpose (> 13,000) |
| Truck (actual weight less than 13,000 lbs) | 5 | 5 | Vehicles - Autos & Trucks (choose the correct years when adding the asset) |
| Water Wells | 15 | 20 | Miscellaneous Assets |
| Recovery Period in Years | |||
|---|---|---|---|
| Assets | GDS | ADS | CenterPoint Capital Asset Type |
| Airplanes (airframes and engines), except those used in commercial or contract carrying of passengers or freight, and all helicopters (airframes and engines). | 5 | 6 | Miscellaneous Assets |
| Amortization | 15 | 0 | Amortized Assets |
| Automobiles, Taxis | 5 | 5 | Vehicles - Autos & Trucks |
| Buses | 5 | 9 | Miscellaneous Assets |
| Data Handling Equipment; except Computers (includes only typewriters, calculators, adding and accounting machines, copiers, and duplicating equipment) | 5 | 6 | Equipment - Office |
| Heavy General Purpose Trucks (actual unloaded weight >= 13,000 lbs.) | 5 | 6 | Vehicles - Truck Tractor Units |
|
Industrial Steam and Electric Generation and/or Distribution Systems |
15 |
22 |
Miscellaneous Assets |
| Information Systems (includes computers and peripheral equipment) | 5 | 5 | Equipment - Office |
| Land (Non-Depreciable) | 0 | 0 | Land |
| Land Improvements | 15 | 20 | Improvements |
| Light General Purpose Trucks (includes trucks for use over the road (actual weight < 13,000 lbs.) | 5 | 5 | Vehicles - Autos & Trucks < 13,000 (choose the correct years when adding the asset) |
| Non-depreciable | 0 | 0 |
Non-depreciable - Other Non-deprecialble - Personal Non-depreciable - Stock |
| Office Furniture, Fixtures and Equipment (includes furniture that are not a structural component of a building.) | 7 | 10 | Equipment - Business |
| Railroad Cars and Locomotives, except those owned by railroad transportation companies | 7 | 15 | Miscellaneous Assets |
|
Tractor Units for Use Over-the-Road
|
3 | 4 | Vehicles - Truck Tractor Units |
|
Trailers and Trailer-Mounted Containers
|
5 | 6 | Miscellaneous Assets |
| Vessels, barges, Tugs, and Similar Water Transportation Equipment (except those used in marine construction) | 10 | 18 | Miscellaneous Assets |
|
Document: 3216 |
|---|